
1. Introduction
Thank you for choosing the TOOLPORT 4x8 m PRO Smart Reception Tent. This manual provides essential information for the safe and efficient assembly, operation, and maintenance of your tent. Please read these instructions carefully before setup and retain them for future reference.
The TOOLPORT 4x8 m PRO Smart reception tent is designed to provide a comfortable and protected space for various events and gatherings, offering a robust structure and high-quality PVC fabric.
2. Safety Information
Your safety is paramount. Always follow these general safety guidelines:
- Ensure the tent is assembled on a level and stable surface.
- Securely anchor the tent to the ground using all provided pegs and guy ropes to prevent wind damage.
- Do not assemble the tent during strong winds, heavy rain, or thunderstorms.
- Keep all heat sources, open flames, and electrical appliances away from the tent fabric.
- Regularly check all connections and anchors for stability, especially after adverse weather conditions.
- Do not hang heavy objects from the tent frame.
- Ensure adequate ventilation if using heating or cooking equipment inside the tent.
For detailed safety information, please refer to the official Safety Information PDF document: Safety Information (PDF)
3. Product Overview
The TOOLPORT PRO Smart reception tent features a robust design for durability and ease of use.
3.1 Components
- Galvanized Steel Frame (tubes and connectors)
- High-Quality PVC Roof Tarp
- PVC Side Walls with Wind Deflectors
- Gable Entrance with Zipper
- Tensioners and Guy Ropes
- Ground Pegs
- Assembly Instructions and Tools
3.2 Key Features
- High-Quality PVC Fabric: 700 N PVC material for the roof, 100% waterproof, tear-resistant, and UV protected (UV 50+).
- Robust Galvanized Steel Frame: Tubes with approx. 38mm diameter and connectors with approx. 42mm diameter, protected against rust.
- Bolted Assembly: Frame components are securely bolted with wing screws for high load resistance and easy setup.
- Optimal Climate Control: Side panels with wind deflectors and good air circulation for temperature regulation.
- Flexible Design: Removable side panels every 2 meters, zippered entrance.
- Weather Resistant: Designed to withstand temperatures between -20 °C and +50 °C.

Figure 1: Fully assembled TOOLPORT 4x8 m PRO Smart Reception Tent.

Figure 2: Key features of the tent's construction and materials.
4. Setup Instructions
Assembly of the TOOLPORT PRO Smart tent is designed to be straightforward with numbered tubes and clear instructions. It is recommended to have multiple people for assembly due to the tent's size and weight.
4.1 Preparation
- Unpack all components and verify against the packing list.
- Lay out the frame tubes and connectors, organizing them by their numbering.
- Choose a level, clear area for assembly, free from overhead obstructions and sharp objects on the ground.
4.2 Frame Assembly
- Begin by assembling the base frame on the ground. Connect the horizontal and vertical tubes using the provided connectors and wing screws.
- Gradually build up the side and roof sections, following the numbered parts in the detailed assembly manual.
- Ensure all connections are securely bolted. The bolted assembly provides strong resistance to loads.

Figure 3: Detail of the bolted galvanized steel frame connection.
4.3 Tarp and Side Panel Installation
- Carefully drape the roof tarp over the assembled frame. Ensure it is centered and evenly distributed.
- Attach the roof tarp to the frame using the integrated fasteners.
- Install the side panels and gable ends. The side panels are equipped with wind deflectors and can be attached individually every 2 meters.
- Secure the zippered entrance panel at the desired location.

Figure 4: Detailed view of roof and structure features.
4.4 Anchoring
For perfect ground fixation, use the provided pegs and guy ropes. Ensure all anchoring points are utilized to maximize stability and wind resistance.
4.5 Estimated Assembly Time
For a 4m wide tent like this model, assembly typically takes approximately 1 hour 30 minutes to 2 hours with 3 to 4 people.
5. Operating Instructions
Once assembled, your TOOLPORT reception tent is ready for use.
- Access: Use the zippered entrance for easy access.
- Ventilation: The side panels can be removed or adjusted to provide optimal air circulation and temperature regulation.
- Weather Protection: The 100% waterproof PVC roof and side walls provide protection against rain and wind. The tent is designed to withstand temperatures from -20 °C to +50 °C.

Figure 5: Interior view of the tent, highlighting the spacious area.
6. Maintenance
Proper maintenance will extend the lifespan of your TOOLPORT tent.
- Cleaning Fabric: Clean the PVC roof and side panels with mild soap and water. Avoid harsh chemicals or abrasive cleaners that could damage the material. Rinse thoroughly and allow to dry completely before storage.
- Cleaning Frame: Wipe down the galvanized steel frame with a damp cloth to remove dirt and debris. The galvanization protects against rust, but regular cleaning helps maintain its condition.
- Storage: When not in use, disassemble the tent and store all components in a dry, cool place, protected from direct sunlight and extreme temperatures. Ensure the fabric is completely dry to prevent mold and mildew.
- Inspection: Periodically inspect all components for wear and tear, especially before and after each use. Check for any damage to the fabric, bent poles, or loose connections. Replace damaged parts as necessary.
7. Troubleshooting
Here are some common issues and their solutions:
| Problem | Possible Cause | Solution |
|---|---|---|
| Tent unstable or swaying | Insufficient anchoring; loose frame connections; uneven ground. | Ensure all pegs and guy ropes are securely fastened. Check and tighten all bolted frame connections. Relocate to a more level surface if possible. |
| Water leakage | Improperly installed roof tarp; damage to PVC fabric. | Verify the roof tarp is correctly positioned and taut. Inspect the fabric for tears or holes; repair if necessary. |
| Difficulty with zipper | Fabric caught in zipper; zipper teeth misaligned. | Gently pull fabric away from the zipper. Apply a silicone-based lubricant if the zipper is stiff. |
| Missing parts during assembly | Oversight during unpacking; packaging discarded prematurely. | Double-check all packaging materials. Contact TOOLPORT customer support with your model and part numbers. |
8. Specifications
| Feature | Detail |
|---|---|
| Model Name | PRO Smart |
| Dimensions (L x W x H) | 8 x 4 x 2 meters (800 x 400 x 200 cm) |
| Ridge Height | 3.1 meters |
| Weight | 110.7 kg |
| Roof Material | PVC 700 N |
| Frame Material | Galvanized Steel |
| Tube Diameter | Approx. 38 mm |
| Connector Diameter | Approx. 42 mm |
| Color | Grey-White |
| Water Resistance | 100% Waterproof |
| UV Protection | UV 50+ |
| Temperature Resistance | -20 °C to +50 °C |
| Assembly Required | Yes |
| Part Number | 6090 |
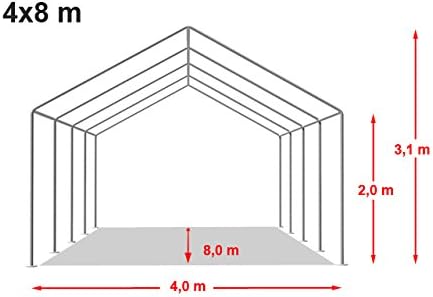
Figure 6: Dimensional diagram of the 4x8 m tent.
9. Warranty and Support
TOOLPORT stands behind the quality of its products. Specific warranty details may vary by region and purchase point. Please refer to your purchase documentation or contact your retailer for precise warranty information.
For further assistance, spare parts, or inquiries, please visit the official TOOLPORT brand store or contact customer service:
TOOLPORT Brand Store: Visit TOOLPORT Store
When contacting support, please have your model number (PRO Smart) and ASIN (B00TPVX7E6) ready.


