
1. Product Overview
The Intermatic WG736-14D is a robust replacement timer clock motor designed for specific Intermatic time clock series. This motor operates at 480V and 60Hz, providing high torque for reliable performance. It features fixed tab connectors for straightforward installation into compatible timer units.
Intended Use: This motor is specifically designed as a replacement part for Intermatic T1900, T8800, and R8800 series time clocks. It is not intended for standalone operation or use with other timer models.
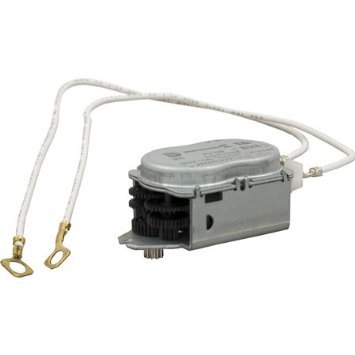
Figure 1: Intermatic WG736-14D Timer Clock Motor. This image displays the compact motor unit with two white wires extending from it, each terminating in a brass spade connector. The motor casing is metallic gray, revealing internal gears.
2. Safety Information
Please read and understand all safety instructions before attempting installation or maintenance. Failure to follow these instructions may result in electric shock, fire, or serious injury.
- DANGER: Risk of electric shock. Disconnect power at the circuit breaker or fuse box before installing or servicing the timer clock motor.
- Installation should be performed by a qualified electrician in accordance with all national and local electrical codes.
- Ensure the voltage rating of the motor (480V) matches the power supply of the timer unit.
- Do not operate the motor if it appears damaged.
- Keep hands and tools clear of moving parts during operation.
3. Package Contents
Verify that all components are present and undamaged upon opening the package.
- 1x Intermatic WG736-14D Timer Clock Motor
4. Specifications
| Model Number | WG736-14D |
| Voltage | 480V |
| Frequency | 60Hz |
| Compatibility | Intermatic T1900, T8800, and R8800 Series Time Clocks |
| Dimensions | Approximately 7 x 7 x 7 inches (Product dimensions as packaged) |
| Weight | Approximately 3.2 ounces |
| Manufacturer | Intermatic |
5. Installation / Setup
WARNING: Ensure power is disconnected at the main circuit breaker before proceeding with installation. Only qualified personnel should perform electrical installations.
- Power Disconnection: Locate the circuit breaker or fuse controlling the timer unit and switch it to the OFF position. Verify that power is off using a voltage tester.
- Access Timer Enclosure: Open the timer's enclosure to access the existing motor. Refer to your specific Intermatic T1900, T8800, or R8800 series timer manual for instructions on safely opening the enclosure.
- Remove Old Motor: Carefully disconnect the wires from the old motor by slipping the tab connectors off the timer's connection poles. Note the orientation and connection points for proper reinstallation. Remove any mounting screws or clips securing the old motor.
- Install New Motor: Position the new Intermatic WG736-14D motor in the designated slot within the timer unit. Secure it with any necessary mounting hardware.
- Connect Wiring: Connect the fixed tab connectors of the new motor to the appropriate connection poles on the timer. Ensure a secure and proper connection. The connectors are designed to easily slip over the poles.
- Close Enclosure: Carefully close and secure the timer's enclosure.
- Restore Power: Restore power at the circuit breaker.
- Test Operation: Observe the timer's operation to ensure the new motor is functioning correctly and the timer is advancing as expected.
6. Operation
The Intermatic WG736-14D is a component motor that drives the internal clock mechanism of your compatible Intermatic T1900, T8800, or R8800 series time clock. Once properly installed, the motor continuously rotates, enabling the timer to accurately track time and execute programmed switching operations. Refer to the instruction manual of your specific Intermatic time clock for details on setting schedules and operating the timer functions.
7. Maintenance
The WG736-14D motor is designed for long-term, maintenance-free operation. However, periodic inspection of the timer unit and its components is recommended.
- Annual Inspection: At least once a year, with power disconnected, inspect the motor and its connections for any signs of wear, corrosion, or loose wiring.
- Cleaning: If necessary, gently clean any dust or debris from the motor and surrounding areas using a soft, dry cloth or a small brush. Do not use liquids or abrasive cleaners.
- Environmental Conditions: Ensure the timer enclosure remains sealed and protected from moisture and extreme temperatures, as these can affect motor longevity.
8. Troubleshooting
If your Intermatic time clock is not functioning correctly after motor replacement, consider the following troubleshooting steps:
- No Movement:
- Verify that power is supplied to the timer unit.
- Ensure all motor connections are secure and properly seated on the timer poles.
- Confirm the voltage of the timer unit matches the 480V requirement of the motor.
- Check the timer's internal gears for any obstructions or damage.
- Incorrect Timekeeping:
- Ensure the motor is securely mounted and not slipping.
- Refer to your specific timer's manual for calibration or time-setting procedures.
- Unusual Noises:
- Disconnect power and inspect the motor and timer gears for any foreign objects or damage.
- If noises persist, the motor may be faulty and require replacement.
If troubleshooting steps do not resolve the issue, contact Intermatic customer support or a qualified electrician.
9. Warranty and Support
For information regarding the warranty period and terms for the Intermatic WG736-14D Timer Clock Motor, please refer to the documentation provided with your original purchase or visit the official Intermatic website. For technical assistance, replacement parts, or further inquiries, please contact Intermatic customer support directly.
Intermatic Contact Information: Please visit www.intermatic.com for the latest contact details and support resources.