
1. Introduction
This manual provides detailed instructions for the setup, operation, and maintenance of your Intermec EasyCoder PX4i Thermal Transfer Printer. The PX4i is a robust and flexible industrial printer designed for high-volume label printing, offering monochrome output at a resolution of 203 dpi and speeds up to 12 inches per second. Please read this manual thoroughly before using the printer to ensure safe and efficient operation.
2. Product Features
- High-Speed Printing: Capable of printing at speeds up to 12 inches per second.
- High Resolution: Delivers clear monochrome prints at 203 dpi.
- Flexible Media Handling: Supports various media types including black mark, continuous label, fanfold, gap, general identification label, notch, roll fed, tag, and ticket.
- Ethernet Connectivity: Integrated Ethernet for network integration.
- Programmable: Designed for optimized printing operations and streamlined deployment.
- Durable Design: Industrial-grade construction for demanding environments.
3. Package Contents
Verify that all items listed below are included in your printer package. If any items are missing or damaged, contact your supplier immediately.
- Intermec EasyCoder PX4i Thermal Transfer Printer
- Power Cord
- Labels (Included Components)
- User Documentation (This manual)
4. Safety Information
Always observe the following safety precautions to prevent injury and damage to the printer:
- Ensure the printer is placed on a stable, level surface.
- Connect the printer to a grounded power outlet.
- Do not operate the printer in wet or excessively humid conditions.
- Keep hands and loose clothing away from moving parts during operation.
- Disconnect power before performing any maintenance or cleaning.
- Use only approved replacement parts and accessories.
5. Setup
5.1 Unpacking
- Carefully remove the printer from its packaging.
- Remove all packing materials, tapes, and protective films.
- Retain the original packaging for future transport or storage.
5.2 Connecting Power
- Ensure the printer's power switch is in the OFF position.
- Connect the power cord to the printer's power inlet.
- Plug the other end of the power cord into a grounded electrical outlet.
5.3 Loading Media (Labels)
The PX4i printer supports various label types. Follow these general steps to load your labels:

Image: Front view of the Intermec EasyCoder PX4i printer, showing a label being fed out of the front slot. The control panel with an LCD screen and numeric keypad is visible on the top front.
- Open the media cover of the printer.
- Place the roll of labels onto the media supply spindle, ensuring it unwinds correctly.
- Feed the leading edge of the labels through the media guides and under the printhead assembly.
- Adjust the media guides to fit the width of your labels snugly but without binding.
- Close the media cover. The printer may automatically calibrate to the new media.
5.4 Connecting to a Computer/Network
The PX4i offers Ethernet connectivity for network integration.
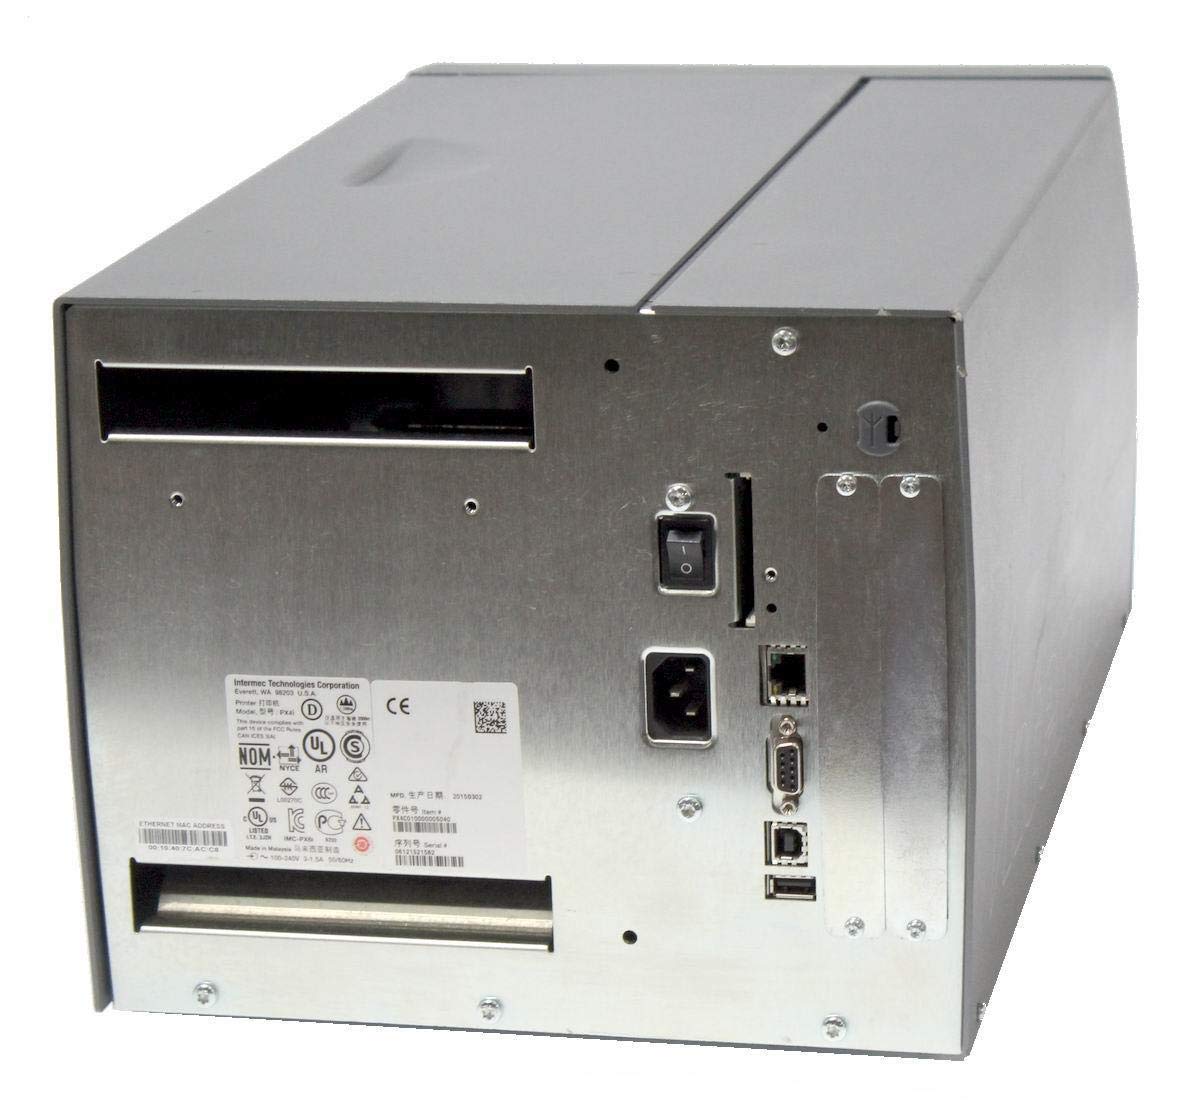
Image: Rear view of the Intermec EasyCoder PX4i printer, displaying the power inlet, power switch, Ethernet port, serial ports, and USB ports. The metallic casing is clearly visible.
- Locate the Ethernet port on the rear of the printer.
- Connect a standard Ethernet cable from the printer to your network router or switch.
- For direct connection to a computer, use an appropriate USB or serial cable if supported by your system and printer configuration.
- Refer to the printer's network configuration guide for setting up IP addresses and other network parameters.
6. Operation
6.1 Control Panel Overview
The front control panel provides access to printer functions and status information.
Image: Close-up of the Intermec EasyCoder PX4i control panel, featuring an LCD display, navigation buttons (up, down, left, right, enter), and a numeric keypad with function keys like Pause, Feed, and Clear.
- LCD Display: Shows printer status, menu options, and error messages.
- Navigation Buttons: Used to scroll through menus and select options.
- Numeric Keypad: For entering data or selecting numbered options.
- Pause Button: Temporarily stops printing.
- Feed Button: Advances one label.
- Setup Button: Accesses printer configuration menus.
6.2 Basic Printing
- Ensure the printer is powered on and connected to your computer or network.
- Open the document or application from which you wish to print labels.
- Select the Intermec PX4i printer from your printer list.
- Configure print settings such as label size, orientation, and quantity as needed.
- Initiate the print job. The printer will begin feeding and printing labels.
6.3 Adjusting Print Settings
Advanced print settings can be adjusted through the printer's control panel or via the printer driver on your computer. These settings include print darkness, print speed, label gap sensing, and more. Consult your printer driver documentation for software-based adjustments.
7. Maintenance
Regular maintenance ensures optimal performance and extends the life of your printer.
7.1 Cleaning the Printhead
The printhead should be cleaned regularly, especially if print quality degrades.
- Turn off the printer and disconnect the power cord.
- Open the printhead assembly.
- Using a lint-free cloth or a printhead cleaning pen moistened with isopropyl alcohol, gently wipe the printhead surface from center to edge.
- Allow the printhead to dry completely before closing the assembly and reconnecting power.
7.2 Replacing Media and Ribbon
When the label roll or thermal transfer ribbon (if used) runs out, replace it promptly.
- Turn off the printer and open the media cover.
- Remove the empty label roll and/or used ribbon core.
- Install a new roll of labels and/or a new ribbon, following the loading instructions in Section 5.3.
- Ensure media and ribbon are properly tensioned and aligned.
- Close the media cover.
8. Troubleshooting
This section addresses common issues you might encounter with your PX4i printer.
- Printer Not Powering On: Check power cord connection, power outlet, and printer's power switch.
- No Print Output: Verify printer is online, connected to the computer/network, and has media loaded. Check for error messages on the LCD.
- Poor Print Quality: Clean the printhead (Section 7.1). Adjust print darkness settings. Ensure correct media and ribbon are used.
- Labels Not Feeding Correctly: Check media loading (Section 5.3) and ensure media guides are properly adjusted. Calibrate media sensors if necessary.
- Error Messages: Refer to the printer's LCD display for specific error codes and consult the full Intermec PX4i technical manual for detailed explanations and solutions.
9. Specifications
| Feature | Description |
|---|---|
| Model Name | PX4i |
| Item Model Number | PX4C010000000020 |
| Printing Technology | Thermal Transfer |
| Print Color | Monochrome |
| Maximum Print Speed | 12 in/s (Monochrome) |
| Maximum Print Resolution | 203 dpi |
| Connectivity Technology | Ethernet |
| Maximum Media Size | 12 inches |
| Included Components | Labels |
| Controller Type | Push Button |
| Manufacturer | INTERMEC INDUSTRIAL PRINTERS |
| Package Dimensions | 23.25 x 15.5 x 15.25 inches; 36.2 Pounds |
10. Warranty and Support
The Intermec EasyCoder PX4i Thermal Transfer Printer comes with a standard manufacturer's warranty. For specific warranty terms and conditions, please refer to the warranty card included with your product or visit the official Intermec (Honeywell) support website. For technical assistance, troubleshooting beyond this manual, or to inquire about service, please contact Intermec customer support or your authorized dealer.
Online Resources: For the latest drivers, firmware updates, and additional documentation, please visit the official Intermec support portal.


