GOOFIT K071-016
GOOFIT Pull Start Starter Recoil Pulley Instruction Manual
Model: K071-016
1. Introduction
This manual provides detailed instructions for the installation, operation, and maintenance of your GOOFIT Pull Start Starter Recoil Pulley. Designed for durability and ease of use, this replacement part ensures reliable starting for compatible engines. Please read this manual thoroughly before installation and use to ensure proper function and safety.
2. Specifications
| Feature | Specification |
|---|---|
| Material | High Quality Metal |
| Center to Center Hole Distance | 160mm / 6.3 inches |
| Distance Between Adjacent Holes | 80mm / 3.15 inches |
| Core Diameter | 54mm / 2.12 inches |
| Mounting Hole Distance of Recoil Starter | 158mm / 6.22 inches |
| Replacement Part Numbers | 28400-ZE1-003ZF, 28400-ZH8-013YA |
| Item Weight | 13.7 ounces |
| Package Dimensions | 7.76 x 7.05 x 1.85 inches |
3. Compatibility
This GOOFIT Pull Start Starter Recoil Pulley is designed as a direct replacement for the following engine models and applications:
- Generator Models: GX120, GX160, GX168, GX200
- Engine Horsepower: 4hp, 5.5hp, 6.5hp
- Other Compatible Applications: 196cc 6.5hp mini shark, 163cc 5.5hp go kart, various lawn mowers and other equipment utilizing compatible GX series engines.

Image: Examples of compatible applications including electric generators, lawn mowers, and GX series engines.

Image: Visual representation of engine compatibility for GX120, GX160, GX168, GX200, 4hp, 5.5hp, 6.5hp engines and lawn mowers.
4. Setup and Installation
Before beginning installation, ensure the engine is turned off and cooled down. Disconnect the spark plug wire to prevent accidental starting.
Required Tools:
- Socket wrench set
- Screwdriver
Installation Steps:
- Remove Old Starter: Locate the existing pull start starter on your engine. Typically, it is secured by several bolts around its perimeter. Use the appropriate socket wrench to carefully remove these bolts.
- Detach Old Starter: Once all bolts are removed, gently pull the old starter away from the engine. Be mindful of any remaining connections or debris.
- Inspect Mounting Area: Clean the mounting surface on the engine to ensure a flat and secure fit for the new starter. Remove any rust, dirt, or old gasket material.
- Position New Starter: Align the new GOOFIT Pull Start Starter with the mounting holes on the engine. Ensure the recoil rope is positioned correctly.
- Secure New Starter: Insert the bolts through the new starter's mounting holes and into the engine. Hand-tighten all bolts first to ensure proper alignment, then tighten them evenly with the socket wrench. Do not overtighten.
- Verify Functionality: Gently pull the starter rope a few times to ensure it retracts smoothly and engages the engine's flywheel correctly.
- Reconnect Spark Plug: Once installation is complete and verified, reconnect the spark plug wire.

Image: An example of the pull start starter installed on a compatible engine.
5. Operation
To start your engine using the GOOFIT Pull Start Starter:
- Prepare Engine: Ensure the engine's fuel tank is filled, the oil level is correct, and the choke (if applicable) is set to the appropriate starting position.
- Grip Handle: Firmly grasp the pull start handle.
- Pull Smoothly: Pull the rope slowly until you feel resistance (this is the compression stroke). Then, pull the rope with a quick, strong, and smooth motion all the way out.
- Allow Retraction: Allow the rope to retract fully and smoothly back into the starter housing. Do not let the handle snap back against the housing, as this can cause damage.
- Repeat if Necessary: If the engine does not start on the first pull, repeat the process. Adjust the choke or throttle settings as needed for cold or warm starts.
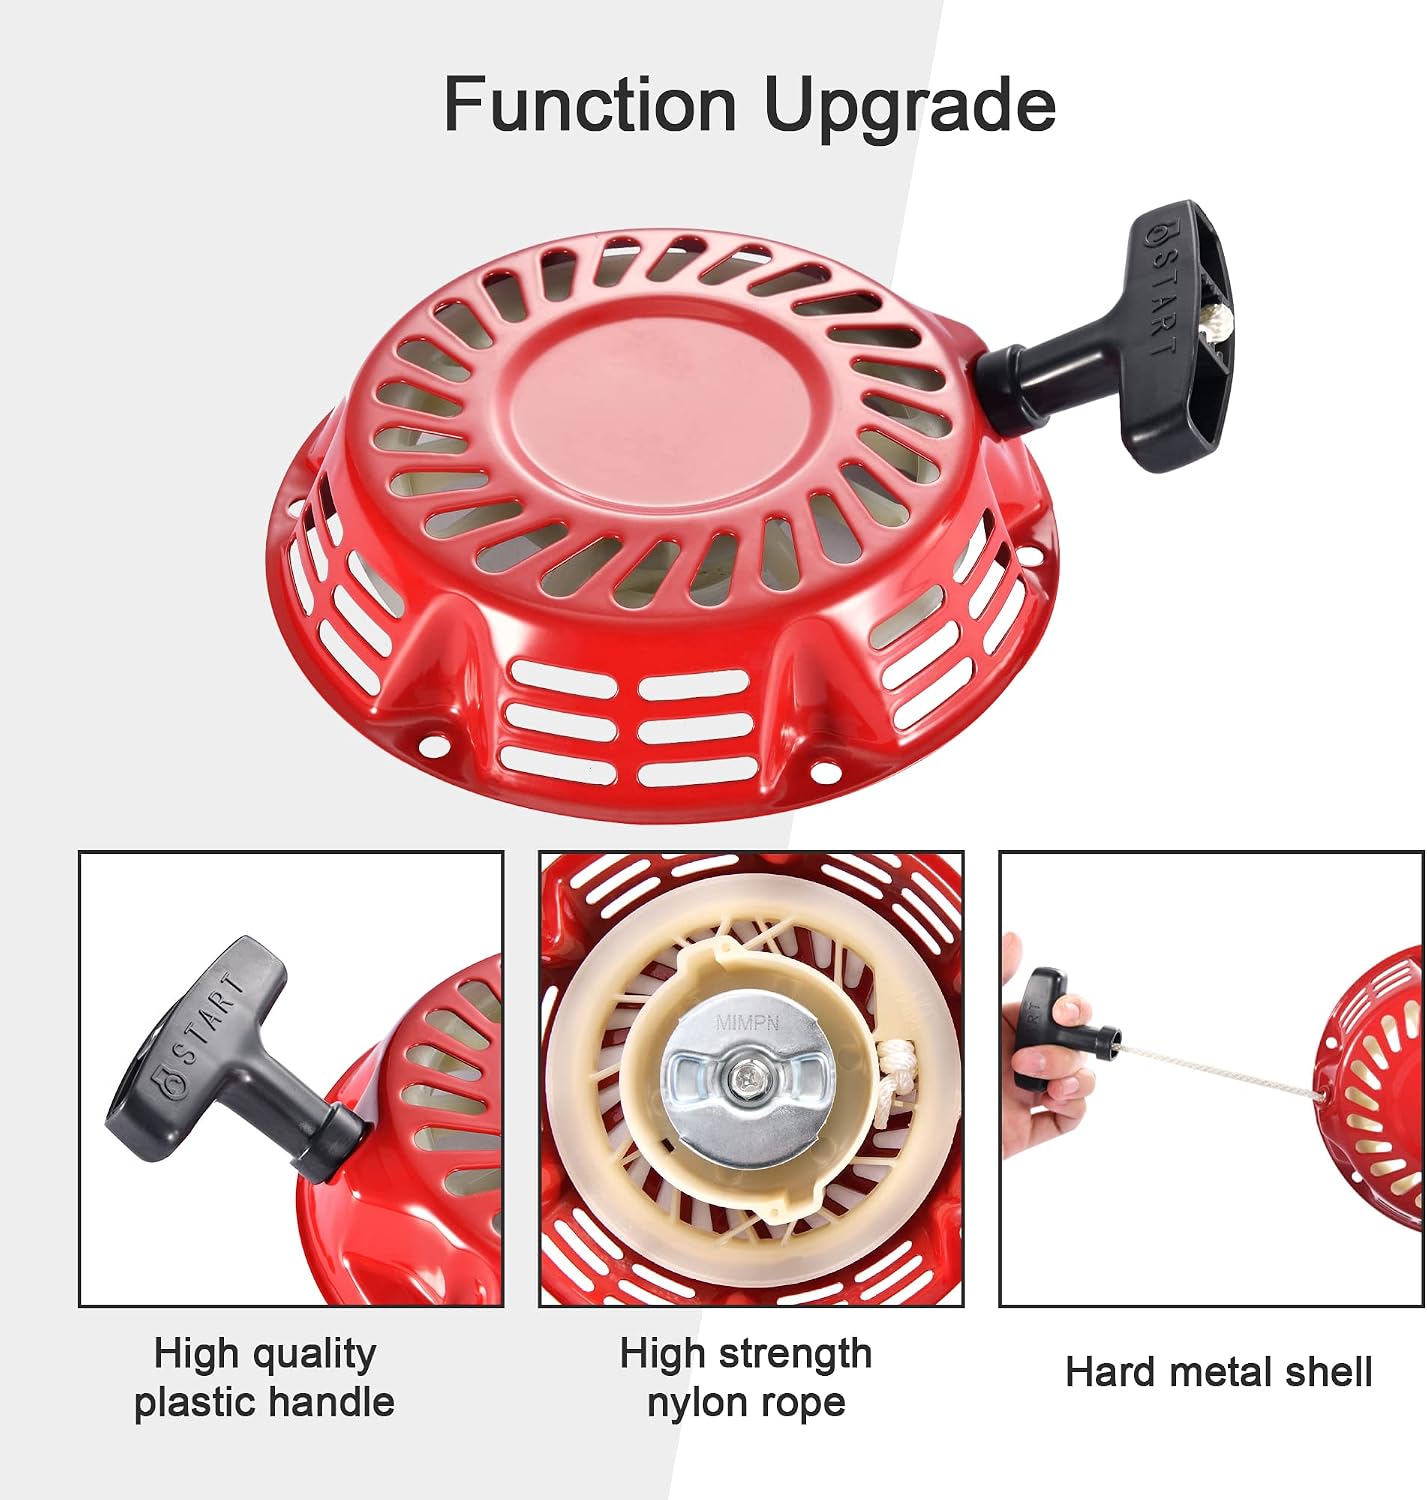
Image: Key components of the GOOFIT Pull Start Starter, highlighting the durable plastic handle, strong nylon rope, and robust metal shell.
6. Maintenance
Regular maintenance will extend the life of your GOOFIT Pull Start Starter:
- Keep Clean: Periodically clean the exterior of the starter to prevent dirt and debris from entering the mechanism. Use a dry cloth or soft brush.
- Inspect Rope: Regularly check the condition of the pull rope for fraying or wear. Replace the rope if any damage is observed to prevent breakage during operation.
- Check Spring Tension: If the rope does not retract fully or smoothly, the internal spring may need inspection or replacement. This typically requires disassembly by a qualified technician.
- Lubrication: Avoid applying lubricants directly to the internal mechanism unless specifically instructed by a service professional, as this can attract dirt and cause issues.

Image: The durable internal spring, designed for repeated use without breaking easily.
7. Troubleshooting
If you encounter issues with your pull start starter, refer to the following common problems and solutions:
| Problem | Possible Cause | Solution |
|---|---|---|
| Rope does not retract fully | Broken or weak recoil spring; debris inside housing. | Inspect for debris. If spring is damaged, replacement by a professional is recommended. |
| Rope pulls out but does not engage engine | Damaged pawls (grapples) or internal mechanism. | Inspect pawls for wear or breakage. Replace the starter if internal components are severely damaged. |
| Rope is frayed or broken | Normal wear and tear; improper pulling technique. | Replace the pull rope. Ensure smooth, consistent pulling motion during operation. |
| Starter housing is cracked or deformed | Impact damage; material fatigue. | Replace the entire pull start starter assembly. |

Image: Visual examples of potential safety hazards and common failures, including deformed housing, broken spring, detached pulling disc, and broken grapple.
8. Warranty and Support
GOOFIT is committed to customer satisfaction. If you are not satisfied with your order or require assistance, please contact us for replacement or refund options. We are always available to help our customers.
For further support or inquiries, please visit the official GOOFIT store or contact customer service through your purchase platform.
Ask a question about this manual
Ask about setup, troubleshooting, compatibility, parts, safety, or missing instructions. Manuals+ will review the question and use this page’s manual context to help answer it.