
1. Introduction and Product Overview
The XtremepowerUS HVAC Air Vacuum Pump and Manifold Gauge Set is a comprehensive kit designed for diagnosing, evacuating, and recharging automotive and residential air conditioning systems. This kit provides the essential tools for maintaining optimal performance of your AC units, compatible with refrigerants such as R12, R22, R134a, and R410a.
The 1/4 HP 3 CFM 1-Stage Rotary Air Vacuum Pump is engineered for high efficiency and low noise, featuring an internal high-volume cooling fan for extended operation. The heavy-duty die-cast aluminum alloy casing ensures durability while keeping the unit lightweight. The manifold gauge set offers precise readings for accurate system analysis.
2. What's in the Box
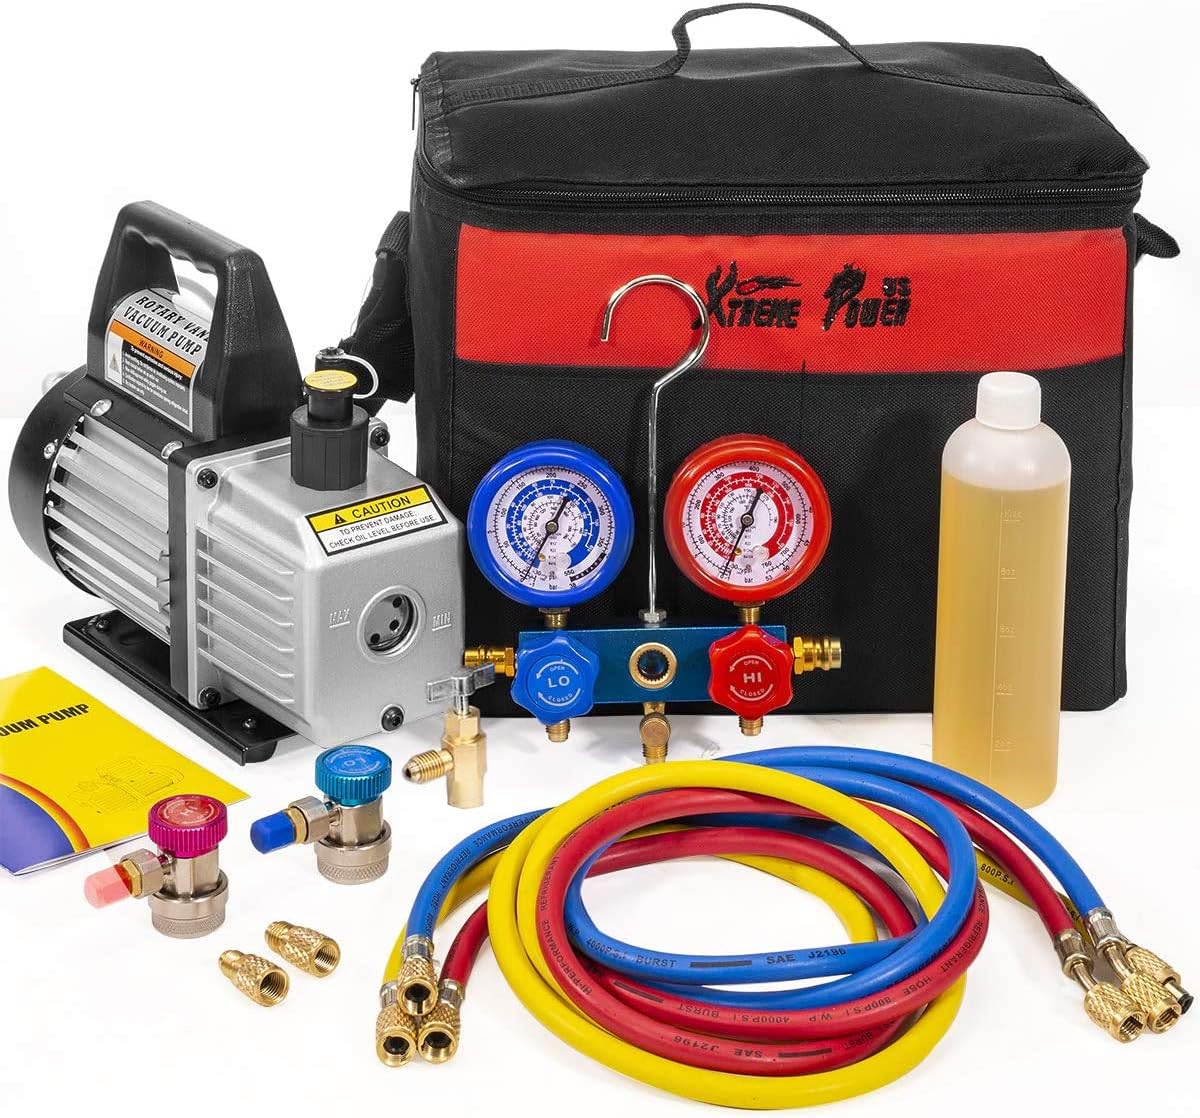
Complete kit including vacuum pump, manifold gauge, hoses, and accessories.

Durable carrying tote for convenient storage and transport.
- 1/4 HP 3 CFM 1-Stage Rotary Air Vacuum Pump
- AC Manifold Gauge Set (High and Low Pressure Gauges)
- Multicolored set of three 36” hoses (Red, Blue, Yellow)
- R134 Can Tap
- Vacuum Pump Oil Bottle
- Brass fittings and adapters
- Carrying Tote Bag
- Owner's Manuals for Manifold Gauge Set and Vacuum Pump
3. Setup
3.1 Vacuum Pump Preparation
Before initial use, ensure the vacuum pump has sufficient oil. The pump comes with a vacuum pump oil bottle. Locate the oil fill port and the sight glass on the pump. Fill the oil reservoir until the oil level is halfway in the sight glass. Do not overfill.

Vacuum pump showing the oil fill port and sight glass for checking oil level.
3.2 Manifold Gauge Assembly
Attach the hanging hook to the top of the manifold gauge. Remove any protective caps from the manifold ports. The manifold features high (red) and low (blue) pressure gauges, along with corresponding valves and hose connections.

Close-up of the manifold gauge set, showing high and low pressure gauges and valves.
3.3 Connecting Hoses
Connect the colored hoses to their respective ports on the manifold gauge:
- Red Hose: Connect to the HIGH pressure side of the manifold and the vehicle's high-pressure service port.
- Blue Hose: Connect to the LOW pressure side of the manifold and the vehicle's low-pressure service port.
- Yellow Hose: Connect to the central service port on the manifold. This hose is used for connecting to the vacuum pump or refrigerant can.

Red, blue, and yellow hoses used for connecting the manifold gauge to the AC system and vacuum pump/refrigerant.
4. Operating Instructions
4.1 Evacuating the AC System (Pulling a Vacuum)
- Ensure all valves on the manifold gauge are in the CLOSED position.
- Connect the red and blue hoses to the high and low-pressure service ports of the vehicle's AC system.
- Connect the yellow hose from the manifold's central service port to the vacuum pump's inlet.
- Open both the high (red) and low (blue) valves on the manifold gauge.
- Turn on the vacuum pump. The gauges should immediately start to drop, indicating a vacuum is being pulled.
- Allow the pump to run until the low-pressure gauge reaches -30 inches of mercury (or the lowest possible vacuum reading). This typically takes 15-30 minutes, depending on system size and condition.
- Once the desired vacuum is achieved, close both the high (red) and low (blue) valves on the manifold gauge.
- Turn off the vacuum pump.
- Perform a Leak Test: Observe the low-pressure gauge for at least 30 minutes. If the needle remains at -30 inches of mercury (or the initial vacuum reading) without rising, the system is sealed and free of leaks. If the needle rises, there is a leak that must be located and repaired before proceeding.
4.2 Recharging the AC System (Adding Refrigerant)
- Ensure the AC system has been successfully evacuated and passed the leak test (as per Section 4.1).
- Disconnect the yellow hose from the vacuum pump.
- Connect the yellow hose to the R134a can tap, then attach the can tap to a refrigerant can.
- Purge the Yellow Hose: Briefly open the can tap valve to allow a small amount of refrigerant to escape, purging any air from the yellow hose before it enters the system. Close the can tap valve immediately.
- Start the vehicle's engine and turn the AC system to its maximum cooling setting (full fan, coldest temperature, recirculation on).
- Slowly open the low (blue) valve on the manifold gauge.
- Invert the refrigerant can (if liquid charging is recommended for your system, consult vehicle manual) and allow the refrigerant to flow into the low-pressure side of the AC system. Monitor the low-pressure gauge.
- Periodically close the low (blue) valve and check the high-pressure gauge to ensure it does not exceed recommended levels for your vehicle.
- Continue adding refrigerant until the low-pressure gauge reaches the manufacturer's recommended pressure for your vehicle's AC system (consult your vehicle's service manual or under-hood label).
- Once the desired pressure is reached, close the low (blue) valve on the manifold gauge and close the can tap valve.
- Disconnect the hoses from the vehicle's service ports. Replace the protective caps on the service ports.
5. Maintenance
5.1 Vacuum Pump Oil Change
Regularly check the oil level and clarity in the vacuum pump's sight glass. If the oil appears cloudy, discolored, or below the recommended level, it should be changed. The vacuum pump features a simple Oil Fill Port for a clean pour and an Oil Drain Plug positioned beneath the oil reservoir to quickly drain when needed.
5.2 Storage
After each use, ensure all components are clean and dry. Store the manifold gauge set and hoses neatly in the provided carrying tote to keep equipment clean and dust-free, and to prevent damage to fittings and gauges.
6. Troubleshooting
- Vacuum Not Holding: If the vacuum gauge rises after the pump is turned off, it indicates a leak in the AC system or connections. Check all fittings for tightness and inspect hoses for damage. Use a leak detector if necessary.
- Pump Not Pulling Full Vacuum: Ensure the oil level is correct and the oil is clean. Check for blockages in hoses or connections. Verify the vacuum pump is running correctly.
- Refrigerant Not Entering System: Ensure the low-pressure valve on the manifold is fully open. Check if the refrigerant can is empty or if the can tap is properly piercing the can. Verify the vehicle's AC system is running and calling for cooling.
For more detailed troubleshooting, please refer to the specific owner's manuals included with your product.
7. Specifications
| Brand | XtremepowerUS |
| Model | Manifold Gauge and Pump Set (Item Model Number: 71097-V) |
| Vacuum Pump Power | 1/4 HP |
| Vacuum Pump Flow Rate | 3 CFM |
| Voltage | 115 Volts |
| Compatible Refrigerants | R12, R22, R134a, R410a |
| Item Weight | 10 pounds |
| Product Dimensions | 10.5 x 14 x 12.5 inches |
8. Warranty & Support
This XtremepowerUS product is covered by a manufacturer's warranty. Please refer to the "OWNER'S MANUAL" included in your package for specific warranty terms and conditions. For product support, technical assistance, or warranty claims, please contact XtremepowerUS customer service directly.
You can also visit the official XtremepowerUS store on Amazon for more information and products: XtremepowerUS Store


