
Square D SQD9007G
Telemecanique Sensors 9007G Side Plunger Head User Manual
Model: SQD9007G
Introduction
This manual provides essential information for the proper installation, operation, and maintenance of the Telemecanique Sensors 9007G Side Plunger Head. This component is designed for use with 9007C Limit Switches, featuring a side push rod plunger with spring return. Please read this manual thoroughly before using the product to ensure safe and efficient operation.
Product Overview
The 9007G Side Plunger Head is a critical component for industrial limit switch applications. It is specifically designed to provide reliable mechanical actuation for 9007C series limit switches. Its robust construction ensures durability in demanding industrial environments.
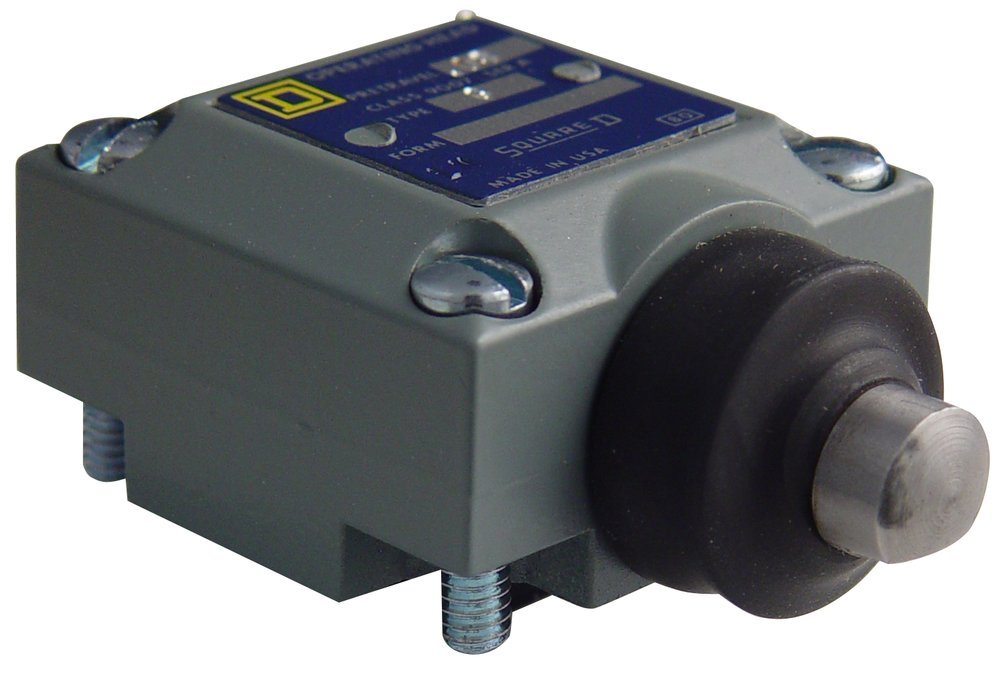
Figure 1: Telemecanique Sensors 9007G Side Plunger Head. This image shows the grey housing of the plunger head with a blue label on top, indicating "SQUARE D" and "OPERATING HEAD". A black rubber boot covers the spring-return metal plunger extending from the side.
Key Features:
- Designed for 9007C Limit Switches.
- Side push rod plunger for specific actuation requirements.
- Spring return mechanism for consistent operation.
- Durable construction for industrial use.
Setup and Installation
Proper installation is crucial for the reliable operation of the 9007G Side Plunger Head. Ensure all power is disconnected from the limit switch circuit before proceeding with installation.
Tools Required:
- Screwdriver (appropriate type for mounting screws)
- Wrench (if applicable for mounting)
Installation Steps:
- Safety First: Disconnect all power to the limit switch and associated machinery before beginning installation. Verify zero energy state.
- Mounting: Securely attach the 9007G Side Plunger Head to the 9007C Limit Switch body. Ensure the mounting screws are tightened to the manufacturer's recommended torque specifications to prevent loosening due to vibration.
- Orientation: Position the plunger head so that the side push rod plunger aligns correctly with the target object or mechanism that will actuate the switch.
- Adjustment: If the limit switch allows for adjustment of the operating head, fine-tune the position to achieve the desired actuation point and overtravel.
- Testing: Once installed, manually actuate the plunger several times to confirm smooth operation and proper switch activation. Reconnect power and perform functional tests under controlled conditions.
Operating Principles
The 9007G Side Plunger Head operates on a simple mechanical principle. When an external force or object contacts the side push rod plunger, it depresses the plunger. This linear motion is then translated internally to actuate the contacts within the connected 9007C Limit Switch. Upon removal of the force, the internal spring mechanism returns the plunger to its original extended position, resetting the switch.
- Actuation: The plunger is designed for direct contact actuation.
- Spring Return: Ensures the plunger returns to its initial state after actuation.
- Contact Type: The associated limit switch typically features Normally Open (NO) or Normally Closed (NC) contacts, which change state upon plunger depression.
Maintenance
The 9007G Side Plunger Head is designed for minimal maintenance. However, periodic inspection can help ensure long-term reliability.
Inspection Schedule:
- Monthly: Visually inspect the plunger head for any signs of physical damage, excessive wear, or corrosion. Check the integrity of the rubber boot around the plunger.
- Quarterly: Verify that mounting screws are still tight. Ensure the plunger moves freely without sticking or excessive friction. Clean any accumulated dust or debris from the plunger mechanism.
Cleaning:
Use a soft, dry cloth to wipe down the exterior of the plunger head. For stubborn dirt, a slightly damp cloth with mild detergent can be used, ensuring no liquid enters the internal mechanism. Do not use abrasive cleaners or solvents.
Troubleshooting
This section addresses common issues that may arise with the 9007G Side Plunger Head.
| Problem | Possible Cause | Solution |
|---|---|---|
| Plunger not returning fully | Debris accumulation; Damaged spring; Misalignment | Clean plunger area; Inspect for damage (replace if necessary); Realign the head. |
| Switch not actuating reliably | Insufficient plunger travel; Misalignment; Worn plunger head | Adjust actuation point; Correct alignment; Replace plunger head if worn. |
| Excessive play in plunger | Wear and tear | Consider replacing the plunger head. |
If issues persist after attempting these solutions, contact qualified service personnel or Telemecanique Sensors support.
Specifications
| Attribute | Value |
|---|---|
| Brand | Square D |
| Manufacturer | Telemecanique Sensors |
| Model Number | SQD9007G |
| Product Dimensions | 5 x 10 x 8 inches |
| Item Weight | 5.29 ounces |
| Operation Mode | Manual |
| Actuator Type | Plunger |
| International Protection Rating | IP00 |
| Specification Met | Nema |
| Compatible Limit Switches | 9007C Series |
Warranty and Support
For warranty information, please refer to the documentation provided with your complete 9007C Limit Switch assembly or contact Telemecanique Sensors directly. This 9007G Side Plunger Head is a component part and its warranty may be covered under the main limit switch unit.
Customer Support:
For technical assistance, troubleshooting beyond this manual, or replacement parts, please contact Telemecanique Sensors customer support. Visit the official Square D or Telemecanique Sensors website for the most current contact information.
Note: Always provide the model number (SQD9007G) and any relevant serial numbers when contacting support.
Related documentsSQD9007G


Ask a question about this manual
Ask about setup, troubleshooting, compatibility, parts, safety, or missing instructions. Manuals+ will review the question and use this page’s manual context to help answer it.