
1. Product Overview
The Renkforce W205GU is a comprehensive wireless weather station designed to provide accurate and real-time weather data. It features a radio-controlled clock, various environmental sensors, and a clear display for easy monitoring of weather conditions.
- Radio Clock: Automatic time synchronization for accuracy.
- Manual Time Setting: Option for manual adjustment and time zone offset (±12h).
- Atmospheric Pressure: Monitors barometric pressure changes.
- Wind Speed: Measures current, minimum, and maximum wind speeds.
- Precipitation Measurement: Tracks daily, weekly, and monthly rainfall.
- Lightning Sensor: Detects lightning strikes and estimates storm distance.
- UV Sensor: Measures UV index and highest daily UV value.
- Temperature & Humidity: Monitors indoor and outdoor temperature and humidity with min/max value storage.
- Dew Point, UV Index, Wind Chill: Displays calculated environmental factors.
- Ice and Frost Protection: Provides alerts for freezing conditions.
- Alarm Function: Includes alarm with snooze feature.
- Calendar: Displays date and day.
- 12/24-Hour Display: Selectable time format.
- Backlight: For improved visibility in low light conditions.
- Battery Status Indicator: Shows the charge level of the batteries.
2. Safety Information
Please read this manual carefully before using the device. Keep these instructions for future reference.
- Do not expose the main unit to extreme temperatures, direct sunlight, or high humidity.
- Ensure the outdoor sensor is installed in a location protected from direct impact and excessive moisture, while allowing accurate readings.
- Use only the specified battery types. Do not mix old and new batteries or different battery types.
- Dispose of batteries according to local regulations.
- Do not attempt to disassemble or repair the device yourself. Refer all servicing to qualified personnel.
- Keep the device away from strong magnetic fields.
3. What's in the Box
The package includes the following components:
- Main Display Unit
- Outdoor Multi-Sensor (for wind speed, precipitation, lightning, UV, humidity, temperature)
- Mounting accessories for the outdoor sensor
- Batteries (if included in specific package)
- User Manual (this document)
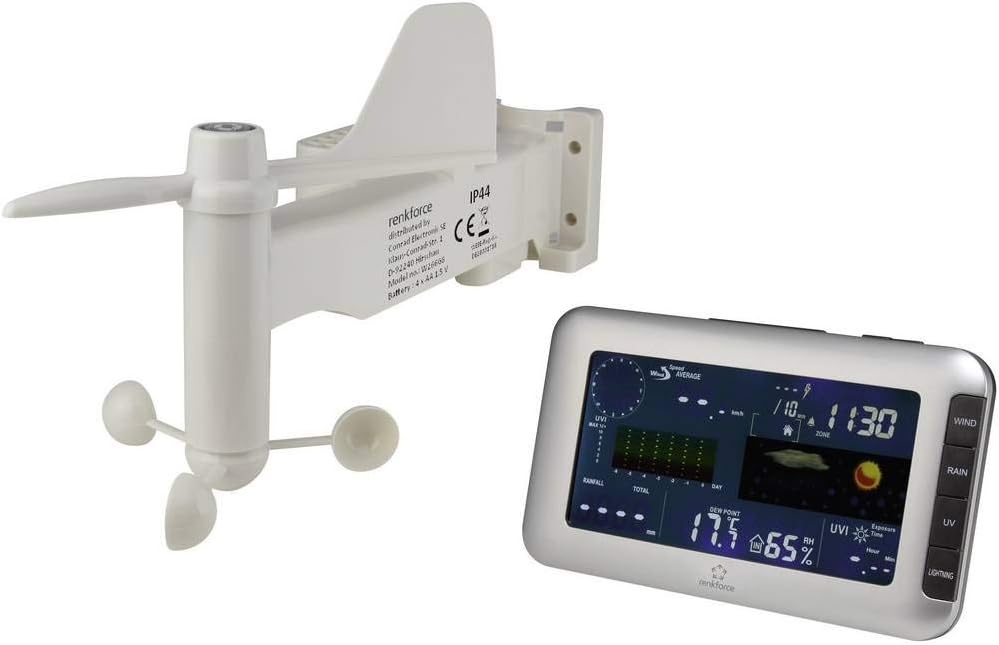
Figure 1: Renkforce W205GU main display unit and integrated outdoor sensor. The outdoor sensor measures wind speed, precipitation, UV, lightning, temperature, and humidity.
4. Setup
4.1 Battery Installation
Main Display Unit:
- Open the battery compartment cover on the back of the main unit.
- Insert the required batteries (e.g., AA or AAA, refer to specifications) observing the correct polarity (+/-).
- Close the battery compartment cover securely.

Figure 2: Rear view of the main display unit, showing the battery compartment and control buttons for Clock/Set, Alarm, Channel/Search, and Memory/Clear.
Outdoor Multi-Sensor:
- Locate the battery compartment on the outdoor sensor. This is typically sealed to protect against weather.
- Open the compartment and insert the specified batteries, ensuring correct polarity.
- Close the compartment tightly to maintain its weather resistance.
4.2 Sensor Placement and Mounting
Outdoor Multi-Sensor:
- Choose an open location for the outdoor sensor, free from obstructions that could block wind, rain, or sunlight.
- Mount the sensor securely using the provided mounting accessories (pole, screws, etc.). Ensure it is level for accurate rain measurement.
- Ideal height for wind measurement is typically 2-10 meters above ground.
- Ensure the sensor is within the wireless range of the main display unit (typically up to 100 meters in open air).
Main Display Unit:
- Place the main unit indoors, away from direct sunlight, heat sources, or drafts that could affect indoor temperature readings.
- Ensure it is placed where it can easily receive signals from the outdoor sensor and the radio clock signal.
4.3 Initial Synchronization
After installing batteries in both units, the main display unit will automatically attempt to connect with the outdoor sensor and receive the radio clock signal. This process may take a few minutes. Ensure both units are within range during this initial setup.
5. Operating the Weather Station
5.1 Time and Date Settings
- Radio Clock: The unit automatically synchronizes with the DCF77 radio signal (or equivalent for your region). This ensures accurate time.
- Manual Time Setting: If the radio signal is not available, or for specific time zone adjustments, press the "Clock/Set" button (refer to Figure 2) to enter time setting mode. Use the "Channel/+" and "Memory/-" buttons to adjust values, and "Clock/Set" to confirm.
- Time Zone: Adjust the time zone offset (±12 hours) as needed in the manual time setting mode.
- 12/24-Hour Display: Toggle between 12-hour (with AM/PM) and 24-hour format during time setting.
5.2 Display Functions
The main display unit shows various weather parameters:
- Indoor/Outdoor Temperature & Humidity: Current readings are displayed. Press "Memory/Clear" to cycle through maximum and minimum recorded values.
- Atmospheric Pressure: Shows current barometric pressure and a trend indicator.
- Wind Speed: Displays current wind speed. Use buttons to view minimum and maximum recorded wind speeds.
- Precipitation: Shows daily, weekly, or monthly rainfall totals.
- Lightning Detection: Indicates lightning strikes and estimates distance to the storm.
- UV Index: Displays the current UV index and the highest daily value.
- Dew Point: Calculated dew point temperature.
- Wind Chill: Calculated wind chill factor.
5.3 Alarm and Alerts
- Time Alarm: Press the "Alarm" button (refer to Figure 2) to set or activate the daily alarm. Use "Channel/+" and "Memory/-" to adjust.
- Snooze Function: When the alarm sounds, press any button (except "Alarm Off") to activate snooze.
- Frost/Ice Alert: The unit will provide an alert when outdoor temperatures approach freezing point, indicating potential ice or frost conditions.
6. Maintenance
- Cleaning: Wipe the main unit and outdoor sensor with a soft, damp cloth. Do not use abrasive cleaners or solvents.
- Battery Replacement: Replace batteries in both units when the low battery indicator appears on the display. Ensure to replace all batteries at once.
- Outdoor Sensor Check: Periodically check the outdoor sensor for debris (leaves, dirt) that might obstruct the wind cups, wind vane, or rain collector. Clean as necessary.
- Rain Collector: Ensure the rain collector funnel is clear of obstructions for accurate precipitation measurement.
7. Troubleshooting
| Problem | Possible Cause | Solution |
|---|---|---|
| No outdoor data displayed. |
|
|
| Inaccurate temperature/humidity readings. |
|
|
| Radio clock not synchronizing. |
|
|
| Wind or rain readings are incorrect. |
|
|
8. Specifications
| Feature | Detail |
|---|---|
| Model Number | 1208067 |
| Brand | Renkforce |
| Power Source | Battery Powered |
| Connectivity Technology | Radio Frequency |
| Color | Black |
| Item Weight | 1.4 Kilograms |
| Special Features | Alarm, Wireless |
| First Available Date | December 22, 2014 |
9. Warranty and Support
For warranty information and technical support, please refer to the documentation provided with your purchase or visit the official Renkforce website. Keep your proof of purchase for any warranty claims.
You can visit the Renkforce store for more information: Renkforce Store


