
1. Introduction
Thank you for choosing the Philips Daily HD7462/20 Filter Coffee Maker. This manual provides essential information for the safe and efficient use, maintenance, and troubleshooting of your appliance. Please read these instructions carefully before first use and keep them for future reference.
This coffee maker is designed to brew delicious filter coffee with features like Aroma Swirl for optimal taste, a generous 1.2-liter capacity, and a convenient drip-stop system.
2. Important Safety Information
- Read all instructions before operating the appliance.
- Do not immerse the appliance, cord, or plug in water or any other liquid.
- This appliance is not intended for use by persons (including children) with reduced physical, sensory or mental capabilities, or lack of experience and knowledge, unless they have been given supervision or instruction concerning use of the appliance by a person responsible for their safety.
- Children should be supervised to ensure that they do not play with the appliance.
- Unplug from outlet when not in use and before cleaning. Allow to cool before putting on or taking off parts, and before cleaning the appliance.
- Do not operate any appliance with a damaged cord or plug or after the appliance malfunctions, or has been damaged in any manner.
- The heating plate remains hot after brewing. Avoid contact with hot surfaces.
- Always ensure the carafe lid is properly closed during brewing to prevent hot water or steam from escaping.
- Use only the original carafe provided with the appliance.
3. Product Overview
Familiarize yourself with the components of your Philips Daily HD7462/20 Filter Coffee Maker.

Figure 1: Philips Daily HD7462/20 Filter Coffee Maker, front view with coffee brewing.
- Water Reservoir: For filling with fresh water. Features a clear level indicator.
- Lid: Covers the water reservoir and filter holder.
- Filter Holder: Removable basket for holding the coffee filter and ground coffee.
- Aroma Swirl Nozzle: Distributes coffee evenly in the carafe for optimal aroma.
- Glass Carafe: With a capacity of 1.2 liters (15 cups).
- Heating Plate: Keeps the brewed coffee warm.
- Power Switch: On/Off button with an indicator light.
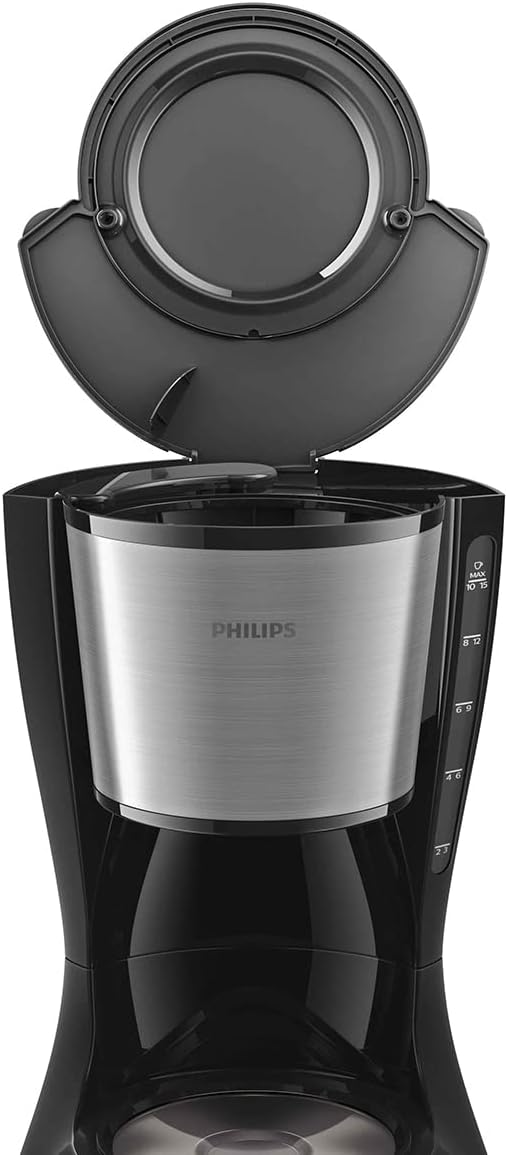
Figure 2: Top view of the coffee maker with the lid open, revealing the water reservoir and filter basket area.
4. Setup
4.1 Unpacking
Carefully remove all packaging materials from the coffee maker. Ensure all parts are present and undamaged. Dispose of packaging responsibly.
4.2 First Use Cleaning
Before brewing coffee for the first time, clean the appliance to remove any manufacturing residues:
- Fill the water reservoir with fresh cold water up to the MAX level.
- Place an empty paper filter (size 1x4 or similar) into the filter holder.
- Place the empty glass carafe with its lid on the heating plate.
- Press the power switch to start a brewing cycle with only water.
- Once the cycle is complete, discard the water and rinse the carafe and filter holder.
4.3 Placement
Place the coffee maker on a stable, flat, heat-resistant surface, away from water sources and direct heat. Ensure there is adequate space around the appliance for ventilation.
5. Operating Instructions
5.1 Brewing Coffee
- Fill Water Reservoir: Open the lid and fill the water reservoir with fresh, cold water. Use the water level indicator on the side of the appliance to measure the desired number of cups (up to 1.2 liters or 15 cups).
- Add Coffee Filter: Place a paper filter (e.g., size 1x4) into the filter holder.
- Add Ground Coffee: Add the desired amount of ground coffee into the filter. A general guideline is one level scoop (approximately 7g) per cup, but adjust to your taste.
- Close Lid: Close the lid securely.
- Place Carafe: Ensure the glass carafe with its lid is correctly placed on the heating plate.
- Start Brewing: Plug the appliance into a power outlet. Press the power switch. The indicator light will illuminate, and the brewing process will begin.
- Drip-Stop Function: The drip-stop system allows you to temporarily remove the carafe during brewing to pour a cup of coffee. The flow of coffee will stop automatically. Return the carafe to the heating plate within 20 seconds to prevent overflow.
- Aroma Swirl: During brewing, the Aroma Swirl nozzle inside the carafe will circulate the coffee, ensuring an optimal and consistent aroma throughout the entire pot.
- Automatic Shut-off: For safety and energy saving, the coffee maker will automatically switch off approximately 30 minutes after the brewing cycle is complete. The indicator light will turn off.
5.2 After Brewing
Once brewing is complete, the heating plate will keep the coffee warm until the automatic shut-off activates. To turn off the appliance manually, press the power switch again.
6. Cleaning and Maintenance
6.1 Daily Cleaning
- Always unplug the coffee maker and allow it to cool completely before cleaning.
- Remove the filter holder and discard the used coffee filter and grounds.
- Wash the glass carafe and filter holder in warm, soapy water. Rinse thoroughly and dry. These parts are generally dishwasher-safe (top rack).
- Wipe the exterior of the appliance with a soft, damp cloth. Do not use abrasive cleaning agents or scourers.
- Do not immerse the main unit in water or any other liquid.
6.2 Descaling
Regular descaling is crucial to maintain optimal performance and extend the lifespan of your coffee maker. The frequency depends on water hardness and usage, but generally every 2-3 months is recommended.
- Prepare a descaling solution according to the manufacturer's instructions (e.g., white vinegar and water, or a commercial descaler).
- Pour the descaling solution into the water reservoir up to the MAX level.
- Place the empty carafe on the heating plate.
- Start a brewing cycle. After about half of the solution has run through, switch off the appliance and let it soak for 15-20 minutes.
- Switch the appliance back on to complete the brewing cycle.
- After descaling, run at least two full cycles with fresh, cold water to rinse the appliance thoroughly and remove any residual descaler taste.
7. Troubleshooting
If you encounter issues with your coffee maker, refer to the following common problems and solutions:
| Problem | Possible Cause | Solution |
|---|---|---|
| Coffee does not brew. | No power; water reservoir empty; appliance not switched on. | Check power connection; fill water reservoir; press the power switch. |
| Coffee is weak or tastes bad. | Insufficient coffee grounds; incorrect grind size; appliance needs descaling. | Add more coffee; use medium grind; descale the appliance. |
| Coffee overflows from the filter holder. | Too much coffee grounds; filter holder clogged; carafe not placed correctly. | Reduce coffee amount; clean filter holder; ensure carafe is fully seated. |
| Water leaks from the appliance. | Water reservoir overfilled; components not assembled correctly. | Do not exceed MAX fill line; reassemble filter holder and carafe properly. |
If the problem persists after trying these solutions, please contact customer support.
8. Specifications
- Model Number: HD7462/20
- Power: 1000 Watts
- Voltage: 220V
- Capacity: 1.2 Liters (15 cups)
- Material: Metal
- Color: Black/Silver
- Dimensions (L x W x H): 6 x 19 x 14 cm
- Weight: 2.13 Kilograms
- Features: Aroma Swirl, Drip-stop system, Automatic shut-off
9. Warranty and Support
9.1 Warranty
This Philips appliance comes with a standard manufacturer's warranty. Please refer to the warranty card included in your product packaging or visit the official Philips website for detailed warranty terms and conditions applicable in your region. Keep your proof of purchase for warranty claims.
Spare parts are generally available for a period of 2 years from the date of purchase.
9.2 Customer Support
For further assistance, product registration, or to find answers to frequently asked questions, please visit the official Philips support website or contact their customer service helpline. Contact details can typically be found on the Philips website or in your product documentation.
Online Support: www.philips.com/support


