
1. Introduction
Thank you for choosing the Technivorm Moccamaster 59656 KBG 10-Cup Coffee Maker. This manual provides essential information for the safe and efficient operation, maintenance, and care of your coffee brewer. The Moccamaster KBG is designed to brew a full 40oz pot of coffee in approximately six minutes, maintaining optimal brewing temperatures for a superior coffee experience. It features a glass carafe and an automatic drip-stop brew-basket.

Figure 1.1: The Technivorm Moccamaster 59656 KBG 10-Cup Coffee Maker in Matte Black.

Figure 1.2: The Specialty Coffee Association (SCA) Certified Home Brewer logo, indicating adherence to strict brewing standards.
2. Safety Information
Please read all safety instructions before using the appliance to prevent injury or damage.
- Do not let the power cord hang over the edge of a table or counter.
- Avoid contact of the power cord with hot surfaces.
- Ensure the appliance is placed on a stable, level surface away from water.
- Do not immerse the appliance, cord, or plug in water or other liquids.
- Unplug the coffee maker from the outlet when not in use and before cleaning.
- Do not operate any appliance with a damaged cord or plug, or after the appliance malfunctions or has been damaged in any manner.
- This appliance is for household use only.
3. Product Overview
The Technivorm Moccamaster 59656 KBG is a high-quality drip coffee machine designed for optimal brewing. Key components include:
- Moccamaster Brewer Unit
- Glass Carafe
- Brew Basket
- Water Reservoir Lid
- Brew Basket Lid
- 9-Hole Outlet Arm
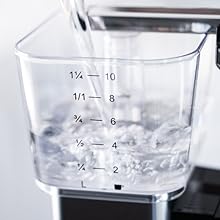
Figure 3.1: The transparent water reservoir with clear measurement markings.
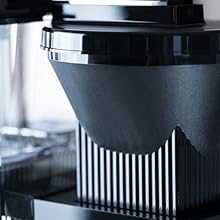
Figure 3.2: The brew basket, designed for optimal coffee extraction.
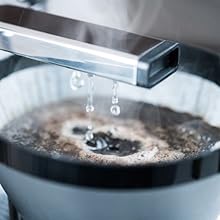
Figure 3.3: The 9-hole outlet arm ensures even saturation of coffee grounds.
4. Setup
4.1 Unpacking and Initial Placement
- Carefully remove all components from the packaging.
- Place the coffee maker on a flat, stable, and heat-resistant surface. Ensure adequate clearance around the unit for ventilation.
- Ensure the power cord is not obstructed and does not hang over edges.
4.2 Initial Cleaning
Before first use, it is recommended to clean the internal components to remove any manufacturing residues.
- Wash the glass carafe, brew basket, and lids with warm, soapy water. Rinse thoroughly.
- Fill the water reservoir to the maximum level with fresh, filtered water.
- Place an empty paper filter in the brew basket.
- Run two full brewing cycles with just water. Discard the water after each cycle.
5. Operating Instructions
5.1 Preparing for Brewing
- Ensure the coffee maker is plugged into a grounded electrical outlet.
- Place a #4 cone paper filter into the brew basket.
- Add your desired amount of medium-ground coffee to the filter. For a full 40oz pot, approximately 55-60 grams of coffee is recommended.

Figure 5.1: Coffee grounds placed in the paper filter within the brew basket.
5.2 Adding Water
- Fill the water reservoir with fresh, cold, filtered water to the desired level. The reservoir has markings for 2, 4, 6, 8, and 10 cups (40oz).
- Ensure the water reservoir lid is securely placed.

Figure 5.2: Filling the water reservoir to the desired level using the clear markings.
5.3 Brewing Coffee
- Place the glass carafe with its lid on the warming plate.
- Press the main power switch (marked with a circle and vertical line) to the 'ON' position. The indicator light will illuminate.
- The coffee maker will begin heating water to the optimal brewing temperature (196°F - 205°F) and dispense it over the coffee grounds. A full 40oz pot typically brews in 4-6 minutes.

Figure 5.3: The brewing process, showing hot water evenly saturating the coffee grounds.
5.4 Hot Plate Function and Automatic Shut-Off
- The hot plate has two settings to keep your coffee warm: 175°F and 185°F. Use the separate switch (marked with a half-circle) to select your preferred temperature.
- The hot plate will automatically turn off after 100 minutes to prevent coffee from burning and for safety.

Figure 5.4: The main power switch (left) and the hot plate temperature selection switch (right).
5.5 Automatic Drip-Stop
The brew-basket features an automatic drip-stop mechanism. If the carafe is pulled away from the warming plate during brewing, the flow of coffee will stop, preventing drips onto the hot plate.
5.6 Operational Video
Video 5.1: A demonstration of the Technivorm Moccamaster coffee brewing process, highlighting key operational steps.
6. Maintenance
Regular cleaning and maintenance ensure optimal performance and longevity of your Moccamaster coffee maker.
6.1 Daily Cleaning
- After each use, unplug the appliance and allow it to cool.
- Discard the used coffee filter and grounds.
- Wash the glass carafe, brew basket, and lids with warm, soapy water. These parts are dishwasher safe.
- Wipe down the exterior of the coffee maker with a damp cloth. Do not use abrasive cleaners.
6.2 Descaling
Descaling is crucial to prevent mineral buildup, which can affect brewing performance and taste. Descale your Moccamaster every 3 months or more frequently if you have hard water.
- Use a descaling solution specifically designed for coffee makers (e.g., Urnex Cleancaf). Follow the descaling product's instructions carefully.
- Alternatively, a solution of white vinegar and water (1:1 ratio) can be used.
- Fill the water reservoir with the descaling solution.
- Place an empty paper filter in the brew basket and the carafe on the warming plate.
- Run a full brewing cycle.
- After the cycle, discard the solution and run two full cycles with fresh, clean water to rinse the system thoroughly.
6.3 Cleaning Demonstration
Video 6.1: A short video demonstrating the ease of cleaning and maintenance for the Moccamaster coffee maker.
7. Troubleshooting
If you encounter issues with your Moccamaster, refer to the following common problems and solutions:
| Problem | Possible Cause | Solution |
|---|---|---|
| Coffee not brewing or slow brewing | Mineral buildup (scale) in the heating element or water tubes. | Perform a descaling cycle as described in Section 6.2. |
| Coffee overflows from brew basket | Too much coffee grounds, filter clogged, or grind is too fine. | Reduce coffee quantity, ensure filter is not clogged, use a coarser grind. |
| Coffee tastes weak or sour | Insufficient coffee, water not hot enough (due to scale), or grind too coarse. | Increase coffee quantity, descale the machine, use a finer grind. |
| Coffee tastes bitter | Over-extraction due to too fine a grind or too much coffee. | Use a coarser grind, reduce coffee quantity. |
| Hot plate not warming | Hot plate switch is off or unit has automatically shut off after 100 minutes. | Ensure the hot plate switch is in the desired position. If 100 minutes have passed, turn the main power switch off and then on again to reactivate. |
8. Specifications
| Feature | Detail |
|---|---|
| Brand | Technivorm Moccamaster |
| Model Name | 59656 KBG |
| Capacity | 10 cups (40 oz) |
| Color | Matte Black |
| Coffee Maker Type | Drip Coffee Machine |
| Operation Mode | Fully Automatic |
| Wattage | 65 watts |
| Power Source | Electric |
| Filter Type | Reusable (or #4 cone paper filters) |
| Item Weight | 6.3 pounds |
| Material | Aluminum, Copper, Glass, Plastic, Stainless Steel (BPA/BPS/BPF & Phthalate Free plastics) |
| Special Features | Automatic Shut-Off, Dishwasher Safe Parts, Pause/Interrupt (Drip-Stop), Removable Filter, Removable Lid, Water Level Indicator |
9. Warranty & Support
9.1 Manufacturer's Warranty
The Technivorm Moccamaster 59656 KBG coffee maker is backed by an industry-leading 15-year manufacturer warranty. This warranty covers defects in materials and workmanship under normal household use. Please retain your proof of purchase for warranty claims.
9.2 Customer Support
For technical assistance, warranty service, or to order replacement parts, please visit the official Technivorm Moccamaster website or contact their customer service department. Refer to the contact information provided with your product packaging or on the official brand website.
You can also find additional resources and a downloadable PDF version of the user manual here.


