
1. Introduction
The Behringer U-PHORIA UMC204HD is a 2-input, 4-output USB 2.0 audio and MIDI interface designed for recording microphones, instruments, and line-level sources to a computer-based Digital Audio Workstation (DAW). It features Midas-designed microphone preamplifiers with +48V phantom power and supports audio resolution up to 24-Bit/192 kHz. This manual provides essential information for the proper installation, operation, and care of your UMC204HD.
2. Key Features
- 2x4 USB Audio/MIDI Interface: Provides two inputs and four outputs for flexible recording and playback.
- Midas-Designed Mic Preamplifiers: Equipped with high-quality preamps for clear audio capture, including +48V phantom power for condenser microphones.
- 24-Bit/192 kHz Resolution: Supports high-fidelity audio recording and playback for professional results.
- USB 2.0 Connectivity: Ensures fast data transfer and compatibility with Mac and Windows computers.
- Analog Inserts: Two dedicated insert points for connecting external effects processors.
- MIDI I/O: Integrated MIDI input and output for connecting keyboards and other MIDI devices.
- Direct Monitoring: Allows for zero-latency monitoring of input signals.

A graphic displaying '192 kHz', indicating the high-resolution audio capabilities of the interface.

A large Midas mixing console, representing the professional audio heritage and quality of the Midas-designed preamplifiers in the UMC204HD.
3. Setup Guide
3.1 System Requirements
The UMC204HD is compatible with most modern computer systems. Ensure your operating system meets the following minimum requirements:
- Operating System: Windows (XP or higher), macOS (OS X 10.6.8 or higher).
- Hardware: Available USB 2.0 port.
3.2 Driver Installation
For optimal performance on Windows systems, it is recommended to install the latest ASIO drivers from the official Behringer website. For macOS, the UMC204HD typically operates as a class-compliant device, requiring no additional driver installation.
- Visit the Behringer support page for the UMC204HD.
- Download the latest drivers compatible with your operating system.
- Follow the on-screen instructions to complete the installation.
- Restart your computer after installation, if prompted.
3.3 Hardware Connections
Connect the UMC204HD to your computer using the provided USB cable. The unit is USB bus-powered, so no external power supply is required.
Front Panel Connections
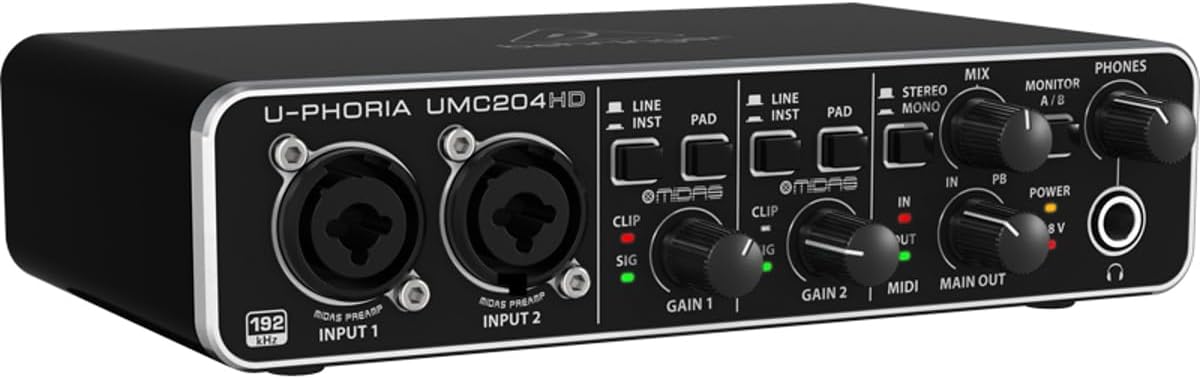
This image displays the front panel of the Behringer UMC204HD, showing the two XLR/TRS combo inputs, individual gain controls, Line/Inst and Pad switches, Clip/Sig indicators, Mix and Monitor A/B knobs, and the headphone output with its level control.
- INPUT 1 / INPUT 2 (XLR/TRS Combo Jacks): Connect microphones (XLR) or instruments/line-level sources (1/4" TRS/TS).
- LINE/INST Switch: Toggles input impedance for line-level or instrument-level signals.
- PAD Switch: Engages a -20 dB attenuation pad for high-level input signals.
- GAIN 1 / GAIN 2 Knobs: Adjust the input level for each channel.
- CLIP / SIG Indicators: SIG (green) indicates signal presence; CLIP (red) indicates input signal clipping.
- MIX Knob: Blends the direct input signal (IN) with the computer playback signal (PB) for monitoring.
- MONITOR A/B Switch: Selects between playback outputs A (Main Out) and B (Playback Outputs 3/4) for headphone monitoring.
- PHONES Knob: Adjusts the volume of the headphone output.
- PHONES Jack (1/4" TRS): Connect stereo headphones.
Rear Panel Connections

The rear panel of the Behringer UMC204HD is shown, featuring the USB port, MIDI In and Out ports, Playback Outputs (RCA), Main Out (TRS), two Insert jacks, and the +48V phantom power switch.
- USB Port: Connects the interface to your computer.
- MIDI IN / MIDI OUT: Standard 5-pin DIN connectors for MIDI devices.
- PLAYBACK OUTPUTS 3 / 4 (RCA): Unbalanced stereo outputs for additional monitoring or routing.
- MAIN OUT 1 / 2 (1/4" TRS): Balanced stereo main outputs for connecting to studio monitors or a mixer.
- INSERTS 1 / 2 (1/4" TRS): Send/Return jacks for connecting external effects processors to input channels 1 and 2.
- +48V ON/OFF Switch: Activates or deactivates phantom power for condenser microphones connected to the XLR inputs.
4. Operation
4.1 Powering On
The UMC204HD receives power directly from your computer via the USB connection. Ensure the USB cable is securely connected to both the interface and your computer.
4.2 Input Level Adjustment
Proper input level setting is crucial for recording quality.
- Connect your microphone or instrument to an input jack.
- If using a condenser microphone, activate the +48V phantom power switch on the rear panel.
- If connecting an instrument (e.g., guitar), press the LINE/INST switch for the corresponding channel. For high-output sources, engage the PAD switch.
- While performing or speaking into the microphone, slowly turn the GAIN knob clockwise until the green SIG LED illuminates consistently. The red CLIP LED should only flash occasionally during the loudest peaks. If the CLIP LED stays lit, reduce the GAIN.
4.3 Monitoring
The MIX knob allows you to blend the direct input signal (IN) with the audio playback from your computer (PB). This provides zero-latency monitoring of your input signal, preventing delays that can occur when monitoring through software.
- Turn the MIX knob towards IN to hear more of your live input.
- Turn the MIX knob towards PB to hear more of your computer's playback.
- Use the MONITOR A/B switch to select which playback outputs are routed to the headphone jack.
4.4 Playback
Connect your studio monitors to the MAIN OUT (1/4" TRS) jacks on the rear panel. Adjust the main output level within your DAW or operating system. For headphone monitoring, connect headphones to the front panel PHONES jack and adjust its volume with the PHONES knob.

A person wearing headphones smiles while working at a computer with an audio interface, demonstrating typical usage for recording or mixing.

A woman sings into a large diaphragm condenser microphone, illustrating the use of the UMC204HD for vocal recording.

A musician with a guitar sits in a home studio setup, demonstrating the use of the audio interface for recording instruments.
4.5 MIDI Functionality
The UMC204HD includes MIDI In and Out ports. Connect your MIDI controller or other MIDI devices to these ports. Your DAW software will recognize the UMC204HD as a MIDI interface, allowing you to send and receive MIDI data.
5. Maintenance
To ensure the longevity and optimal performance of your UMC204HD, follow these maintenance guidelines:
- Cleaning: Use a soft, dry cloth to clean the exterior of the unit. Avoid abrasive cleaners or solvents.
- Storage: Store the interface in a cool, dry place away from direct sunlight and extreme temperatures.
- Handling: Avoid dropping or subjecting the unit to strong impacts.
- Ventilation: Ensure adequate airflow around the unit to prevent overheating.
6. Troubleshooting
If you encounter issues with your UMC204HD, refer to the following common problems and solutions:
- No Power/Unit Not Recognized:
- Ensure the USB cable is securely connected to both the interface and your computer.
- Try a different USB port on your computer.
- Verify that the correct drivers are installed (Windows only).
- Test with a different USB cable.
- No Audio Input Signal:
- Check all cable connections from your microphone/instrument to the interface.
- Ensure the GAIN knob for the respective channel is turned up.
- If using a condenser microphone, confirm that +48V phantom power is activated.
- Verify that the LINE/INST switch is correctly set for your input source.
- Check your DAW's input settings to ensure the UMC204HD is selected and the correct input channel is armed.
- No Audio Output/Playback:
- Ensure your speakers or headphones are connected correctly and their volume is turned up.
- Check the PHONES knob for headphone volume.
- Verify that the UMC204HD is selected as the output device in your computer's sound settings and your DAW.
- Adjust the MIX knob to ensure you are hearing the playback (PB) signal.
- High Latency (Delay in Audio):
- Ensure you are using the dedicated ASIO drivers on Windows.
- Adjust the buffer size in your DAW's audio settings (lower buffer size reduces latency but requires more CPU).
- Utilize the direct monitoring feature with the MIX knob to monitor inputs with zero latency.
- Input Signal Clipping (Red CLIP LED Stays On):
- Reduce the GAIN knob for the affected channel.
- Engage the PAD switch if the input source is very loud.
7. Technical Specifications
| Feature | Specification |
|---|---|
| Model Number | UMC204HD |
| Number of Channels | 2 Input, 4 Output |
| Connectivity Technology | USB 2.0 |
| Audio Resolution | 24-Bit/192 kHz |
| Preamplifiers | Midas-designed Mic Preamps |
| Phantom Power | +48V |
| Hardware Interface | USB |
| Compatible Devices | Laptop, Personal Computer |
| Supported Software | Avid Pro Tools, Ableton Live, Steinberg Cubase (and others) |
| Operating System | Windows, macOS |
| Item Weight | 1.37 pounds |
| Product Dimensions | 7.28 x 5.12 x 1.97 inches |
8. Warranty and Support
For detailed warranty information, technical support, or service inquiries, please visit the official Behringer website or contact their customer support. You can also refer to the official User Manual (PDF) for additional information.
