
APDTY 859099
APDTY 859099 Power Window Regulator and Motor Assembly User Manual
Model: 859099 | Brand: APDTY
1. Introduction and Overview
This manual provides essential information for the proper installation, operation, and maintenance of your APDTY 859099 Power Window Regulator and Motor Assembly. This assembly is designed as a direct replacement for the front right (passenger side) window regulator and motor in compatible vehicles. Please read this manual thoroughly before beginning any installation to ensure safe and correct procedures.
2. Safety Information
WARNING: This product contains chemicals known to the State of California to cause cancer and birth defects or other reproductive harm. For more information, visit www.P65Warnings.ca.gov.
- Always disconnect the vehicle's battery before performing any electrical work to prevent accidental activation or electrical shock.
- Wear appropriate personal protective equipment, including safety glasses and gloves, during installation.
- Exercise caution when handling the window glass, as it can be heavy and sharp.
- If you are not comfortable performing automotive repairs, it is highly recommended to seek professional installation.
- Ensure the vehicle is parked on a level surface with the parking brake engaged.
3. Product Components
The APDTY 859099 assembly includes the window regulator mechanism and the integrated electric motor. It is designed as a complete unit for straightforward replacement.
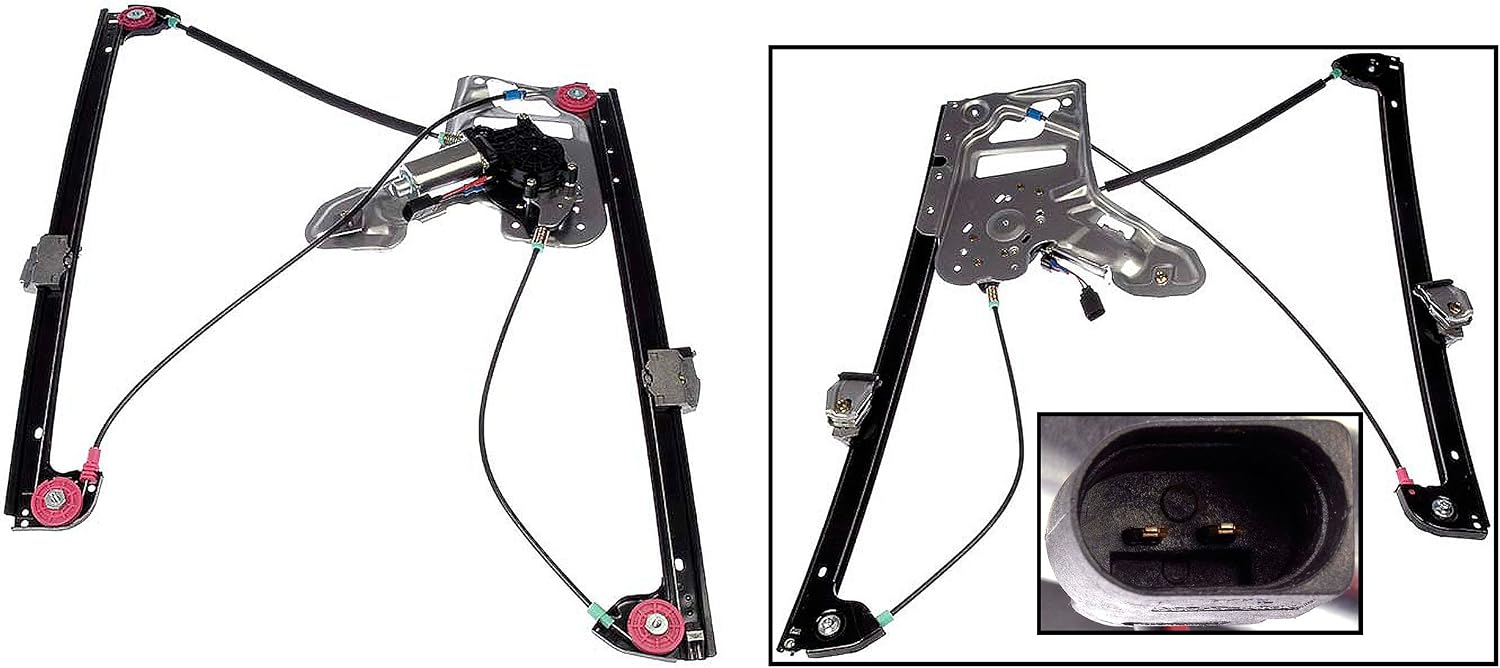
Figure 3.1: The complete APDTY 859099 Power Window Regulator and Motor Assembly. This image displays the full unit, including the metal frame, cables, pulleys, and the integrated electric motor, ready for installation.
4. Compatibility
This APDTY 859099 Power Window Regulator and Motor Assembly is compatible with the following vehicle:
- 2003-2012 Land Rover Range Rover (Front Right / Passenger Side)
Always verify compatibility with your specific vehicle's make, model, and year before installation. Refer to your vehicle's service manual for precise details.
5. Setup and Installation
The following steps provide a general guide for installing the power window regulator and motor assembly. Specific procedures may vary by vehicle model. Always consult your vehicle's factory service manual for detailed instructions.
Required Tools:
- Socket set and ratchet
- Screwdriver set (Phillips and flathead)
- Trim panel removal tools
- Torque wrench
- Safety glasses and gloves
Installation Steps:
- Prepare Vehicle: Park the vehicle on a level surface, engage the parking brake, and turn off the ignition. Disconnect the negative terminal of the vehicle's battery to prevent electrical hazards.
- Remove Door Panel: Carefully remove the interior door panel. This typically involves removing screws hidden behind trim pieces, door handles, or armrests, and then prying the panel away from the door frame. Disconnect any electrical connectors attached to the door panel (e.g., window switches, door lights).
- Access Window Regulator: Remove the vapor barrier or plastic sheeting covering the inner door structure. Be careful not to tear it, as it helps prevent moisture from entering the cabin.
- Position Window Glass: If the window glass is still in place, carefully support it in the up position using tape or a wedge. This prevents it from falling during regulator removal.
- Disconnect Old Regulator: Disconnect the electrical connector from the old window motor. Remove the bolts or rivets securing the old window regulator to the door frame and the window glass. Carefully remove the old assembly from the door cavity.
- Install New Regulator: Insert the new APDTY 859099 assembly into the door cavity. Secure it to the door frame using the appropriate bolts or rivets. Ensure all mounting points are aligned correctly.
- Attach Window Glass: Carefully lower the window glass and attach it to the new regulator's mounting points. Ensure the glass is securely fastened.
- Connect Electrical: Connect the electrical harness to the new window motor. Ensure the connection is secure and fully seated.

Figure 5.1: The APDTY 859099 assembly showing the electrical connector. This image highlights the specific electrical connection point on the motor, which must be securely attached to the vehicle's wiring harness during installation.
- Test Operation: Reconnect the vehicle's battery. Before reinstalling the door panel, test the window's operation using the window switch. Ensure it moves smoothly up and down without binding or unusual noises. Adjust if necessary.
- Reinstall Door Panel: Reinstall the vapor barrier, ensuring it is properly sealed. Reconnect any electrical connectors to the door panel and reattach the door panel to the door frame. Secure all screws and trim pieces.
- Final Check: Verify all functions of the door and window are working correctly.
6. Operating the Power Window
Once installed, the APDTY 859099 Power Window Regulator and Motor Assembly operates identically to the original equipment. Use your vehicle's existing power window switch to raise and lower the window. Ensure there are no obstructions in the window path before operating to prevent damage to the assembly or injury.
7. Maintenance
The APDTY 859099 Power Window Regulator and Motor Assembly is designed for long-term, maintenance-free operation. However, general vehicle maintenance practices can help ensure its longevity:
- Keep window tracks clean and free of debris. Dirt and grime can impede window movement and put strain on the motor.
- Avoid forcing the window if it encounters an obstruction.
- Periodically inspect the window's operation for any signs of sluggishness or unusual noises.
8. Troubleshooting
If you experience issues with your power window after installation, consider the following common troubleshooting steps:
- Window does not move:
- Check the electrical connection to the motor for looseness or corrosion.
- Verify that the vehicle's battery is fully charged and connections are secure.
- Check the fuse for the power windows in your vehicle's fuse box (consult your vehicle's owner's manual for fuse location).
- Ensure the window lock-out switch (if equipped) is not engaged.
- Window moves slowly or with difficulty:
- Inspect the window tracks for dirt, debris, or obstructions. Clean the tracks if necessary.
- Ensure the window glass is properly aligned within its tracks.
- Check for any binding or resistance in the regulator mechanism itself.
- Unusual noises (grinding, clicking):
- This could indicate an issue with the motor or the regulator mechanism. Re-check all mounting bolts for tightness.
- Ensure no cables are rubbing against other components inside the door.
If these steps do not resolve the issue, professional diagnosis may be required.
9. Specifications
| Specification | Detail |
|---|---|
| Manufacturer | APDTY |
| Brand | APDTY |
| Model | APDTY 859099 |
| Item Weight | 7.92 pounds |
| Product Dimensions | 27.95 x 14.37 x 4.52 inches |
| Item Model Number | 859099 |
| Manufacturer Part Number | 859099 |
| OEM Part Number | CUH000182 |
| Hollander Number | 125-58952RWM |
| ASIN | B00QB4EF3W |
| Date First Available | November 28, 2014 |
10. Warranty and Support
For information regarding the warranty of your APDTY 859099 Power Window Regulator and Motor Assembly, please refer to the specific warranty terms provided by APDTY or the retailer from whom you purchased the product. Warranty details are typically available on the manufacturer's official website or through your purchase documentation.
For technical support or further assistance, please contact APDTY customer service or the seller directly. Have your product model number (859099) and purchase information ready when contacting support.
Ask a question about this manual
Ask about setup, troubleshooting, compatibility, parts, safety, or missing instructions. Manuals+ will review the question and use this page’s manual context to help answer it.