
1. Introduction
Thank you for choosing the Necchi M223 Mechanical Sewing Machine. This manual provides essential information for the safe and efficient operation, setup, maintenance, and troubleshooting of your new sewing machine. Please read these instructions carefully before using the machine and keep them for future reference.
The Necchi M223 is designed for various sewing tasks, offering reliability and ease of use for both beginners and experienced sewers.
2. Important Safety Instructions
When using an electrical appliance, basic safety precautions should always be followed, including the following:
- Read all instructions before using this sewing machine.
- Keep fingers away from all moving parts. Special care is required around the sewing machine needle.
- Always use the correct needle plate. The wrong plate can cause the needle to break.
- Do not use bent needles.
- Turn the sewing machine off when making any adjustments in the needle area, such as threading the needle, changing the needle, threading the bobbin, or changing the presser foot.
- Always unplug the sewing machine from the electrical outlet when removing covers, lubricating, or when making any other user servicing adjustments mentioned in the instruction manual.
- Never drop or insert any object into any opening.
- Do not use outdoors.
- Do not operate where aerosol (spray) products are being used or where oxygen is being administered.
- To disconnect, turn all controls to the off position, then remove the plug from the outlet.
- Do not unplug by pulling on the cord. To unplug, grasp the plug, not the cord.
3. Product Features
The Necchi M223 sewing machine is equipped with features designed for versatile and convenient sewing:
- Stitch Operations: 18 distinct stitch operations.
- Stitch Types: Includes 25 straight stitches, zigzag stitches, elastic stitches, and decorative stitches.
- Hook Type: Vertical oscillating hook system.
- Buttonhole: Integrated 4-step buttonhole function.
- Presser Foot: Fixed presser foot pressure for consistent fabric feeding.
- Free Arm: Allows for easy sewing of cylindrical items like sleeves and pant hems.
- Speed Control: Electronic pedal for precise speed adjustment.
- Stitch Length: Micrometric adjustment for stitch length.
- Power Type: Electromechanical operation.
- Accessories: Comes with a protective case.
- Color: White finish.
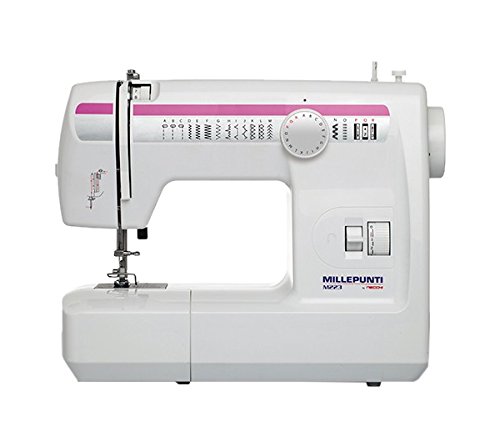
This image shows the Necchi M223 mechanical sewing machine in white, highlighting its compact design and main controls.
4. Setup
Before you begin sewing, ensure your machine is properly set up.
4.1 Unpacking and Placement
- Carefully remove the machine from its packaging. Retain all packaging materials for storage or transport.
- Place the machine on a stable, flat surface with adequate lighting.
- Ensure there is enough space around the machine for fabric handling.
4.2 Power Connection
- Connect the foot controller plug to the machine's power socket.
- Plug the power cord into a suitable electrical outlet.
- Ensure the voltage matches your local power supply.
4.3 Winding the Bobbin
- Place a spool of thread on the spool pin.
- Follow the winding path indicated on the machine for bobbin winding.
- Place an empty bobbin onto the bobbin winder spindle and push it to the right.
- Press the foot controller to wind the thread onto the bobbin. Stop when the bobbin is full.
4.4 Threading the Machine
- Raise the presser foot lever.
- Follow the numbered threading path from the spool pin down to the needle.
- Ensure the thread is correctly seated in all tension discs and guides.
- Thread the needle from front to back.
- Insert the wound bobbin into the bobbin case under the needle plate, ensuring the thread feeds correctly.
5. Operating Instructions
This section covers basic operation of your Necchi M223 sewing machine.
5.1 Selecting a Stitch
- Turn the stitch selector dial to choose your desired stitch pattern. Refer to the stitch chart on the machine or in this manual.
- Adjust the stitch length dial for shorter or longer stitches as needed.
5.2 Starting to Sew
- Place your fabric under the presser foot.
- Lower the presser foot lever.
- Gently press the foot controller to start sewing. The harder you press, the faster the machine will sew.
- Guide the fabric gently; do not pull or push it forcefully.
5.3 Reverse Sewing
- To reinforce seams, press and hold the reverse lever/button. The machine will sew backward.
- Release the lever/button to resume forward sewing.
5.4 Finishing a Seam
- Sew a few reverse stitches at the end of your seam to secure it.
- Raise the needle to its highest position.
- Raise the presser foot lever.
- Pull the fabric towards the back of the machine and cut the threads using the thread cutter on the machine or scissors.
6. Maintenance
Regular maintenance ensures the longevity and optimal performance of your sewing machine.
6.1 Cleaning
- Always unplug the machine before cleaning.
- Remove the needle plate and bobbin case.
- Use a small brush to remove lint and dust from the bobbin area and feed dogs.
- Wipe the exterior of the machine with a soft, dry cloth. Do not use harsh chemicals.
6.2 Oiling (if applicable)
- Consult a qualified service technician for specific oiling instructions if your machine requires it. Over-oiling can cause issues.
6.3 Needle Replacement
- Turn off and unplug the machine.
- Loosen the needle clamp screw.
- Remove the old needle and insert a new one, ensuring the flat side of the needle faces the back of the machine.
- Tighten the needle clamp screw securely.
7. Troubleshooting
Here are some common issues and their potential solutions:
| Problem | Possible Cause | Solution |
|---|---|---|
| Machine not sewing | Machine unplugged, power switch off, bobbin winder engaged. | Check power connection, turn on switch, disengage bobbin winder. |
| Skipped stitches | Incorrect needle, bent needle, improper threading, wrong needle size for fabric. | Change needle, re-thread machine, use correct needle for fabric type. |
| Thread breaking | Incorrect threading, tension too tight, poor quality thread, bent needle. | Re-thread machine, adjust tension, use good quality thread, replace needle. |
| Fabric not feeding | Presser foot not lowered, feed dogs clogged with lint, stitch length set to zero. | Lower presser foot, clean feed dogs, adjust stitch length. |
| Noisy operation | Lack of lubrication, lint in bobbin area, loose parts. | Clean and lubricate (if applicable), check for loose screws. |
If you encounter a problem not listed here or cannot resolve an issue, please contact customer support or a qualified service technician.
8. Specifications
| Feature | Detail |
|---|---|
| Brand | Necchi |
| Model Number | M223 |
| Color | White |
| Package Dimensions | 43 x 34 x 24 cm |
| Item Weight | 4 Kilograms |
| Power Source | Electromechanical |
| Is Electric | Yes |
| International Article Code | 08031204113359 |
9. Warranty and Support
Specific warranty information for the Necchi M223 sewing machine is typically provided with your purchase documentation. Please refer to the warranty card or contact your retailer for details regarding warranty coverage and duration.
For technical support, spare parts, or service inquiries, please contact Necchi customer service or an authorized service center. Contact information can usually be found on the manufacturer's website or in your purchase documentation.


