
1. Introduction
The FloodStop Washing Machine Leak Detector Kit is designed to provide automatic water shut-off and alert you to potential leaks from your washing machine. This system helps prevent significant water damage by detecting even small leaks and promptly stopping the water supply. It features audible and visual alarms for immediate notification.
2. Package Contents
Your FloodStop Washing Machine Leak Detector Kit includes the following components:
- Control Unit
- Two 3/4" 90-degree Motorized Ball Valves (Hot & Cold)
- Water Leak Sensor
- Power Adapter (AC/DC)
- Mounting Hardware (screws, anchors)
- Instruction Manual
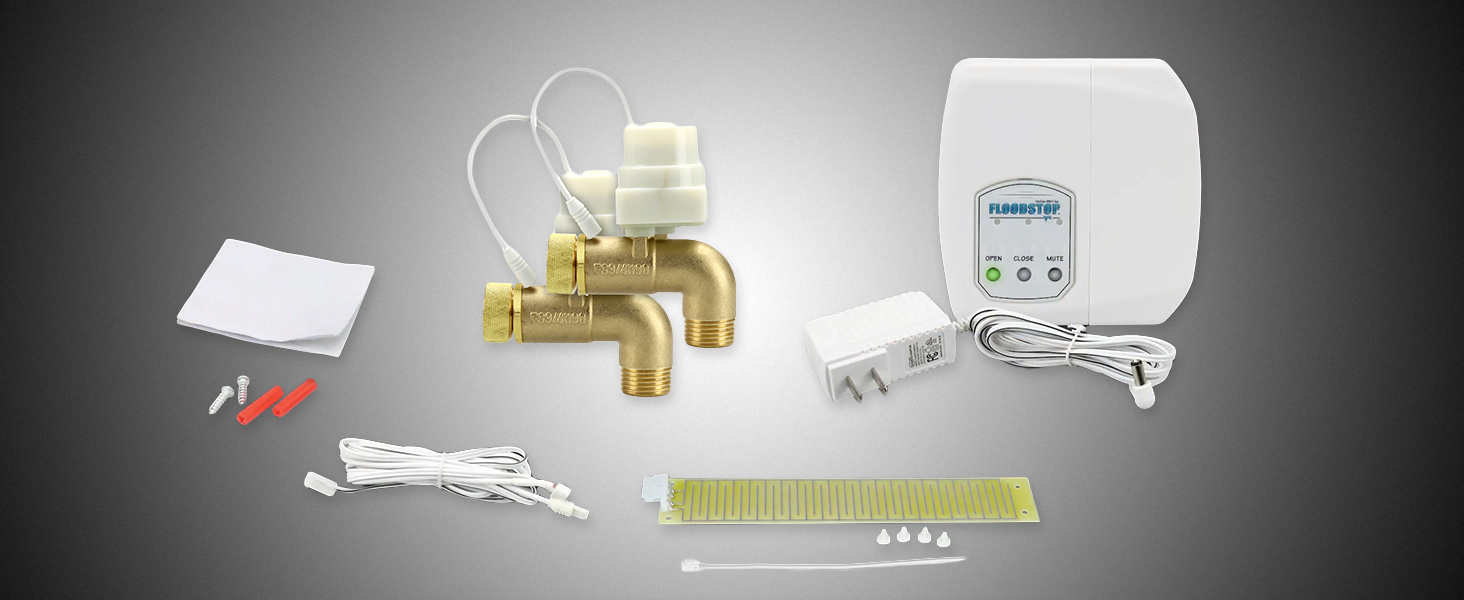
Image: Overview of the FloodStop Washing Machine Leak Detector Kit components, including the control unit, two 90-degree valves, a water sensor, power adapter, and mounting hardware.

Image: Close-up of the two 3/4 inch 90-degree motorized ball valves included in the kit.
3. Installation
Installation of the FloodStop system is designed to be straightforward, typically taking about 15 minutes. Follow these steps carefully:
- Turn Off Water Supply: Locate the main water shut-off valve for your washing machine (or the entire house) and turn it off.
- Disconnect Hoses: Disconnect the existing hot and cold water supply hoses from the washing machine's water inlet valves.
- Install Motorized Valves: Thread the FloodStop motorized ball valves onto the washing machine's hot and cold water inlet valves. Ensure a tight, leak-free connection. Use plumber's tape if necessary.
- Connect Washing Machine Hoses: Reconnect your washing machine's water supply hoses to the outlets of the newly installed FloodStop motorized valves.
- Mount Control Unit: Mount the control unit on a wall near the washing machine using the provided mounting hardware. Ensure it is easily accessible.
- Connect Valves to Control Unit: Plug the cables from the motorized valves into the designated ports on the control unit.
- Place Water Sensor: Position the water leak sensor on the floor directly beneath or behind the washing machine, in an area where a leak would most likely occur. Ensure the sensor is facing upwards.
- Connect Power: Plug the power adapter into the control unit and then into a standard electrical outlet. The unit can also operate with 4 AA batteries as a backup power source.
- Restore Water Supply: Slowly turn the main water supply back on and check for any leaks at the connections.

Image: The FloodStop control unit is mounted on the wall above a washing machine, showing its placement in a laundry area.

Image: A FloodStop water sensor is placed on the floor next to a toilet, demonstrating typical sensor placement in a potential leak area.
Video: This video demonstrates the step-by-step process of connecting the valves and sensors to the main controller unit for the FloodStop leak detection system.
Video: This video illustrates the installation of a HydroCheck WaterWatcher leak detector with a washing machine, demonstrating how to plug in the unit and position the sensor. While this video features a HydroCheck product, the installation principles for a plug-in leak detector are similar.
4. Operating Instructions
The FloodStop system operates automatically to protect your home from water damage.
Automatic Leak Detection and Shut-Off:
- When the water sensor detects moisture, the control unit will immediately trigger an audible alarm (87 Decibels) and a visual alarm (flashing LED indicators).
- Simultaneously, the motorized ball valves will automatically close, stopping the water flow to the washing machine.
Manual Control:
The control unit features three buttons for manual operation:
- OPEN: Press this button to manually open the water valves, restoring water flow. The 'OPEN' indicator light will illuminate.
- CLOSE: Press this button to manually close the water valves, stopping water flow. The 'CLOSE' indicator light will illuminate. This is useful when going on vacation or when the appliance is not in use for extended periods.
- MUTE: Press this button to silence the audible alarm after a leak has been detected and addressed. The visual alarm will continue until the system is reset.

Image: The FloodStop control unit displaying its status indicator lights for Open, Close, and Mute functions.

Image: A close-up view of the FloodStop motorized valve in the open position, allowing water to flow through.

Image: A close-up view of the FloodStop motorized valve in the closed position, blocking water flow.
Video: This video provides an overview of the FloodStop leak detection system, highlighting its automatic shut-off capabilities and how it protects against water damage.
5. Maintenance
Battery Replacement (Optional):
The FloodStop control unit can use 4 AA batteries for backup power. If the unit is not connected to AC power or if AC power is lost, the batteries will power the system. Replace batteries as needed to ensure continuous protection.
Video: This video guides you through the process of replacing the battery in a GoveeLife water leak detector. While this video features a GoveeLife product, the general steps for battery replacement in similar leak detectors are applicable.
General Care:
- Keep the water sensor clean and free from debris to ensure accurate detection.
- Periodically check all water connections for tightness.
- Test the system periodically by placing a small amount of water on the sensor to confirm functionality.
6. Troubleshooting
- System Not Responding: Ensure the power adapter is securely plugged in and the outlet is functional. Check the optional AA batteries if used.
- False Alarm: Verify the water sensor is dry and free from any moisture or condensation. Reposition the sensor if it is in an area prone to false triggers.
- Valves Not Opening/Closing: Check all cable connections between the control unit and the valves. Ensure the control unit has power.
- Continuous Alarm: If the alarm continues after addressing a leak, press the 'MUTE' button and then the 'OPEN' button to reset the system.
- Fault Codes: Refer to the detailed product manual for specific E0-E5 fault codes and their corresponding troubleshooting steps.
7. Specifications
| Feature | Specification |
|---|---|
| Brand | FloodStop |
| Model | 3/4" 90deg |
| Power Source | AC/DC, 4 AA Optional |
| Voltage | 6 Volts |
| Audible Noise | 87 Decibels |
| Mounting Type | Wall Mount |
| Sensor Technology | Contact Sensor |
| Product Dimensions | 11.75"L x 2"W x 7.75"H |
| Item Weight | 3.14 Pounds |
| Compliance | AB1953, NSF 61 lead-free, ICC-ES Listed (PMG-1511), IPC, IRC, UPC, National Plumbing Code of Canada (NPC) |
8. Warranty and Support
This FloodStop product is manufactured by IPS Corporation. For warranty information, technical support, or to purchase replacement parts, please refer to the official FloodStop website or contact customer service directly.
For further assistance, visit the FloodStop Store on Amazon.