1. Introduction
The Coby Car Dash Cam (Model DCHD101-V2) is designed to provide reliable video recording of your driving experience. Equipped with a 1080P Full HD camera, 4x digital zoom, and a 140° wide-angle lens, it captures clear footage. Key features include LED night vision, automatic motion detection, and G-sensor collision detection for enhanced security. The device features a 2.7-inch LCD screen for on-spot playback and supports MicroSD cards up to 32GB.
This manual provides detailed instructions for the proper installation, operation, and maintenance of your Coby Car Dash Cam to ensure optimal performance and longevity.
2. What's in the Box
- Coby Car Dash Cam Unit
- Suction Mount
- Car Charger (Power Cable)
- USB Cable
- User Manual (this document)
3. Product Overview
Familiarize yourself with the components and controls of your Coby Car Dash Cam.
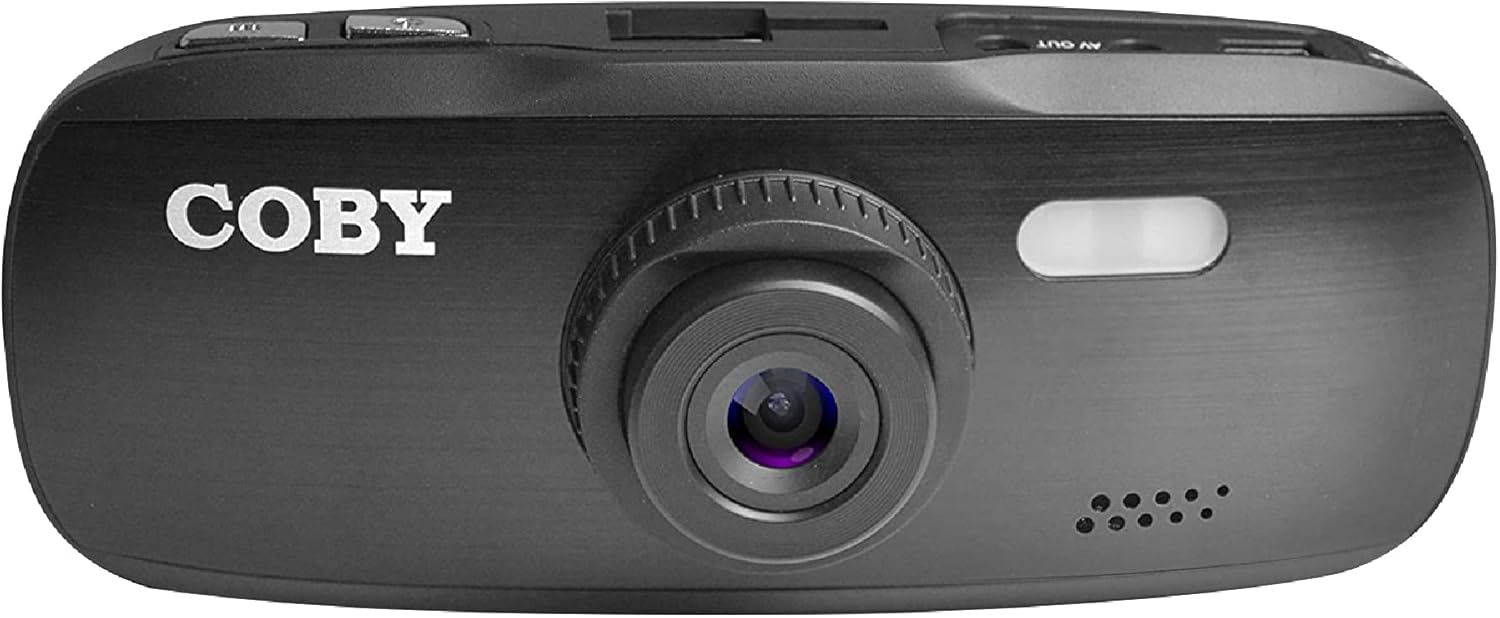
Figure 3.1: Front View of the Dash Cam. This image displays the front of the Coby dash cam, highlighting the main camera lens and the Coby brand logo.

Figure 3.2: Rear View with LCD Screen and Controls. The back of the dash cam is shown, featuring the 2.7-inch LCD screen displaying a scenic road, flanked by control buttons on both sides.

Figure 3.3: Side View with Ports and Slots. This image illustrates the side of the dash cam, detailing the MicroSD card slot, AV Out port, and Micro USB port for connectivity.
3.1. Components and Controls
- Camera Lens: Main lens for video recording.
- LCD Screen: 2.7-inch display for live view, playback, and menu navigation.
- Power Button: Turns the device on/off.
- Menu Button: Accesses system settings.
- Mode Button: Switches between video recording, still photo, and playback modes.
- REC Button: Starts/stops video recording.
- Up/Down Buttons: Navigate menu options and adjust settings.
- MicroSD Card Slot: Insert your MicroSD card (up to 32GB, Class 10 recommended).
- Micro USB Port: For power supply and data transfer to a computer.
- AV Out Port: For connecting to an external display.
- Speaker/Microphone: For audio recording and playback.
4. Setup
4.1. Installing the Suction Mount
- Clean the windshield area where you intend to mount the dash cam. Ensure it is free of dust and grease for optimal suction.
- Attach the suction mount to the dash cam by sliding it into the top mount slot until it clicks securely.
- Press the suction cup firmly against the cleaned windshield and push down the lever on the mount to secure it.
- Adjust the angle of the dash cam to ensure a clear view of the road ahead, avoiding obstruction from the rearview mirror or other vehicle components.

Figure 4.1: Dash Cam Mounted in a Vehicle. This image shows the dash cam securely mounted on the windshield, providing a clear view of the road from the driver's seat.
4.2. Inserting the MicroSD Card
- Locate the MicroSD card slot on the side of the dash cam.
- Insert a Class 10 or higher MicroSD card (up to 32GB) into the slot with the gold contacts facing the back of the camera until it clicks into place.
- To remove, gently push the card in until it springs out.
- Note: It is recommended to format the MicroSD card within the dash cam before first use and periodically thereafter to ensure stable recording.
4.3. Power Connection
- Connect the provided car charger to the Micro USB port on the dash cam.
- Plug the other end of the car charger into your vehicle's 12V power outlet (cigarette lighter socket).
- The dash cam is designed to automatically power on and begin recording when the vehicle's ignition is turned on, and power is supplied. It will also automatically power off shortly after the ignition is turned off.
5. Operating Instructions
5.1. Basic Recording
- Once powered on, the dash cam will automatically start recording in a continuous loop.
- The recording indicator (usually a red dot or flashing icon) will appear on the screen.
- To manually stop recording, press the REC button. Press it again to resume recording.
- Loop Recording: The dash cam records video in segments (e.g., 1, 3, or 5 minutes). When the MicroSD card is full, the oldest unlocked files will be overwritten by new recordings.
5.2. G-Sensor (Emergency Recording)
- The built-in G-sensor detects sudden movements, such as hard braking, impacts, or sharp turns.
- When triggered, the current video segment will be automatically locked and saved to prevent it from being overwritten by loop recording.
- These locked files are typically stored in a separate folder on the MicroSD card (e.g., "EVENT" or "EMERGENCY").
5.3. Motion Detection
- When enabled in the settings, the dash cam can automatically start recording when motion is detected in front of the lens, even when the vehicle is parked.
- This feature is useful for monitoring your vehicle while it is stationary.
- Note: Continuous use of motion detection while parked may drain your vehicle's battery if not connected to a constant power source or a dedicated hardwire kit.
5.4. Menu Settings and Playback
- Accessing Menu: While not recording, press the MENU button to enter the settings menu.
- Navigating Menu: Use the Up and Down arrow buttons to scroll through options.
- Selecting Options: Press the REC button (often functions as OK/Confirm) to select an option or enter a sub-menu.
- Exiting Menu: Press the MENU button again to exit the menu.
- Switching Modes: Press the MODE button to switch between Video Recording, Still Photo, and Playback modes.
- Playback: In Playback mode, use the Up and Down buttons to select a file, then press REC to play.
- Date/Time Stamp: Ensure the date and time are correctly set in the menu for accurate recording timestamps.
6. Maintenance
- Cleaning the Lens and Screen: Use a soft, lint-free cloth to gently wipe the camera lens and LCD screen. Avoid abrasive materials or chemical cleaners that could damage the surfaces.
- MicroSD Card Management:
- Format the MicroSD card regularly (e.g., once a month) using the dash cam's format function. This helps maintain card performance and prevents data corruption.
- Replace the MicroSD card periodically (e.g., every 6-12 months, depending on usage) as continuous overwriting can degrade its lifespan.
- Temperature Considerations: Avoid exposing the dash cam to extreme temperatures for prolonged periods. High temperatures can affect battery life and device performance.
7. Troubleshooting
| Problem | Possible Cause | Solution |
|---|---|---|
| Dash cam does not power on. | No power supply; low internal battery; faulty power cable. |
|
| Dash cam turns off unexpectedly or overheats. | Poor power connection; faulty MicroSD card; extreme ambient temperature. |
|
| "Card Error" or "Please Insert Card" message. | MicroSD card not inserted correctly; card corrupted; incompatible card. |
|
| Cannot access menu settings or buttons unresponsive. | Device is recording; temporary software glitch. |
|
| Suction mount does not stick. | Dirty windshield; cold temperature; worn suction cup. |
|
8. Specifications
| Feature | Detail |
|---|---|
| Model Name | DCHD101 |
| Item Model Number | DCHD101-V2 |
| Video Capture Resolution | 1080p Full HD (30 FPS), 720p (60 FPS) |
| Camera Megapixels | 5.0 Megapixel |
| Lens Angle | 140 Degree Wide Angle |
| Digital Zoom | 4x |
| Display Type | 2.7" HD Wide Screen LCD |
| Storage Support | Up to 32GB MicroSDHC card (not included) |
| Special Features | G-Sensor, Loop Recording, LED Night Vision, Automatic Motion Detection |
| Mounting Type | Suction Mount |
| Connectivity Technology | Auxiliary (Micro USB, AV Out) |
| Item Weight | 3.2 ounces |
| Product Dimensions | 4.3 x 1.3 x 1.8 inches |
| Manufacturer | Summit Electronics, LLC |
9. Warranty and Support
9.1. Warranty Information
This Coby Car Dash Cam (Model DCHD101-V2) comes with a 30-day manufacturer's warranty from the date of purchase. This warranty covers defects in materials and workmanship under normal use. It does not cover damage caused by misuse, accident, unauthorized modification, or external causes.
Please retain your proof of purchase for warranty claims.
9.2. Customer Support
For technical assistance, troubleshooting, or warranty inquiries, please contact Coby customer support. You may find contact information on the official Coby website or through the retailer where the product was purchased.
You can also visit the official Coby store on Amazon for more information and product updates: Coby Amazon Store.


