
1. Introduction
This manual provides essential information for the proper installation, operation, and maintenance of your Master-Bilt MBCB60 Fusion Chef Stand. Please read these instructions thoroughly before operating the unit to ensure safe and efficient performance. Retain this manual for future reference.
2. Safety Information
Observe all safety precautions to prevent injury and damage to the unit. This appliance is intended for commercial use only.
- Electrical Safety: Ensure the unit is connected to a grounded 115 Volt electrical supply. Do not use extension cords. Disconnect power before any service or cleaning.
- Ventilation: Maintain adequate clearance around the refrigeration unit for proper airflow. Blocking vents can lead to overheating and reduced efficiency.
- Weight Capacity: Do not exceed the maximum weight capacity of the chef stand top surface. Refer to specifications for details.
- Flammable Materials: Do not store flammable or explosive materials inside or near the unit.
- Moving the Unit: Use caution when moving the unit, especially on uneven surfaces. Ensure casters are locked once in position.
3. Product Overview
The Master-Bilt MBCB60 Fusion Chef Stand is a robust, stainless steel refrigerated base designed for commercial kitchens. It features two spacious drawers for cold storage and a durable top surface suitable for supporting cooking equipment.
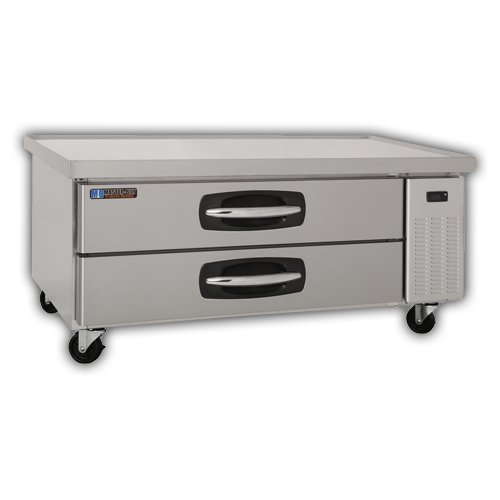
Key Components:
- Stainless Steel Exterior: Durable and easy to clean.
- Refrigerated Drawers: Two pull-out drawers for organized cold storage.
- Casters: Four heavy-duty casters for mobility, with locking mechanisms.
- Control Panel: (Typically located near the refrigeration unit) For temperature adjustment and display.
- Condenser Unit: Located on the right side, responsible for cooling.
4. Setup and Installation
4.1 Unpacking
- Carefully remove all packaging materials, including any protective films or tapes.
- Inspect the unit for any shipping damage. Report any damage immediately to your supplier.
4.2 Placement
- Position the chef stand on a level, sturdy surface capable of supporting its weight plus the weight of any equipment placed on top.
- Ensure adequate ventilation. Maintain a minimum of 4 inches (10 cm) clearance from walls or other equipment on all sides, especially around the condenser unit.
- Avoid direct sunlight or proximity to heat-generating appliances (ovens, fryers) to optimize performance.
- Lock the casters once the unit is in its final position.
4.3 Electrical Connection
- Connect the unit to a dedicated 115 Volt, 60 Hz, single-phase grounded electrical outlet.
- Do not use adapter plugs or extension cords.
- Verify that the power supply matches the requirements listed on the unit's data plate.
4.4 Initial Cleaning
- Before first use, clean the interior and exterior surfaces with a mild soap and water solution. Rinse thoroughly and dry.
5. Operating Instructions
5.1 Powering On
- After connecting to power, the unit will typically power on automatically or require a press of the power button on the control panel.
- Allow the unit to run for several hours empty to reach the desired temperature before loading with food products.
5.2 Temperature Control
- The digital control panel allows for precise temperature adjustment. Refer to the specific controller's instructions for detailed programming.
- Recommended operating temperature for food safety is typically between 33°F and 41°F (0.5°C and 5°C).
5.3 Loading Drawers
- Load drawers evenly to ensure proper airflow and temperature distribution.
- Do not block internal air vents.
- Ensure drawers are fully closed after each use to maintain temperature and energy efficiency.
6. Maintenance and Cleaning
Regular maintenance ensures optimal performance and extends the lifespan of your chef stand.
6.1 Daily Cleaning
- Wipe down interior and exterior stainless steel surfaces with a soft cloth and mild, non-abrasive cleaner.
- Clean drawer gaskets to ensure a tight seal.
6.2 Monthly Cleaning (or as needed)
- Condenser Coil: Disconnect power. Carefully clean the condenser coil using a brush or vacuum cleaner to remove dust and debris. A dirty coil reduces efficiency and can lead to compressor failure.
- Drain Pan: Inspect and clean the drain pan to prevent blockages and odors.
7. Troubleshooting
Before contacting service, review these common issues and solutions.
| Problem | Possible Cause | Solution |
|---|---|---|
| Unit not cooling | Power supply issue Dirty condenser coil Door/drawer not sealed Thermostat setting | Check power connection and circuit breaker Clean condenser coil Ensure drawers are fully closed; check gaskets Adjust thermostat to lower setting |
| Excessive noise | Loose components Fan obstruction Unit not level | Inspect for loose parts and tighten Check fan for obstructions Level the unit using caster adjustments |
| Water on floor | Clogged drain line Excessive humidity | Clear drain line Ensure drawers are closed; reduce ambient humidity if possible |
8. Specifications
| Feature | Detail |
|---|---|
| Model | MBCB60 (02-72539) |
| Brand | Master-Bilt |
| Product Dimensions (W x D x H) | 60 x 31 x 25.5 inches |
| Item Weight | 250 Pounds |
| Capacity | 9.8 Cubic Feet |
| Electrical Requirements | 115 Volts |
| Material | Stainless Steel |
| Installation Type | Freestanding |
9. Warranty and Support
For warranty information, technical support, or service inquiries, please contact Master-Bilt customer service or your authorized dealer. Keep your purchase receipt and model number (MBCB60) readily available when contacting support.
Master-Bilt Contact Information: Refer to the official Master-Bilt website or product documentation for the most current contact details.