
1. Introduction
The Strymon Deco effects pedal is designed to recreate the distinctive sound and feel of vintage tape machines from the 1950s and 1960s. It integrates two primary effects sections: Tape Saturation and Doubletracker, allowing users to achieve a wide range of classic tape-inspired tones directly within their pedalboard setup.

Image: An angled view of the Strymon Deco pedal, highlighting its robust metal casing and the arrangement of its control knobs and footswitches. The bronze finish is visible, along with the Strymon logo and the "tape saturation & doubletracker" subtitle.
The Tape Saturation section provides natural compression, musical harmonic saturation, and transparent overdrive, enriching the audio signal with added warmth and low-end presence. The Doubletracker section offers versatile modulation effects, including slapback echoes, psychedelic flanger, and lush chorus sounds, by simulating the subtle variations of two synchronized tape decks.
2. Setup
Before operating your Strymon Deco, ensure proper connections and power supply. This section guides you through the initial setup process.
2.1 Power Requirements
- The Strymon Deco requires a standard 9V DC power supply with a center-negative barrel connector.
- A minimum current supply of 300mA is recommended for optimal performance. Using an underpowered supply may result in unexpected behavior or damage.
- Always use a regulated power supply to prevent noise and ensure stable operation.
2.2 Connecting Your Pedal
Connect your instrument and amplifier to the Deco using standard 1/4-inch instrument cables. The pedal supports both mono and stereo configurations.

Image: Rear view of the Strymon Deco pedal. This image displays the input and output jacks, the expression pedal input, and the 9V DC power input. The input jack is labeled "INPUT", the expression pedal jack "EXP", and the output jacks "LEFT OUT" and "RIGHT OUT". The power input is labeled "9VDC".
- Input: Connect your guitar or other instrument to the INPUT jack.
- Output: Connect the LEFT OUT jack to your amplifier or the next pedal in your signal chain for mono operation. For stereo, connect both LEFT OUT and RIGHT OUT to two separate amplifiers or a stereo input device.
- EXP (Expression Pedal): An optional expression pedal can be connected here to control various parameters in real-time. Refer to the Strymon website for compatible expression pedals and configuration details.
- 9VDC: Connect your 9V DC center-negative power supply to this jack.
3. Operating Instructions
The Strymon Deco features intuitive controls for both its Tape Saturation and Doubletracker sections. Familiarize yourself with the knobs and switches to unlock its full potential.
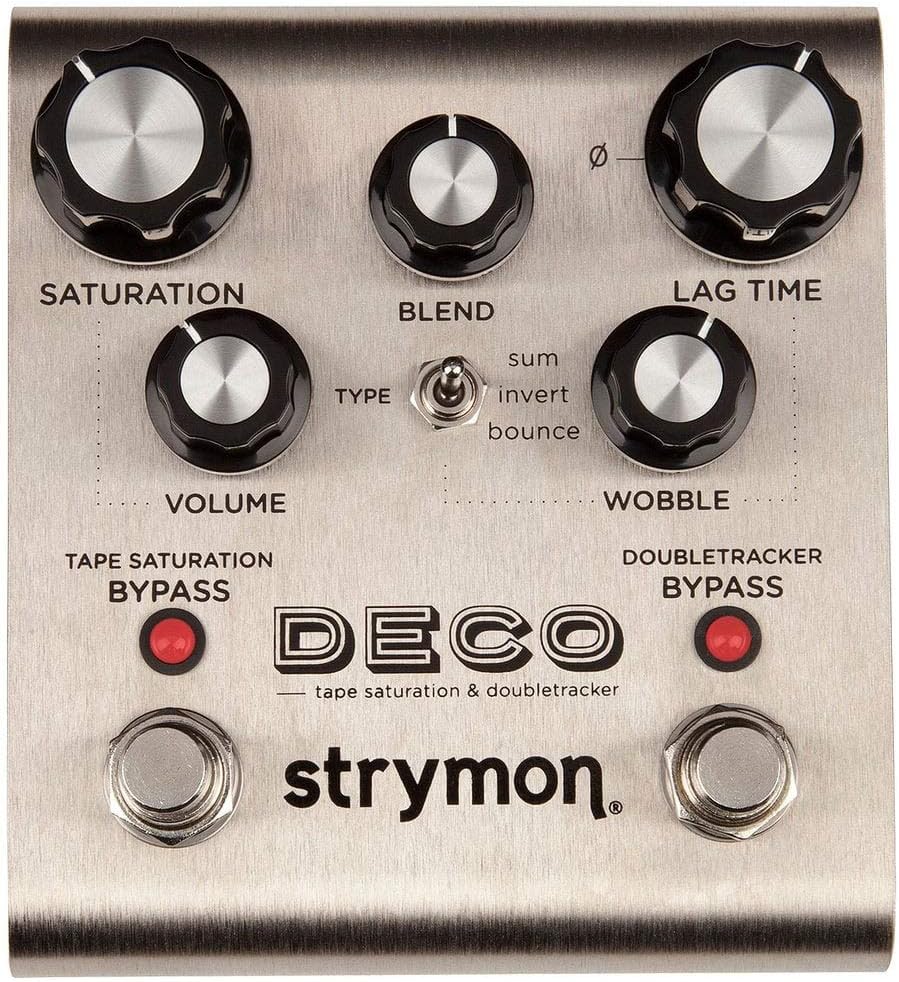
Image: Top view of the Strymon Deco pedal. This image shows the layout of all control knobs, the toggle switch, and the footswitches. From top left to right: SATURATION, BLEND, LAG TIME. Below these: VOLUME, TYPE switch, WOBBLE. At the bottom are the TAPE SATURATION BYPASS and DOUBLETRACKER BYPASS footswitches.
3.1 Tape Saturation Section Controls
This section emulates the characteristics of tape compression and saturation, adding warmth and harmonic richness to your sound.
- SATURATION Knob: Controls the amount of tape saturation and compression. Turning it clockwise increases the effect, leading to more harmonic richness, natural compression, and transparent overdrive.
- VOLUME Knob: Adjusts the overall output level of the Tape Saturation section. Use this to match the volume with your bypassed signal or to provide a slight boost.
- TAPE SATURATION BYPASS Footswitch: Engages or bypasses the Tape Saturation effect. The corresponding LED indicates whether the effect is active (lit) or bypassed (off).
3.2 Doubletracker Section Controls
The Doubletracker section simulates the effects created by running two tape machines slightly out of sync, offering chorus, flanger, and slapback echo effects.
- LAG TIME Knob: Adjusts the delay time between the two virtual tape machines. Lower settings produce chorus and flanger effects, while higher settings create slapback echoes.
- WOBBLE Knob: Controls the amount of random pitch modulation, simulating the "wow and flutter" inherent in analog tape playback. Turning it clockwise increases the intensity of this modulation.
- BLEND Knob: Mixes the dry signal with the doubletracked signal. At minimum, only the dry signal is heard. At maximum, the doubletracked signal is most prominent.
- TYPE Switch: Selects the mode of the Doubletracker effect:
- SUM: Standard doubletracking, creating chorus and flanger effects.
- INVERT: Inverts the phase of the doubletracked signal, leading to more pronounced flanger effects.
- BOUNCE: Creates a unique bouncing delay effect, often used for rhythmic textures.
- DOUBLETRACKER BYPASS Footswitch: Engages or bypasses the Doubletracker effect. The corresponding LED indicates whether the effect is active (lit) or bypassed (off).
4. Maintenance
Proper care and maintenance will ensure the longevity and optimal performance of your Strymon Deco pedal.
- Cleaning: Use a soft, dry cloth to clean the pedal's exterior. Avoid abrasive cleaners or solvents, as these can damage the finish and internal components.
- Storage: Store the pedal in a cool, dry place away from direct sunlight and extreme temperatures. If transporting, use a padded case to protect it from physical shock.
- Power Supply: Always disconnect the power supply when the pedal is not in use for extended periods. Ensure the power supply cable is not crimped or damaged.
- Connections: Periodically check all cable connections for wear and tear. Replace damaged cables to prevent signal loss or intermittent operation.
5. Troubleshooting
If you encounter issues with your Strymon Deco, refer to the following common troubleshooting steps.
| Problem | Possible Cause | Solution |
|---|---|---|
| No sound or weak signal | Incorrect cable connections, faulty cables, incorrect power supply, pedal bypassed. |
|
| Unwanted noise or hum | Unregulated power supply, ground loop, interference from other electronics. |
|
| LEDs not lighting up | No power, incorrect power supply, internal fault. |
|
6. Specifications
Detailed technical specifications for the Strymon Deco effects pedal.
- Model Number: Deco
- Dimensions: 20 x 11 x 9 cm (7.87 x 4.33 x 3.54 inches)
- Weight: 620 grams (1.37 lbs)
- Material: Metal chassis
- Color: Bronze
- Power Requirements: 9V DC, center-negative, 300mA minimum
- Hardware Interface: 1/4 inch Audio jacks
- Signal Format: Analog
- Controls: Knobs for Saturation, Volume, Blend, Lag Time, Wobble; Toggle switch for Type; Footswitches for Tape Saturation Bypass and Doubletracker Bypass.
7. Warranty and Support
For detailed warranty information, product registration, and technical support, please visit the official Strymon website.
Strymon provides comprehensive resources including FAQs, firmware updates, and contact options for customer assistance. Always refer to the official website for the most current and accurate information regarding your product's warranty and support services.
Official Website: www.strymon.net


