
1. Introduction
This manual provides essential information for the safe and efficient installation, operation, and maintenance of the Legrand MicroRex W31 Mechanical Clock Timer (Model 412814). This device is designed for weekly programming of electrical circuits, featuring a 7-day program and a synchronous motor for reliable timing.
2. Safety Information
Always observe the following safety precautions to prevent personal injury or damage to the device:
- Installation and maintenance must be performed by a qualified electrician in accordance with national wiring regulations.
- Ensure the power supply is disconnected before commencing any installation or wiring work.
- Do not expose the device to moisture or extreme temperatures outside its specified operating range.
- Verify all connections are secure and correctly wired before restoring power.
3. Product Overview
The Legrand MicroRex W31 is a 3-module mechanical clock timer designed for series installation on a top-hat rail. It features a clear dial for setting weekly programs and robust terminals for electrical connections.

Figure 1: Front view of the Legrand MicroRex W31 Mechanical Clock Timer. This image shows the main dial for programming, the transparent protective cover, and the terminal connections at the bottom. Markings for voltage (230V 50Hz) and current (16A 250V) are visible.
4. Setup and Installation
The MicroRex W31 timer is designed for installation on a top-hat rail (DIN rail) within an electrical enclosure. It occupies 3 division units (modules) of 17.5 mm each.
4.1 Mounting
- Ensure the main power supply to the installation area is switched off.
- Clip the timer onto the top-hat rail. The device width is 3 x 17.5 mm.
- Surface mounting is also possible using an optional wall bracket and terminal cover (not included).
4.2 Wiring
The timer features a 1-changer contact. Refer to the wiring diagram on the device for specific connections. The rated voltage is 230 V, 50 Hz.
- Connect the incoming phase and neutral to the designated terminals.
- Connect the load to the appropriate output terminals (common, normally open, normally closed) as required for your application. The switching capacity is 16 A at 250 V/50 Hz.
- Ensure all terminal screws are tightened securely.
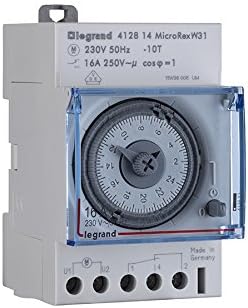
Figure 2: Side view of the Legrand MicroRex W31 Mechanical Clock Timer, illustrating the compact design and terminal block for electrical connections. This view helps in understanding the physical dimensions for installation.
5. Operating Instructions
The MicroRex W31 timer allows for weekly programming with a minimum switching time of 4 hours and a switching step of 2 hours.
5.1 Setting the Current Time
- Rotate the central dial clockwise until the current day and time align with the reference mark (usually an arrow or line on the housing).
5.2 Programming On/Off Times
The timer features a day dial with non-detachable segments. Each segment represents a 2-hour interval.
- To set an ON period, push the corresponding segments outwards.
- To set an OFF period, leave the corresponding segments in their inward position.
- The shortest programmable switching time is 4 hours (two segments).
- The switching accuracy is approximately +/- 30 minutes.
5.3 Manual Override
The timer includes a manual switch-on function. This allows you to temporarily override the programmed schedule. The timer will automatically revert to the programmed schedule at the next scheduled switching point.
6. Maintenance
The Legrand MicroRex W31 is designed for reliable, long-term operation with minimal maintenance.
- Cleaning: Use a soft, dry cloth to clean the exterior of the timer. Do not use abrasive cleaners or solvents.
- Operating Environment: Ensure the operating temperature remains within -10 °C to +55 °C. The device has a protection class of IP 20, meaning it is protected against solid objects over 12.5 mm but has no protection against liquids.
- Lid: The transparent lid is sealable to protect the settings from unauthorized changes or dust.
7. Troubleshooting
If the timer is not functioning as expected, consider the following:
- No Power: Check the circuit breaker or fuse supplying power to the timer. Ensure all wiring connections are secure.
- Incorrect Switching Times: Verify that the current time is correctly set on the dial. Check that the program segments are pushed in or out correctly for the desired ON/OFF periods.
- Timer Not Advancing: Ensure the synchronous motor is receiving power. If the timer is completely unresponsive, professional inspection may be required.
- Manual Override Issue: If the manual override is engaged, the timer will follow the manual setting until the next programmed switching point.
For persistent issues, contact Legrand customer support or a qualified electrician.
8. Specifications
| Feature | Specification |
|---|---|
| Model Number | 412814 |
| Type | Mechanical Clock Timer |
| Program | 7-Day (Weekly) |
| Rated Voltage | 230 V, 50 Hz |
| Switching Capacity | 16 A, 250 V/50 Hz (1 changer) |
| Switching Step | 2 hours |
| Shortest Switching Time | 4 hours |
| Switching Accuracy | +/- 30 minutes |
| Motor Type | Synchronous (grid gear accuracy) |
| Device Width | 3 division units (3 x 17.5 mm) |
| Operating Temperature | -10 °C to +55 °C |
| Protection Class | IP 20 |
| Dimensions (Product) | 3.94 x 2.17 x 3.35 inches |
| Item Weight | 4.6 ounces (130 Grams) |
| Material | Copper (internal components) |
9. Warranty and Support
For warranty information, please refer to the terms and conditions provided by Legrand at the time of purchase or visit the official Legrand website. For technical support, product inquiries, or assistance with troubleshooting, please contact Legrand customer service through their official channels.
