
1. Introduction
The SENCO S200BN 18 Gauge Brad Nailer is a robust and lightweight tool designed for precision fastening in various woodworking applications. It is engineered to drive 18-gauge brads into even the hardest woods, making it suitable for a wide range of finishing tasks.
Key features include an adjustable drive depth for precise fastener placement, a comfortable grip for extended use, and a no-mar pad to protect delicate work surfaces. The tool comes with a convenient carrying case for portability and storage.
This manual provides essential information for the safe and effective operation, maintenance, and troubleshooting of your SENCO S200BN brad nailer. Please read it thoroughly before using the tool.
Safety Information
Always prioritize safety when operating power tools. Failure to follow safety instructions can result in serious injury.
- Read the Manual: Understand all instructions and warnings before operation.
- Eye Protection: Always wear ANSI Z87.1 approved safety glasses with side shields.
- Hearing Protection: Use hearing protection in noisy environments.
- Disconnect Air: Disconnect the tool from the air supply before making adjustments, clearing jams, or performing maintenance.
- Proper Attire: Do not wear loose clothing or jewelry that could get caught in moving parts.
- Work Area: Keep the work area clean and well-lit. Keep bystanders away.
- Tool Condition: Do not operate a damaged tool. Inspect it before each use.
2. Setup
Connecting to Air Supply
- Ensure the air compressor is off and the air hose is depressurized.
- Connect a 1/4" NPT air hose to the tool's air inlet. Ensure a secure connection.
- Set the air compressor's output pressure to the recommended operating range (typically 70-120 PSI, refer to tool markings if present).
- Turn on the air compressor and allow it to build pressure.
Loading Fasteners
The S200BN uses 18-gauge brads. Fastener lengths typically range from 5/8" to 2" (16mm to 50mm).
- Disconnect the tool from the air supply.
- Locate the magazine latch at the rear of the magazine.
- Pull the magazine follower back until it locks in place.
- Insert a strip of 18-gauge brads into the magazine with the points facing down.
- Release the magazine follower, allowing it to push the brads forward.
- Ensure brads are seated correctly and move freely within the magazine.
Adjusting Drive Depth
The S200BN features an adjustable drive depth mechanism to control how deep the brad is driven into the material.
- Locate the depth adjustment dial or lever, usually near the nose of the tool.
- Turn the dial or move the lever to increase or decrease the drive depth. Test on a scrap piece of material to achieve the desired depth.
- For flush driving, adjust until the brad head is level with the surface. For countersinking, adjust further.
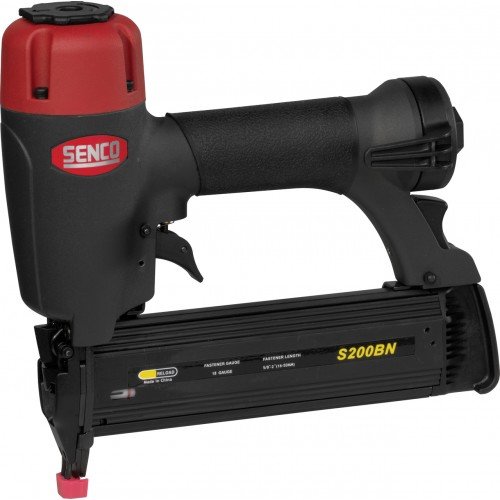
Image: The SENCO S200BN 18 Gauge Brad Nailer, showcasing its black body, red top, and yellow model designation on the magazine. This image provides a full view of the tool, highlighting its compact design and ergonomic grip.
3. Operating the Tool
Basic Operation
- Ensure the tool is connected to the air supply and loaded with fasteners.
- Hold the tool firmly against the workpiece, ensuring the nose is flush with the surface.
- Depress the safety contact element (if present) against the workpiece.
- Pull the trigger to drive a brad.
- Release the trigger and lift the tool from the workpiece.
Sequential Firing
The S200BN typically operates in sequential firing mode, meaning the safety contact must be depressed against the workpiece before the trigger can be pulled to drive a fastener. This enhances safety by preventing accidental firing.
Clearing Jams
If a brad jams in the tool:
- Immediately disconnect the tool from the air supply.
- Open the magazine and remove any remaining fasteners.
- Locate the jammed brad in the nosepiece. Use pliers or a small screwdriver to carefully remove the brad. Do not force it.
- Inspect the nosepiece for any damage before reloading and reconnecting the air supply.
4. Maintenance
Regular maintenance ensures the longevity and optimal performance of your SENCO S200BN.
Lubrication
Pneumatic tools require lubrication to keep internal components operating smoothly.
- Apply 3-5 drops of pneumatic tool oil into the air inlet daily before use, or after every few hours of continuous operation.
- Use only non-detergent pneumatic tool oil. Do not use motor oil or other lubricants.
Cleaning
- Keep the tool clean and free of debris. Use a clean, dry cloth to wipe down the exterior.
- Periodically clean the magazine to ensure smooth feeding of fasteners.
Air Filter and Regulator
- Ensure your air compressor system has a functioning air filter and regulator to prevent moisture and debris from entering the tool.
- Drain moisture from your air compressor tank daily.
5. Troubleshooting
This section addresses common issues you might encounter with your brad nailer.
| Problem | Possible Cause | Solution |
|---|---|---|
| Tool does not fire | No air supply Low air pressure No fasteners Safety contact not fully depressed | Check air hose connection Increase air pressure Load fasteners Ensure tool is firmly against workpiece |
| Brads not driven flush or countersunk | Low air pressure Depth adjustment incorrect Hard wood | Increase air pressure Adjust depth setting Ensure adequate pressure for material |
| Tool jams frequently | Incorrect fasteners Damaged fasteners Worn driver blade Lack of lubrication | Use correct 18-gauge brads Inspect fastener strips Contact service for repair Lubricate tool daily |
| Air leaks | Loose fittings Damaged O-rings/seals | Tighten connections Contact service for repair |
6. Specifications
- Model: S200BN
- Fastener Type: 18 Gauge Brad Nails
- Air Inlet: 1/4" NPT
- Manufacturer: SENCO
- ASIN: B00NSZNOT8
- First Available on Amazon.de: July 13, 2018
7. Warranty and Support
The SENCO S200BN comes with a 1-year warranty, as stated in the product description. This warranty covers defects in materials and workmanship under normal use.
For warranty claims, technical support, or service inquiries, please contact SENCO customer service or an authorized SENCO service center. Keep your proof of purchase for warranty validation.
For the most up-to-date support information, please visit the official SENCO website or refer to the documentation included with your product packaging.


