
1. Introduction
The Fitness Reality TR3000 Manual Treadmill is designed to provide an effective cardiovascular workout. This manual outlines the assembly, operation, maintenance, and safety guidelines to ensure proper use and longevity of your equipment. Please read this manual thoroughly before operating the treadmill.
2. Important Safety Information
Before using the Fitness Reality TR3000 Manual Treadmill, please observe the following safety precautions:
- Consult a physician before starting any exercise program.
- Always place the treadmill on a level, stable surface.
- Keep children and pets away from the treadmill during operation.
- Wear appropriate athletic footwear and clothing.
- Do not use the treadmill if you weigh over 325 lbs (147 kg).
- Hold onto the safety handles for balance, especially when starting or stopping.
- Ensure the treadmill is fully unfolded and locked before use, and properly folded for storage.
- Stop exercising immediately if you feel faint, dizzy, or experience pain.
3. Product Features
The Fitness Reality TR3000 Manual Treadmill includes several features designed to enhance your workout:
- High Weight Capacity: Tested to support users up to 325 lbs (147 kg).
- Dual Flywheels: Twin 6-inch diameter flywheels provide a smooth and consistent belt movement.
- Extended Tread Belt: Features a 16-inch wide by 45-inch long tread belt for comfortable walking or jogging.
- 'Pacer Control' Magnetic Tension: 8 levels of magnetic tension allow for varied workout intensity and help stabilize belt speed for hands-free walking.
- Adjustable Incline: Quick-release adjustments offer 3 incline positions: 8, 10, and 13 degrees.
- Heart Rate Monitoring: Integrated pulse pads on the handles allow for heart rate measurement.
- LCD Display: Tracks elapsed time, distance walked, calorie burn, speed, and heart rate.
- Safety Handles: Extra-long handles provide enhanced stability and balance.
- Foldable Design: Easily folds for convenient storage.
- Transportation Wheels: Built-in wheels for easy movement.
4. Assembly and Setup
The Fitness Reality TR3000 is designed for minimal assembly. Most components are pre-assembled out of the box.
4.1 Initial Setup
- Carefully remove the treadmill from its packaging.
- Unfold the treadmill frame until it locks securely into the upright position.
- Attach the computer console to the designated area on the handlebar post. Ensure all connections are secure.
- Insert the included batteries into the computer console.
4.2 Adjusting Incline
The treadmill offers three incline positions: 8, 10, and 13 degrees. To adjust the incline:
- Ensure the treadmill is not in use.
- Locate the quick-release incline adjustment mechanism near the rear of the treadmill deck.
- Lift the rear of the treadmill deck slightly and adjust the support bar to the desired incline setting. Ensure it locks firmly into place before use.

5. Operating Instructions
5.1 Using the Computer Console

The LCD display tracks your workout progress. It features buttons for MODE, SET, and RESET.
- MODE: Press to cycle through display functions: Time, Distance, Calories, Speed, and Heart Rate.
- SET: Used for setting target values for time, distance, or calories (refer to full manual for detailed programming).
- RESET: Press and hold to clear all current workout data.
The console also includes a storage area for a TV remote control or water bottle.
5.2 Magnetic Tension 'Pacer Control'
The magnetic tension dial, located on the console, allows you to adjust the resistance of the tread belt. This 'Pacer Control' feature helps stabilize the belt speed, enabling a more consistent workout, even hands-free.
- Turn the dial clockwise to increase tension (higher resistance).
- Turn the dial counter-clockwise to decrease tension (lower resistance).
- Start with a lower tension setting and gradually increase as your fitness level improves.
5.3 Heart Rate Monitoring

To measure your heart rate:
- Grasp the heart pulse pads on both safety handles with clean, dry hands.
- Maintain a steady grip. Your heart rate will be displayed on the LCD console after a few seconds.
- Ensure your hands are fully in contact with the metal sensors for an accurate reading.
5.4 Walking and Running Technique


The TR3000 is a manual treadmill, meaning the belt is powered by your own movement. This provides a more natural walking or running experience.
- Step onto the belt carefully, holding the safety handles.
- Begin walking slowly, allowing your feet to initiate the belt movement.
- Maintain a comfortable pace. The 'Pacer Control' can help maintain a consistent speed.
- Keep your gaze forward and maintain good posture.
- To stop, gradually slow your pace and step off the belt.
6. Folding and Storage
The TR3000 treadmill can be folded for compact storage.

6.1 Folding the Treadmill
- Ensure the treadmill is completely stopped and no one is on the belt.
- Carefully lift the rear of the treadmill deck upwards until it locks into the vertical, folded position.
- Ensure the locking mechanism is engaged to prevent accidental unfolding.
6.2 Moving the Treadmill
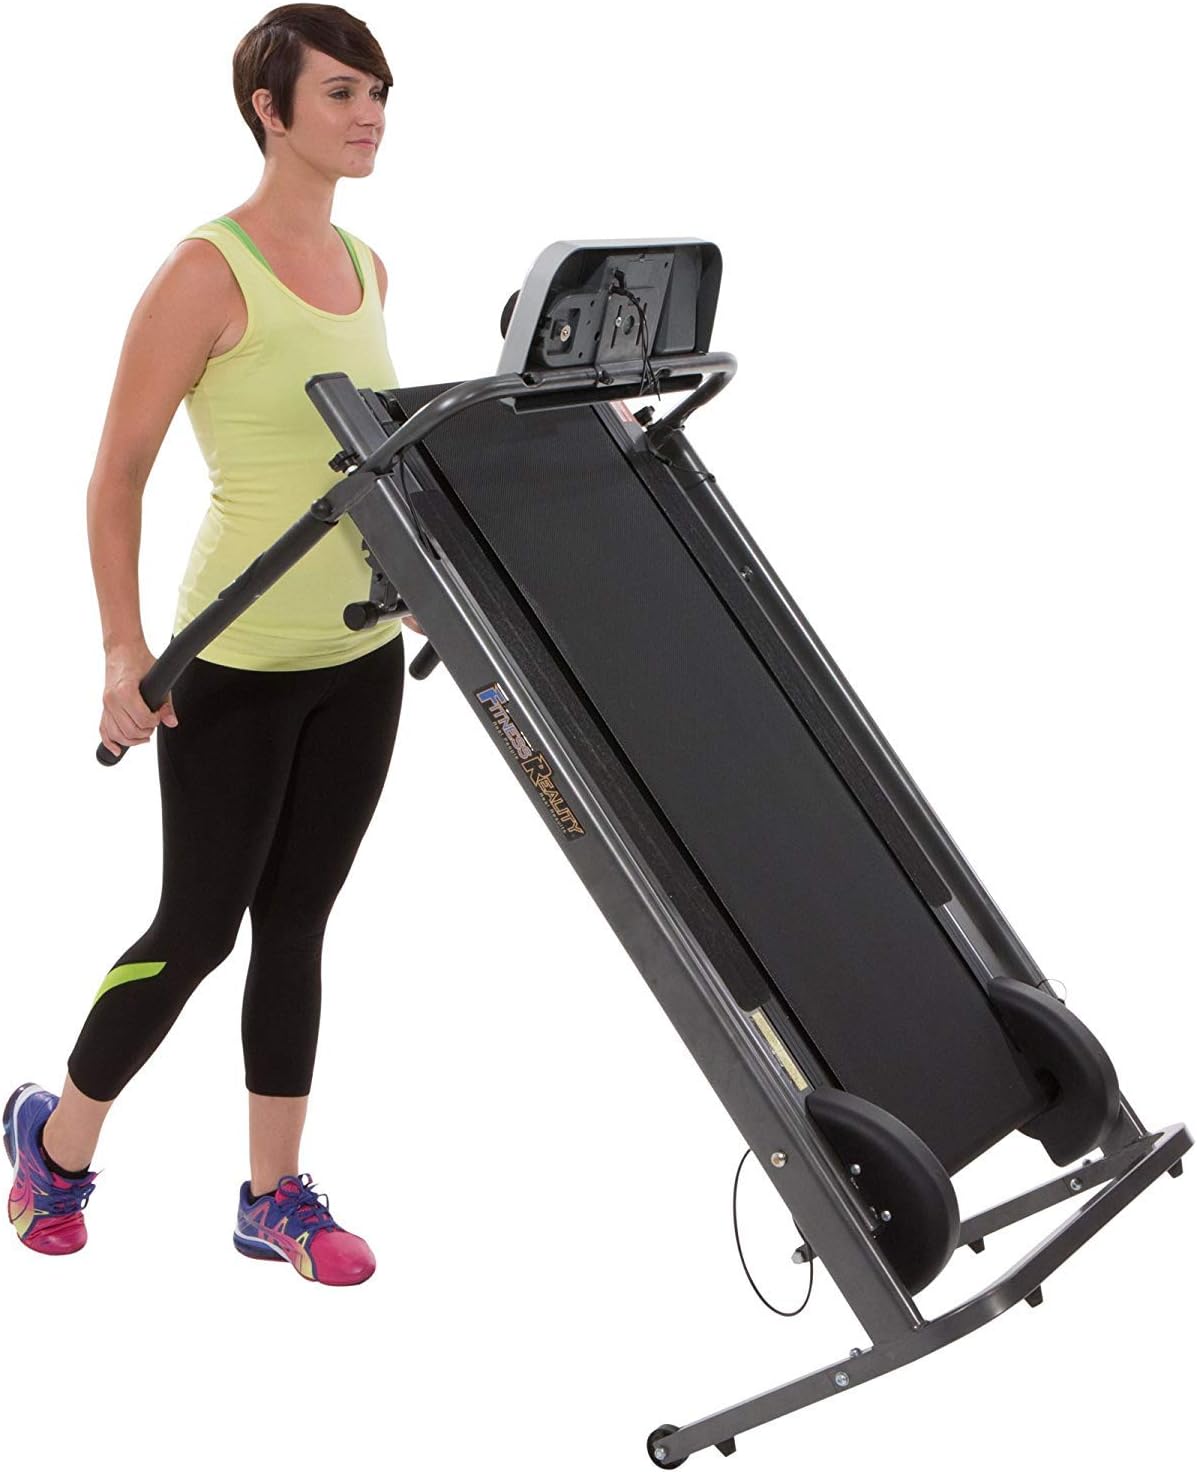
The TR3000 is equipped with transportation wheels for easy relocation.
- Once folded, gently tilt the treadmill onto its transportation wheels.
- Roll the treadmill to your desired storage location.
- Carefully lower it back onto its base for stable storage.
7. Maintenance
Regular maintenance ensures the longevity and optimal performance of your treadmill.
7.1 Lubrication
The treadmill belt requires periodic lubrication to reduce friction and ensure smooth operation. Refer to the included lubrication instructions for proper application frequency and method. Use only the recommended lubricant.
7.2 Cleaning
- Wipe down the treadmill frame and console with a damp cloth after each use to remove sweat and dust.
- Avoid using abrasive cleaners or solvents, as these can damage the finish and electronic components.
- Periodically vacuum underneath the treadmill to prevent dust buildup.
7.3 Belt Adjustment
If the tread belt begins to slide to one side or feels loose, it may require adjustment. Consult the full product manual for detailed instructions on how to center and tension the belt. Incorrect adjustment can lead to damage or unsafe operation.
8. Troubleshooting
This section addresses common issues you might encounter with your TR3000 treadmill.
| Problem | Possible Cause | Solution |
|---|---|---|
| Console display is blank or erratic. | Dead or improperly installed batteries. Loose connection. | Replace batteries with new ones. Ensure batteries are installed correctly. Check console cable connections. |
| Tread belt sticks or is difficult to move. | Lack of lubrication. Belt tension too high. | Lubricate the belt as per maintenance instructions. Adjust belt tension if necessary (refer to full manual). |
| Tread belt slides to one side. | Belt misalignment. | Adjust the belt tracking (refer to full manual for detailed instructions). |
| Inaccurate heart rate reading. | Improper hand placement. Dry hands. | Ensure full contact with both pulse pads. Moisten hands slightly if too dry. |
9. Specifications
Key technical specifications for the Fitness Reality TR3000 Manual Treadmill:
| Specification | Value |
|---|---|
| Brand | Fitness Reality |
| Model Name | TR3000 |
| Product Dimensions (LxWxH) | 50"D x 31"W x 50"H |
| Folded Size (LxWxH) | 35"L x 29"W x 61"H |
| Item Weight | 73 Pounds |
| Material | Alloy Steel |
| Maximum Weight Recommendation | 325 lbs (147 Kilograms) |
| Deck Length | 45 Inches |
| Deck Width | 16 Inches |
| Maximum Incline Percentage | 8 degrees (3 positions: 8, 10, 13 degrees) |
| Power Source | Manual |
| Display Type | LED |
| Metrics Measured | Heart Rate, Time, Distance, Calories, Speed |
| Assembly Required | Yes (minimal) |
10. Warranty and Customer Support
10.1 Warranty Information
The Fitness Reality TR3000 Manual Treadmill comes with a 3 Year Limited Warranty. Please refer to your product registration or the official Fitness Reality website for full warranty terms and conditions.
10.2 Customer Support
For further assistance, parts, or service, please contact Fitness Reality customer support or visit their official store:
