
Introduction
This manual provides essential information for the proper installation, operation, and maintenance of your Hatco HWB-11QT Drop-in Hot Food Well. Please read these instructions thoroughly before use to ensure safe and efficient operation.
Safety Information
Always follow basic safety precautions when using electrical appliances to reduce the risk of fire, electric shock, and injury to persons. Keep this manual for future reference.
- Ensure the unit is properly grounded.
- Do not immerse the unit in water or other liquids.
- Disconnect power before cleaning or servicing.
- Use only in a well-ventilated area.
- Keep hands and utensils away from hot surfaces.
Product Overview
The Hatco HWB-11QT is a UL approved built-in round heated well designed for holding hot food. It features a durable construction and precise temperature control to maintain food at safe serving temperatures.
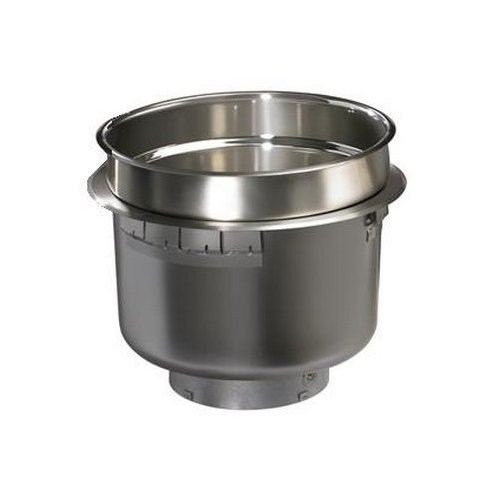
Image: Hatco HWB-11QT Drop-in Hot Food Well. This image displays the stainless steel drop-in hot food well unit, showing its round basin and the outer housing designed for countertop installation.
Key features include:
- 11-Quart (10 liter) capacity.
- Available with or without a drain.
- Standard or high watt options (4-quart standard watt only).
- Compact controls with lighted ON/OFF rocker switch and temperature dial.
- 50% larger drain with flat screen for simplified cleaning.
- Easy service access to heating elements and thermostats.
- EZ locking hardware for quick installation.
Setup and Installation
Proper installation is crucial for the performance and safety of your hot food well. Refer to the following guidelines:
- Countertop Preparation: Ensure the countertop opening matches the dimensions required for the HWB-11QT model. Mounting kits for combustible countertops are available and should be used if applicable.
- Placement: Position the unit in the prepared opening. The EZ locking hardware facilitates quick and secure installation.
- Electrical Connection: Connect the unit to a dedicated electrical circuit according to local electrical codes. Verify the voltage (120V, 208V, or 240V) matches the unit's requirements.
- Drain Connection (if applicable): If your model includes a drain, connect it to a suitable plumbing system. The larger drain with flat screen simplifies this process.
- Control Placement: The standard compact controls or optional larger recessed controls can be conveniently placed where needed for easy access.
Note: Always consult a qualified electrician or plumber for installation if you are unsure.
Operating Instructions
Follow these steps for optimal operation of your Hatco HWB-11QT:
- Power On: Locate the lighted ON/OFF rocker switch on the control panel and switch it to the "ON" position.
- Set Temperature: Use the temperature dial to set the desired holding temperature. The controls allow preset temperatures to be maintained.
- Preheating: Allow the well to preheat for approximately 20-30 minutes before placing food items inside.
- Food Placement: Place pre-cooked hot food into appropriate food pans and then into the heated well. Ensure food is at a safe serving temperature before placing it in the well.
- Monitoring: Periodically check food temperatures to ensure they remain above safe holding temperatures (e.g., 140°F / 60°C).
- Power Off: When finished, switch the ON/OFF rocker switch to the "OFF" position and allow the unit to cool before cleaning.
Important: This unit is designed for holding hot food, not for cooking or reheating cold food.
Maintenance and Cleaning
Regular cleaning and maintenance will extend the life of your unit and ensure sanitary operation.
- Disconnect Power: Always unplug or disconnect the unit from the power supply before cleaning.
- Allow to Cool: Let the unit cool completely before attempting to clean.
- Daily Cleaning:
- Remove food pans and any food debris.
- Wipe down the interior and exterior surfaces with a damp cloth and mild, non-abrasive detergent.
- For models with a drain, ensure the drain and flat screen are clear of blockages.
- Rinse with a clean, damp cloth and dry thoroughly.
- Deep Cleaning: Periodically, a more thorough cleaning may be required to remove mineral deposits or stubborn stains. Use a descaling solution if necessary, following the product manufacturer's instructions.
- Inspection: Regularly inspect the power cord for damage and ensure all connections are secure.
Caution: Do not use abrasive cleaners, steel wool, or scouring pads, as these can damage the stainless steel finish.
Troubleshooting
This section provides solutions to common issues you might encounter with your Hatco HWB-11QT.
| Problem | Possible Cause | Solution |
|---|---|---|
| Unit does not heat | No power supply; ON/OFF switch is off; Faulty heating element or thermostat. | Check power cord and outlet; Ensure ON/OFF switch is on; Contact qualified service technician for element/thermostat issues. |
| Food not staying hot enough | Temperature dial set too low; Insufficient preheating time; Lid not used on food pans. | Increase temperature setting; Allow adequate preheat time; Use lids on food pans to retain heat. |
| Water not draining (if applicable) | Drain clogged; Drain valve closed. | Clear drain and flat screen of debris; Ensure drain valve is open. |
If the problem persists after attempting these solutions, please contact Hatco customer support or a certified service technician.
Specifications
Detailed technical specifications for the Hatco HWB-11QT Drop-in Hot Food Well:
- Model: HWB-11QT
- Capacity: 11-Quart (10 liter)
- Voltage Options: 120V, 208V, 240V
- Wattage Options: 500W (120V), 536W (208V), 600W (240V)
- Amperage Options: 4.2A (120V), 2.6A (208V), 2.5A (240V)
- Shipping Weight: 11 lbs.
- Dimensions: 12.31"D x 9.51"H (Diameter x Height)
- Approvals: UL approved
- Material: Stainless Steel
Warranty and Support
For warranty information, technical support, or to locate authorized service centers, please contact Hatco Corporation directly. Keep your purchase receipt and model number readily available when contacting support.
Manufacturer: Hatco
Website: www.hatcocorp.com
Customer Service: Refer to the Hatco website or product packaging for the most current contact information.


