
1. Introduction and Overview
Thank you for choosing the Ryobi RTMS1800-G Miter and Table Saw. This versatile 2-in-1 power tool is designed for precision cutting in various woodworking applications. It combines the functionality of a miter saw for cross-cuts and angled cuts, and a table saw for ripping and sizing materials. This manual provides essential information for safe operation, proper setup, maintenance, and troubleshooting to ensure optimal performance and longevity of your tool.
Key features include a powerful 1800W motor with overload protection, Exactline laser technology for precise cut indication, and an integrated DustTech dust extraction system for a cleaner work environment.
2. Safety Instructions
Always prioritize safety when operating power tools. Failure to follow these instructions may result in serious injury or damage to the tool.
- Read the Entire Manual: Understand all warnings, instructions, and specifications before use.
- Wear Personal Protective Equipment (PPE): Always wear safety glasses, hearing protection, and a dust mask. Use appropriate gloves when handling blades.
- Maintain a Clean Work Area: Cluttered or dark work areas invite accidents. Ensure adequate lighting.
- Secure the Workpiece: Always clamp or otherwise secure the material being cut to prevent movement during operation.
- Keep Hands Clear: Never place hands near the cutting blade. Use push sticks or push blocks when operating in table saw mode.
- Disconnect Power: Always unplug the tool from the power source before making adjustments, changing accessories, or performing maintenance.
- Avoid Overreaching: Maintain proper footing and balance at all times.
- Use the Correct Blade: Ensure the blade is sharp, clean, and suitable for the material being cut. The included blade is a 48-tooth carbide-tipped blade.
3. Components and Included Items
Familiarize yourself with the components of your Ryobi RTMS1800-G saw and the items included in the package:
- Ryobi RTMS1800-G Miter and Table Saw Unit
- 48-tooth Carbide-Tipped Saw Blade (254 mm diameter, 30 mm bore)
- Parallel Fence
- Miter Fence
- Workpiece Clamp
- Chip Hood
- Push Stick
- Dust Bag
- Operating Tool (for blade changes and adjustments)

Figure 3.1: Overall view of the Ryobi RTMS1800-G Miter and Table Saw, showcasing its dual functionality and main components.
4. Setup
Before operating the saw, ensure it is properly set up and secured.
4.1 Unpacking and Assembly
- Carefully remove all components from the packaging.
- Place the saw on a stable, level workbench or stand.
- Ensure all protective shipping materials are removed.
- Install the 48-tooth carbide-tipped saw blade if not already installed. Refer to Section 6.1 for blade changing instructions.
- Attach the dust bag to the dust port.
4.2 Power Connection
Connect the saw to a suitable power outlet. The saw operates on AC/DC power with an 1800W motor. Ensure the power supply matches the tool's requirements.
4.3 Initial Adjustments
- Miter Angle Adjustment: Loosen the miter lock knob, adjust the turntable to the desired angle (e.g., 0°, 45°), and tighten the knob securely.
- Bevel Angle Adjustment: For miter saw mode, loosen the bevel lock, tilt the saw head to the desired angle, and secure it.
- Table Saw Height Adjustment: In table saw mode, use the height adjustment crank to set the blade exposure above the table.
- Exactline Laser Technology: The integrated laser guide activates with the power switch, providing a precise line for your cut. Verify its alignment before making critical cuts.
5. Operating Instructions
The Ryobi RTMS1800-G offers two primary operating modes: Miter Saw and Table Saw.
5.1 Switching Between Modes
To switch between miter saw and table saw modes, follow the instructions in your detailed manual regarding the locking mechanisms and table conversion. Ensure the tool is unplugged before making any conversions.
5.2 Miter Saw Operation
- Ensure the saw is in miter saw configuration.
- Set the desired miter and/or bevel angle.
- Place the workpiece firmly against the fence and table. Use the workpiece clamp to secure it.
- Align the Exactline laser with your cut line.
- Depress the safety switch and then the trigger to start the saw. Allow the blade to reach full speed.
- Slowly lower the saw blade through the workpiece.
- Once the cut is complete, release the trigger and allow the blade to stop before raising the saw head.
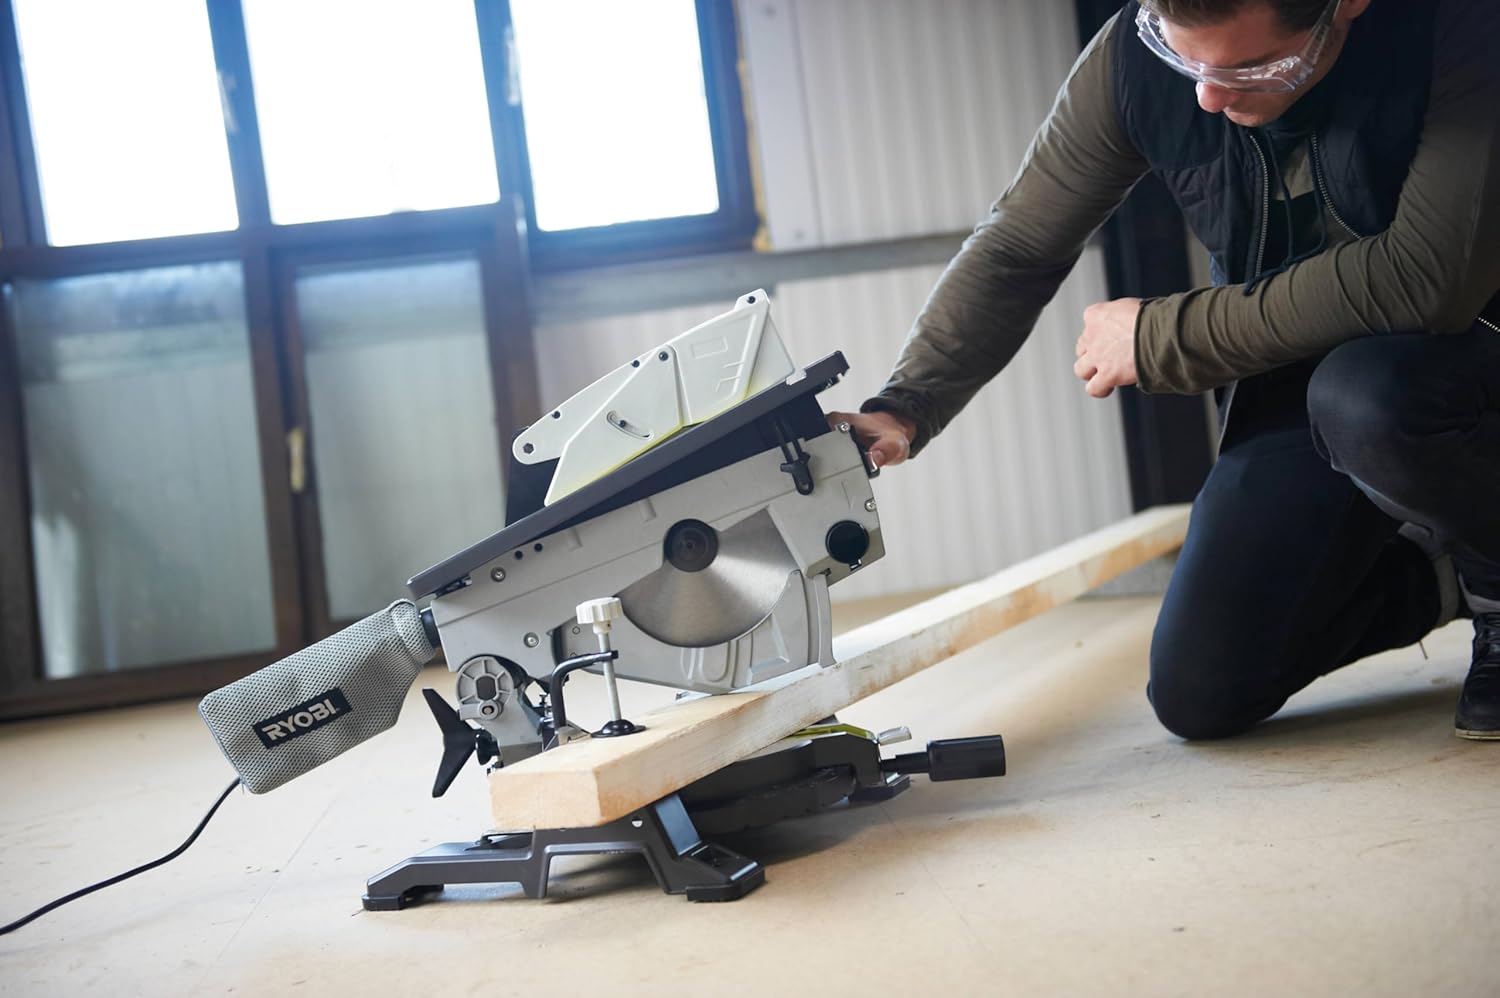
Figure 5.1: A user demonstrating the operation of the Ryobi RTMS1800-G in miter saw mode, making a cross-cut on a wooden beam.
5.3 Table Saw Operation
- Ensure the saw is in table saw configuration.
- Adjust the blade height for the material thickness.
- Set the parallel fence to the desired cutting width.
- Place the workpiece on the table, firmly against the parallel fence.
- Depress the safety switch and then the trigger to start the saw. Allow the blade to reach full speed.
- Using a push stick, slowly feed the workpiece into the rotating blade. Maintain constant pressure against the fence.
- Once the cut is complete, release the trigger and allow the blade to stop before removing the workpiece.

Figure 5.2: A user demonstrating the operation of the Ryobi RTMS1800-G in table saw mode, performing a rip cut on a wooden board.
6. Maintenance
Regular maintenance ensures the safe and efficient operation of your saw.
6.1 Blade Changing
WARNING: Always disconnect the saw from the power supply before changing the blade.
- Use the provided operating tool to loosen the blade retaining bolt.
- Carefully remove the old blade, noting its rotation direction.
- Install the new blade, ensuring the teeth are pointing in the correct direction for cutting.
- Securely tighten the blade retaining bolt.
- Check for proper blade guard operation after installation.
6.2 Cleaning and Dust Collection
The integrated DustTech system helps manage sawdust. Regularly empty the dust bag and clean the dust port to maintain efficient dust extraction. Use compressed air to clear sawdust from vents and moving parts. Keep the table surface and fences clean for accurate cuts.
6.3 General Inspection
Periodically inspect the power cord for damage, check all fasteners for tightness, and ensure all safety guards are functioning correctly. Replace any worn or damaged parts immediately.
7. Troubleshooting
This section addresses common issues you might encounter with your Ryobi RTMS1800-G saw.
| Problem | Possible Cause | Solution |
|---|---|---|
| Saw does not start | No power supply; Safety switch not engaged; Overload protection activated | Check power connection; Ensure safety switch is fully depressed; Allow motor to cool if overloaded. |
| Inaccurate cuts | Blade dull or damaged; Fence not square; Laser misaligned; Workpiece not secured | Replace blade; Adjust fence for squareness; Calibrate laser; Secure workpiece firmly. |
| Excessive dust | Dust bag full or detached; Dust port clogged | Empty dust bag; Reattach dust bag; Clear any clogs from the dust port. |
| Motor overheats | Overloading the motor; Insufficient ventilation | Reduce cutting pressure; Ensure vents are clear and not obstructed. |
8. Specifications
Detailed technical specifications for the Ryobi RTMS1800-G Miter and Table Saw:
- Manufacturer: Ryobi
- Model Number: 5133002152
- Power: 1800 Watts
- Voltage: 18 Volts (AC/DC)
- No-Load Speed: 4800 RPM
- Blade Diameter: 254 mm
- Blade Bore Diameter: 30 mm
- Blade Material: Carbide-tipped (48 teeth)
- Max. Cutting Capacity (Miter Mode 0°): 60 mm
- Max. Cutting Capacity (Table Mode 90°): 70 x 130 mm
- Max. Cutting Capacity (0° Bevel): 48 x 130 mm
- Max. Cutting Capacity (45° Miter): 70 x 85 mm
- Max. Cutting Capacity (45° Miter & Bevel): 48 x 83 mm
- Product Dimensions (L x W x H): 57.4 x 55.8 x 44.6 cm
- Item Weight: 18.2 Kilograms
- Special Features: Exactline Laser Technology, Integrated DustTech Dust Extraction System, Soft Start
- Handle Material: Plastic
- Surface Recommendation: Aluminum, Metal (for appropriate blades)
9. Warranty and Support
Ryobi products are designed for durability and performance. For specific warranty information, please refer to the warranty card included with your product or visit the official Ryobi website. Spare parts availability for this model is typically 5 years from the date of purchase.
If you encounter any issues not covered in the troubleshooting section or require technical assistance, please contact Ryobi customer support. Keep your purchase receipt and model number (RTMS1800-G, 5133002152) readily available when contacting support.
For further information and support, you may visit the Ryobi Brand Store.


