1. Introduction
This manual provides instructions for the safe and efficient use of your KitchenAid KSM1JA Masticating Juicer & Sauce Attachment. This attachment is designed to work with all household KitchenAid Stand Mixers, transforming them into a versatile juicer and sauce maker. It features a slow (masticating) juicing process that first slices and then processes soft, hard, or leafy fruits and vegetables for nutrient-rich extraction. With three included pulp screens, you can create low pulp or high pulp juices, sauces, and jams.
Please read all instructions carefully before using the attachment to ensure proper operation and to prevent injury or damage.
2. Important Safeguards
When using electrical appliances, basic safety precautions should always be followed, including the following:
- Read all instructions.
- To protect against risk of electrical shock, do not immerse the mixer base in water or other liquid.
- Close supervision is necessary when any appliance is used by or near children.
- Unplug from outlet when not in use, before putting on or taking off parts, and before cleaning.
- Avoid contact with moving parts.
- Do not operate any appliance with a damaged cord or plug or after the appliance malfunctions, or is dropped or damaged in any manner. Return appliance to the nearest authorized service facility for examination, repair, or electrical or mechanical adjustment.
- The use of attachments not recommended or sold by KitchenAid may cause fire, electric shock, or injury.
- Do not use the appliance outdoors.
- Do not let cord hang over edge of table or counter.
- Do not let cord contact hot surface, including the stove.
- Always ensure the attachment is properly assembled and securely attached to the stand mixer before operation.
- Do not feed fingers or other utensils into the feed chute while the appliance is operating. Use only the provided food pusher.
- Do not process frozen fruits or vegetables.
- Do not use the attachment for purposes other than its intended use.
3. Parts and Features
Your KitchenAid KSM1JA Masticating Juicer & Sauce Attachment includes the following components:
- Drive Assembly: The main body of the attachment that connects to the stand mixer.
- Juicing Bowl: The transparent bowl where juicing occurs.
- Wiper Basket: Helps to keep the strainer clean during operation.
- Pulp Screens (3):
- Low Pulp Screen
- High Pulp Screen
- Sauce/Jam Screen
- Auger/Blade Assembly: The component that slices and processes fruits and vegetables.
- Lid: Covers the juicing bowl and includes the feed chute.
- Hopper: Sits on top of the feed chute to hold ingredients.
- Food Pusher: Used to guide ingredients into the feed chute.
- Pulp Container: Collects discarded pulp.
- Juice Container: Collects extracted juice.
- Cleaning Brush: For easy cleaning of the strainer and other parts.

Image: The three interchangeable pulp screens for varying pulp levels and sauce making.
4. Setup
- Prepare the Attachment:
- Place the drive assembly on a clean, flat countertop.
- Ensure the rubber gasket is securely placed behind the pulp chute of the juicing bowl.
- Attach the juicing bowl to the drive assembly, ensuring the pulp chute aligns with the shoot slot.
- Insert the wiper basket into the juicing bowl.
- Select the desired pulp screen (low pulp, high pulp, or sauce/jam) and align its red position arrow with the red position arrow on the juicing bowl.
- Firmly place the auger/blade assembly into the selected pulp screen.
- Align the unlock icon on the lid with the red position arrow on the juicing bowl, press the lid down, and twist clockwise until the locked icon aligns with the red position arrow, securing the lid.
- Attach to Stand Mixer:
- Turn off and unplug your KitchenAid Stand Mixer.
- Remove the hub cover from the power hub on the front of your stand mixer.
- Insert the attachment shaft into the power hub, ensuring the shaft fits into the square hub socket.
- Tighten the hub knob clockwise until the attachment is firmly secured to the stand mixer.
- Position Containers:
- Place the pulp container directly under the pulp chute.
- Place the juice container directly under the juice spout.
- Insert Hopper and Pusher:
- Insert the hopper into the top of the feed chute.
- Keep the food pusher nearby for use during operation.

Image: The juicer attachment securely mounted on a KitchenAid stand mixer.
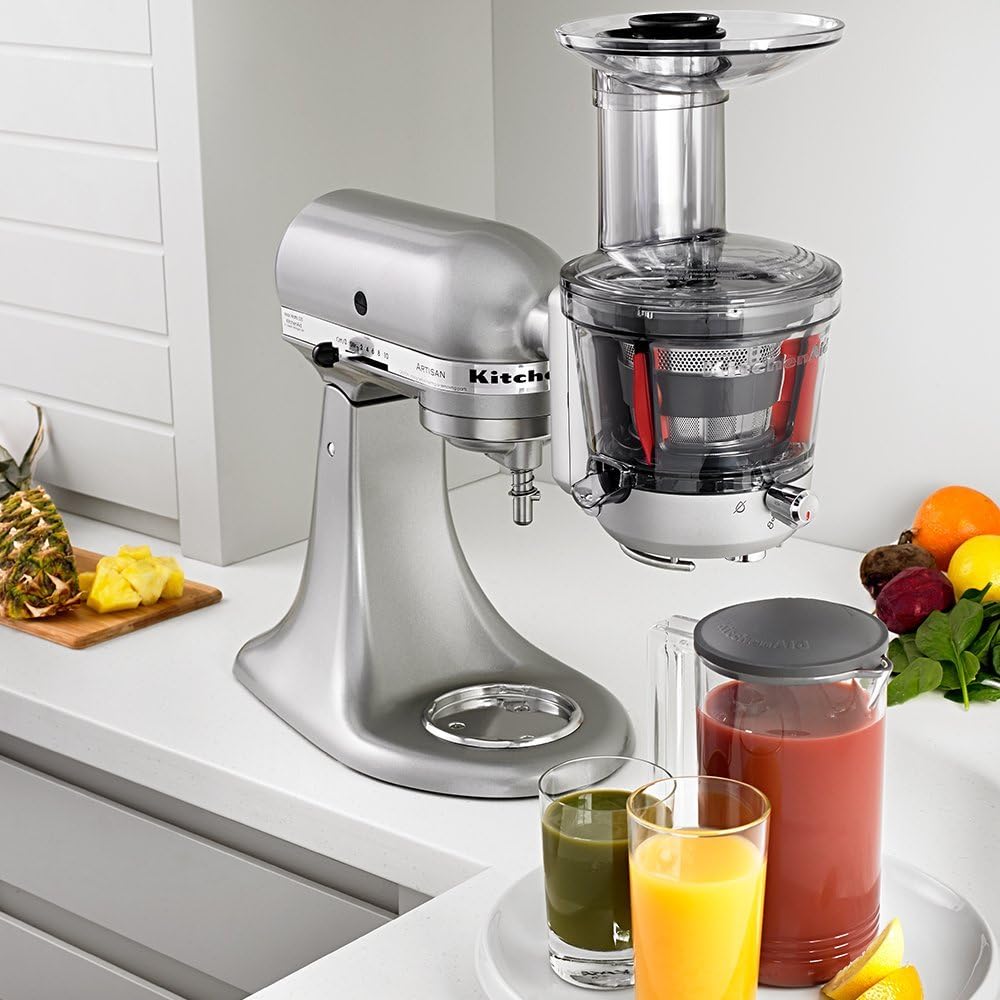
Image: The juicer attachment in use, demonstrating juice collection.
5. Operation
Preparing Ingredients:
- Wash all fruits and vegetables thoroughly.
- Remove any pits, large seeds, or hard cores.
- Cut ingredients into pieces small enough to fit comfortably into the feed chute. The extra-wide feed tube accommodates a variety of sizes.
- For best results, process ingredients that are at room temperature.
Juicing Process:
- Ensure the juicer attachment is properly assembled and attached to your stand mixer.
- Position the pulp and juice containers.
- For Juicing: Open the pulp chute by pressing it towards the juicing bowl. This allows pulp to be ejected into the pulp container and juice to flow into the juice container.
- For Sauces/Jams: Close the pulp chute by pulling it away from the juicing bowl. This allows pulp and juice to flow together into the juicing container.
- Plug in your KitchenAid Stand Mixer.
- Turn the stand mixer to Speed 10.
- Gradually feed prepared fruits or vegetables into the hopper. Use the food pusher to gently guide ingredients down the feed chute. Do not force ingredients.
- Continue feeding ingredients until all desired produce is processed.
- Once finished, turn off the stand mixer and unplug it.
Tips for Best Results:
- Process softer ingredients alternately with harder ingredients to maintain optimal performance.
- For leafy greens, roll them into a tight ball before feeding them into the chute.
- Do not overfill the hopper.
- If the attachment jams, turn off the mixer, unplug it, and disassemble to clear the obstruction.
Video: Official KitchenAid demonstration of assembling and using the KSM1JA Masticating Juicer and Sauce Attachment.
6. Care and Cleaning
Proper cleaning of your juicer attachment is essential for hygiene and longevity. All parts, except the drive assembly, are dishwasher-safe (top rack recommended) or can be hand-washed.
- Disassembly:
- Turn off and unplug the stand mixer.
- Remove the juicer attachment from the power hub.
- Twist the lid counter-clockwise to unlock and remove it.
- Remove the auger/blade assembly, pulp screen, wiper basket, and juicing bowl from the drive assembly.
- Remove the rubber gasket from the pulp chute for thorough cleaning.
- Cleaning:
- Hand Washing: Wash all disassembled parts (except the drive assembly) in warm, soapy water. Use the provided cleaning brush to remove any pulp residue from the screens and other intricate areas. Rinse thoroughly and dry completely before reassembling or storing.
- Dishwasher: All parts except the drive assembly are dishwasher-safe (top rack only).
- Drive Assembly: Wipe the drive assembly with a damp cloth. Do not immerse it in water or other liquids.
- Storage:
- Ensure all parts are completely dry before storing.
- Store the attachment in a clean, dry place.
7. Troubleshooting
| Problem | Possible Cause | Solution |
|---|---|---|
| Attachment not operating. | Stand mixer not plugged in or turned on. Attachment not properly secured. | Ensure stand mixer is plugged in and turned to Speed 10. Re-attach the juicer securely to the power hub. |
| Pulp chute is clogged. | Too much pulp buildup, or ingredients are too fibrous. | Turn off and unplug the mixer. Disassemble the attachment and clear the clog. Clean the pulp screen thoroughly. |
| Juice flow is slow or stops. | Strainer is clogged with pulp. | Turn off and unplug the mixer. Disassemble and clean the strainer and wiper basket. |
| Excessive foam in juice. | Common with certain fruits/vegetables (e.g., apples, leafy greens). | This is normal. Skim off foam if desired. Processing at a slightly lower speed might reduce foam. |
| Attachment detaches during use. | Not securely fastened to the power hub. | Ensure the attachment shaft is fully inserted into the power hub and the hub knob is tightened securely. |
8. Specifications
| Feature | Detail |
|---|---|
| Brand | KitchenAid |
| Model Number | KSM1JA |
| Color | Silver |
| Product Dimensions | 7"D x 9.65"W x 11.6"H |
| Capacity | 1 Liters |
| Blade Material | Stainless Steel |
| Material | Plastic (housing), Stainless Steel (blade) |
| Product Care Instructions | Hand Wash Only (for some parts, check manual) / Dishwasher Safe (top rack for most parts) |
| Compatibility | Fits all Household KitchenAid Stand Mixers |
9. Warranty and Support
For detailed warranty information and customer support, please refer to the official KitchenAid website or contact their customer service directly. Keep your purchase receipt as proof of purchase for warranty claims.
KitchenAid Customer Service:
- Website: www.kitchenaid.com
- Phone: Refer to your region's KitchenAid website for local contact numbers.
This product is designed, engineered, and tested by KitchenAid to meet high-quality standards.


