
Yellow Jacket 95730
Yellow Jacket YJ-LTE Refrigerant Recovery Unit User Manual
Model: 95730
Introduction
The Yellow Jacket YJ-LTE Refrigerant Recovery Unit is designed for efficient and reliable refrigerant recovery. This unit features a built-in purge circuit, eliminating the need for external equipment and simplifying the clearing process. Its superior condenser performance ensures the recovery tank remains cooler for longer, enabling more refrigerant recovery without triggering high-pressure cut-out. The unit is user-friendly, featuring a single valve and a single gauge control panel for straightforward operation.
Key features include a 1/2 hp, twin cylinder, oil-less compressor for fast recovery of various refrigerants, including R-410A. It is lightweight, weighing less than 25 pounds, and its system is engineered to perform effectively under high load conditions.
Safety Information
Always read and understand all safety warnings and instructions before operating this unit.
- To prevent cross-contamination and refrigerant leakage to the atmosphere, ensure all hoses are properly connected and checked for damage before operation.
- Avoid overfilling the recovery cylinder. Always follow the refrigerant manufacturer's recommendations for cylinder capacity and safe handling during recovery.
- Ensure adequate ventilation when operating the unit to prevent accumulation of refrigerant vapors.
- Wear appropriate personal protective equipment (PPE), including safety glasses and gloves, when handling refrigerants.
- Do not operate the unit if it is damaged or malfunctioning. Refer to the troubleshooting section or contact qualified service personnel.
Product Overview
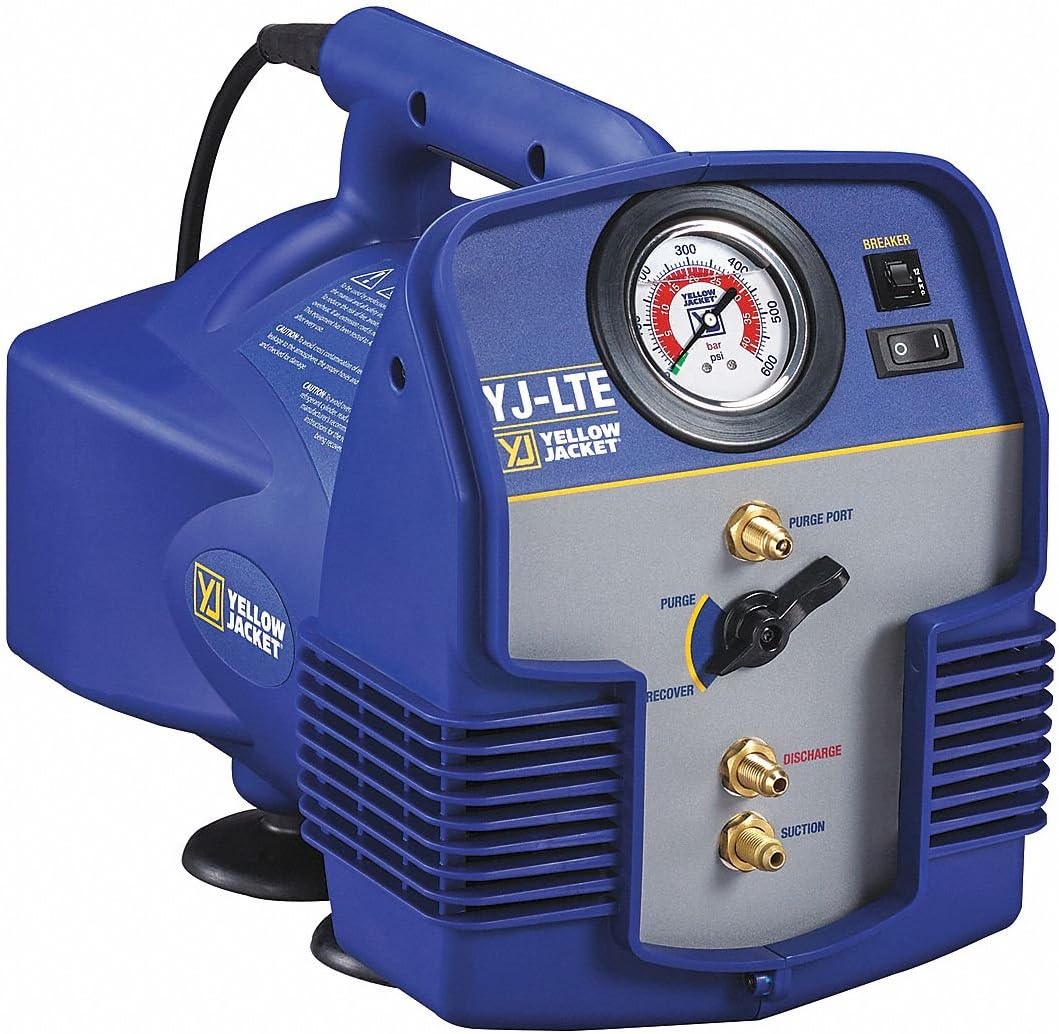
This image displays the Yellow Jacket YJ-LTE Refrigerant Recovery Unit. The unit is blue with a grey control panel. Key features visible include a pressure gauge, a selector knob for 'Purge' and 'Recover' modes, a 'Purge Port', 'Discharge' port, and 'Suction' port. A power switch and circuit breaker are also visible on the top right of the control panel. The unit has a sturdy handle for portability.
Components
- Pressure Gauge: Displays system pressure during operation.
- Breaker: Circuit protection for the unit.
- Power Switch: On/Off control for the unit.
- Purge Port: Connection point for purging the unit.
- Mode Selector Knob: Switches between PURGE and RECOVER modes.
- Discharge Port: Outlet for recovered refrigerant.
- Suction Port: Inlet for refrigerant to be recovered.
- Carry Handle: For easy transport of the unit.
Setup
- Unpack the Unit: Carefully remove the recovery unit from its packaging. Inspect for any signs of shipping damage.
- Placement: Place the unit on a stable, level surface in a well-ventilated area, away from direct sunlight or heat sources.
- Power Connection: Ensure the power switch is in the OFF position. Connect the power cord to a grounded electrical outlet of the correct voltage (refer to specifications for voltage requirements).
- Prepare Hoses: Ensure all hoses are clean, in good condition, and have appropriate service valves.
Operating Instructions
Refrigerant Recovery
- Connect the appropriate recovery hose from the system to be recovered to the SUCTION port of the recovery unit.
- Connect another recovery hose from the DISCHARGE port of the recovery unit to the liquid port of the recovery cylinder.
- Ensure the recovery cylinder is empty and evacuated, or has sufficient vacuum.
- Open the valve on the recovery cylinder.
- Set the Mode Selector Knob to RECOVER.
- Turn on the power switch of the recovery unit. The unit will begin recovering refrigerant.
- Monitor the pressure gauge. Recovery is complete when the system pressure reaches the desired vacuum level or the unit automatically shuts off due to low pressure.
- Once recovery is complete, close the valve on the recovery cylinder, then turn off the recovery unit.
- Close the valve on the system being recovered.
Purging the Unit
The built-in purge circuit allows for easy clearing of residual refrigerant from the unit.
- After recovery, ensure the recovery cylinder valve is closed and the unit is off.
- Connect a short hose from the PURGE PORT to the recovery cylinder or a vacuum pump if further evacuation is desired.
- Set the Mode Selector Knob to PURGE.
- Turn on the power switch. The unit will begin to purge any remaining refrigerant.
- Allow the unit to run until the pressure gauge indicates a vacuum or the unit automatically shuts off.
- Turn off the power switch and disconnect hoses.
Maintenance
- Clean Unit: Regularly wipe down the exterior of the unit with a damp cloth to remove dust and debris. Do not use harsh chemicals or solvents.
- Inspect Hoses: Before each use, inspect all hoses for cracks, leaks, or damage. Replace damaged hoses immediately.
- Check Connections: Ensure all fittings and connections are tight and free of leaks.
- Storage: Store the unit in a clean, dry environment when not in use.
Troubleshooting
| Problem | Possible Cause | Solution |
|---|---|---|
| Unit does not power on. | No power supply; Breaker tripped; Faulty power cord. | Check power outlet; Reset breaker; Inspect and replace power cord if damaged. |
| Slow recovery rate. | Clogged filter; Hoses restricted; Recovery cylinder full or not properly evacuated. | Check and clean filter; Inspect hoses for kinks or blockages; Ensure recovery cylinder is empty and evacuated. |
| Unit shuts off prematurely. | High pressure cut-out activated; Overheating. | Ensure proper ventilation; Check for overfilled recovery cylinder; Allow unit to cool down. |
| Refrigerant leakage. | Loose connections; Damaged hoses or seals. | Tighten all connections; Inspect and replace any damaged hoses or seals. |
Specifications
| Attribute | Value |
|---|---|
| Model Number | 95730 |
| Compressor | 1/2 hp, Twin Cylinder, Oil-less |
| Refrigerants | Including R-410A |
| Item Weight | Approximately 26 pounds |
| Product Dimensions | 15 x 12 x 10 inches |
| Manufacturer | APR Supply Co. |
Warranty and Support
For warranty information and technical support, please refer to the documentation included with your product or visit the official Yellow Jacket website. Keep your purchase receipt as proof of purchase for warranty claims.
Ask a question about this manual
Ask about setup, troubleshooting, compatibility, parts, safety, or missing instructions. Manuals+ will review the question and use this page’s manual context to help answer it.