
Introduction
This manual provides detailed instructions for the installation, operation, and maintenance of your Sensky BS033C 110V Motion Sensor Light Switch. This device is designed to automatically control lighting based on occupancy and ambient light levels, contributing to energy efficiency and convenience.
The Sensky BS033C features a 180-degree passive infrared (PIR) sensor to detect motion and an integrated light sensor to assess environmental brightness. It offers adjustable time delay and multiple operating modes to suit various applications.
Safety Information
- WARNING: To avoid fire, shock, or death, turn off power at the circuit breaker or fuse box and test that the power is off before wiring.
- Installation should be performed by a qualified electrician or in accordance with local electrical codes.
- This switch requires a neutral wire for proper operation. Ensure your electrical box has a neutral wire available.
- Do not connect the green wire to the ground wire in the wall box. The green wire is the neutral wire for this device.
- Do not install near heat sources, cold sources, or beneath rotating objects to prevent false triggers.
- Avoid direct or reflected light from bright surfaces (e.g., mirrors, windows) that could interfere with the sensor.
Product Overview

Image Description: Front and rear view of the Sensky BS033C motion sensor light switch, showing the sensor, manual switch, and wiring connections (black, green, red wires).

Image Description: Diagram highlighting key features of the Sensky BS033C, including 180-degree PIR detection, adjustable sensitivity, ambient light settings, and time delay. It also notes easy quick mounting.
Specifications
| Feature | Specification |
|---|---|
| Brand | Sensky |
| Model Number | BS033C |
| Color | White |
| Power Source | AC 110V |
| Item Weight | 119 g |
| Maximum Range | 9 meters |
| Mounting Type | Embedded |
| Temperature Range | 20°C to 40°C |
| Compatible Devices | Light fixtures |
| Unit Count | 1 Count |
| UPC | 700646315673 |
Installation Instructions
Wiring Diagram and Connections
The Sensky BS033C requires a neutral wire for installation. Follow the wiring diagram carefully to ensure correct and safe operation.
- Black wire: Connects to the Hot (live) wire from your electrical supply.
- Green wire: Connects to the Neutral wire from your electrical supply. Do NOT connect this green wire to the ground wire in the wall box.
- Red wire: Connects to the hot end of your light fixture (the load).
- The other end of the light fixture should connect to the Neutral wire (along with the green wire of the switch).

Image Description: Detailed wiring diagram for the Sensky BS033C motion sensor light switch, illustrating connections for the black (hot), green (neutral), and red (load) wires to the light bulb and main AC supply.

Image Description: An alternative wiring diagram showing the connection points for the Sensky motion sensor switch, including hot, neutral, and load wires, with labels for clarity.
Operating Instructions
Operating Modes
The Sensky BS033C offers three operating modes, selectable via the switch on the front panel:
- ON Mode: The light remains continuously on, overriding the sensor functions.
- OFF Mode: The light remains continuously off, overriding the sensor functions.
- AUTO Mode: The switch operates as an occupancy sensor. Lights turn on automatically when motion is detected and turn off after a set time delay if no further motion is detected and ambient light conditions allow. A built-in daylight sensor prevents the light from turning on if there is sufficient natural light.

Image Description: A table illustrating the different operating modes (ON, OFF, AUTO) of the Sensky motion sensor switch, their conditions (dark/bright environment), and corresponding light bulb states (on/off/working with delay).

Image Description: Visual explanation of the ON, OFF, and AUTO functions of the motion sensor switch, demonstrating how it responds to movement and ambient light conditions (sufficient natural light vs. insufficient light).
Adjustable Settings
The switch features adjustable dials for Time Delay and Ambient Light (LUX) settings:
- Time Delay: Adjusts how long the light remains on after motion is no longer detected. The range is approximately 10 seconds (min) to 7 minutes (max). The default setting is 10 seconds.
- Ambient Light (LUX): Determines the ambient light level at which the motion sensor will activate. If the room's ambient light is above the set LUX value, the light will not turn on even if motion is detected. This saves energy during daylight hours. The range is approximately 3 LUX to 2000 LUX.
Troubleshooting
Refer to the following information for common issues and solutions:
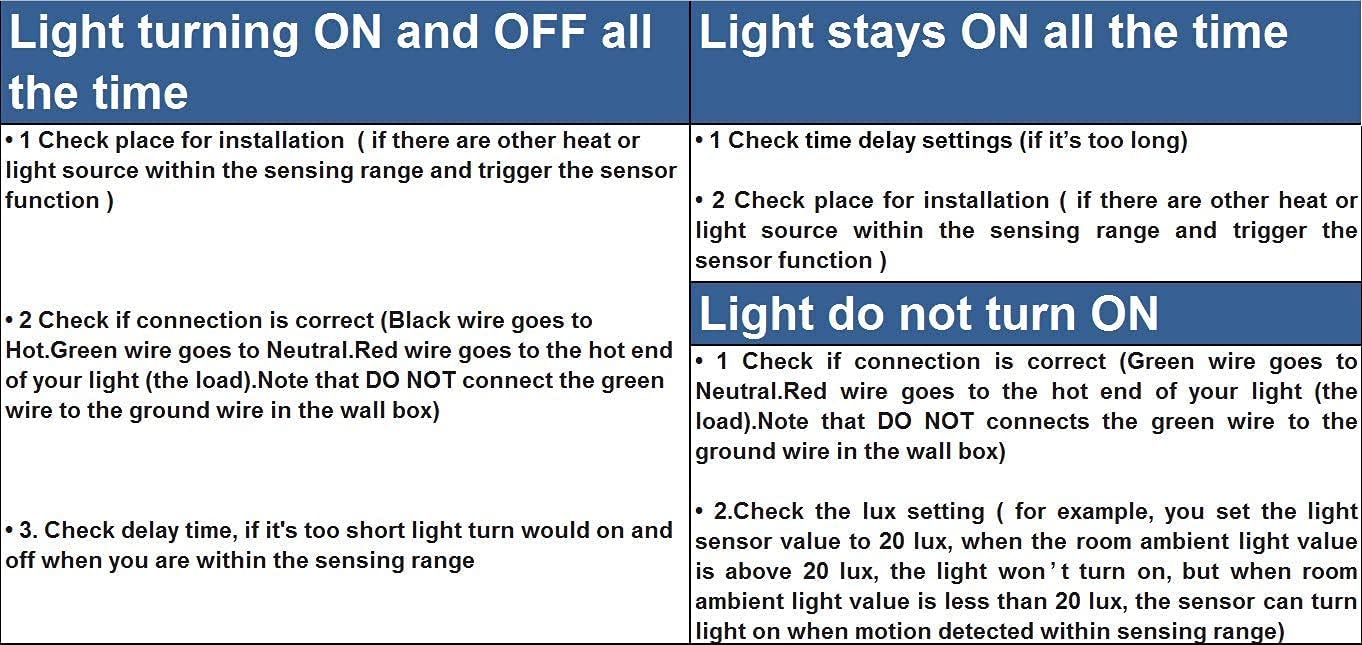
Image Description: A troubleshooting guide in table format, addressing common issues like lights turning on/off constantly, lights staying on, and lights not turning on, with suggested solutions related to installation, connections, and settings.

Image Description: Instructions on how to prevent false alarms by avoiding heat/cold sources and reflective surfaces, along with frequently asked questions regarding delay time, sensor distance, and light sensor settings for optimal performance.
Common Issues and Solutions:
- Light turning ON and OFF all the time:
- Check for heat or light sources within the sensing range that might trigger the sensor.
- Verify wiring connections: Black to Hot, Green to Neutral, Red to Load. Ensure the green wire is not connected to ground.
- If the delay time is too short, the light may turn off and on when you are within the sensing range. Adjust the time delay.
- Light stays ON all the time:
- Check if the time delay setting is too long.
- Check for heat or light sources within the sensing range that might continuously trigger the sensor.
- Light does not turn ON:
- Verify wiring connections: Black to Hot, Green to Neutral, Red to Load. Ensure the green wire is not connected to ground.
- Check the LUX setting. If the ambient light value is above the set LUX value, the light will not turn on. Adjust the LUX setting to a lower value if needed.
Tips for Optimal Performance:
- Set the Time Delay to its minimum value first during testing, then adjust to your preferred duration.
- Adjust the Light Sensor (LUX) setting by testing in different ambient light conditions to find the appropriate threshold for automatic activation.
- For better sensitivity, aim the sensor across the path of movement rather than directly along it.
