
Introduction
This manual provides essential information for the installation, operation, maintenance, and troubleshooting of the HP Compaq DC5850 Small Form Factor (SFF) Motherboard, model MS-7500 VER:1.1. This motherboard is designed for Socket AM2 processors and utilizes the AMD 780V chipset.
Setup and Installation
Proper installation is crucial for the stable operation of your system. Follow these steps carefully.
1. Motherboard Overview
Familiarize yourself with the layout of the motherboard before proceeding with installation.
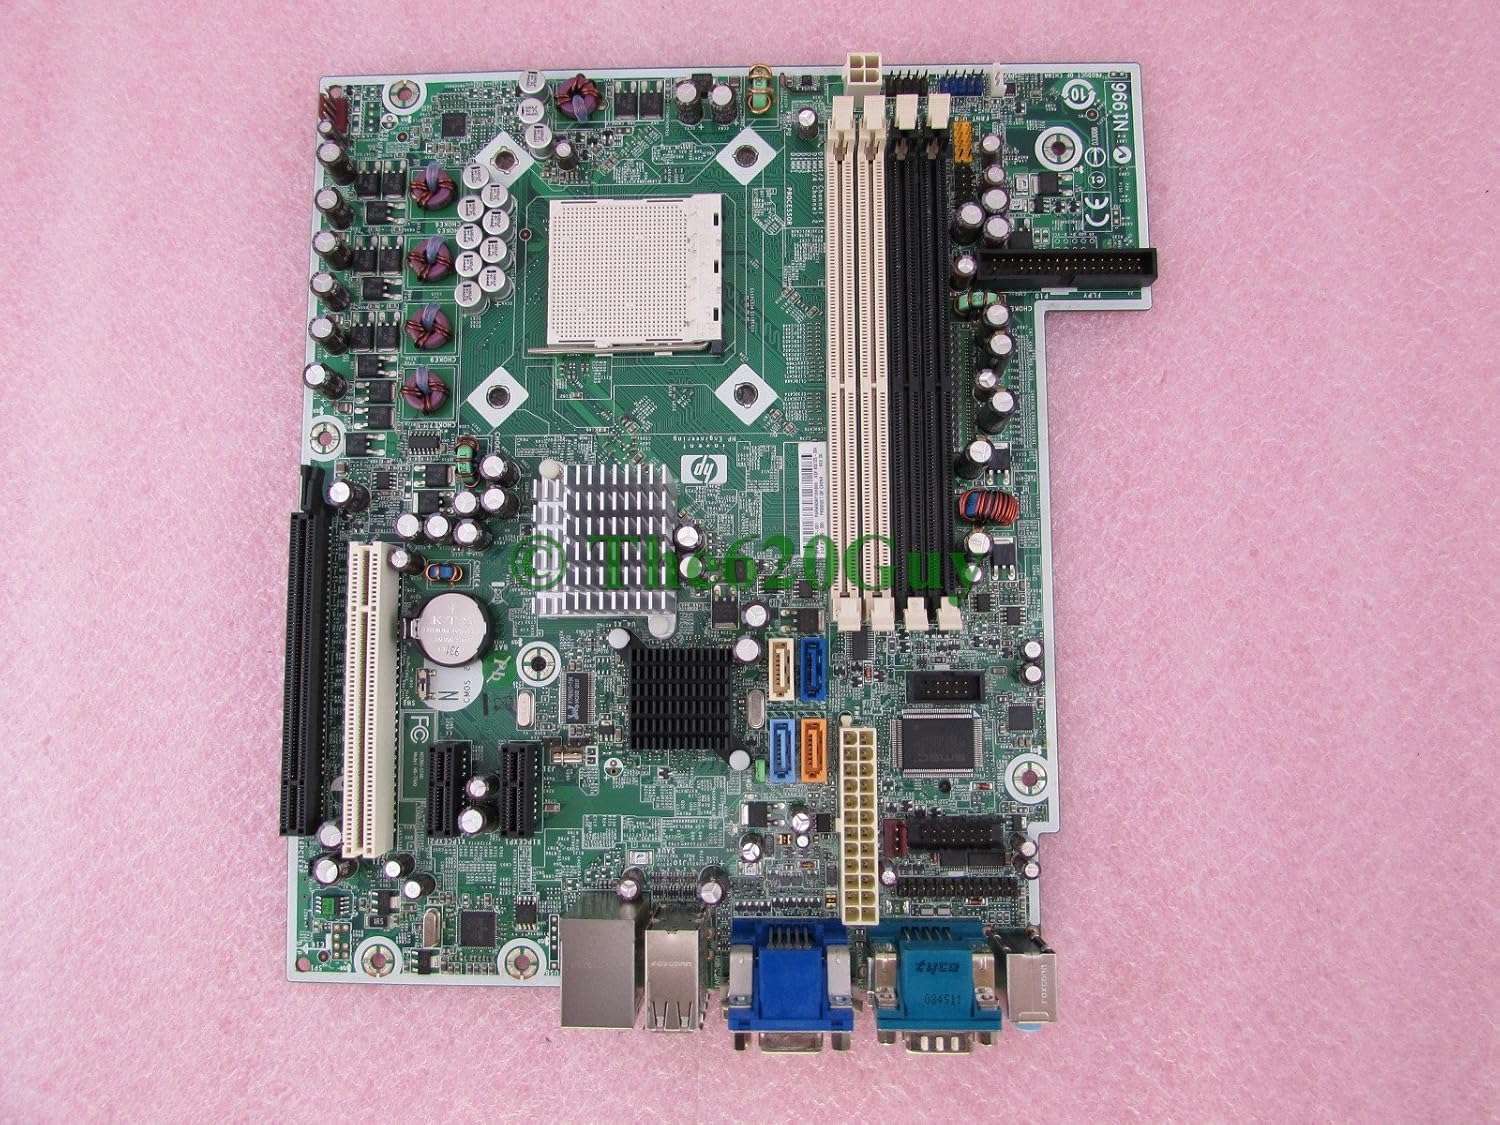
Figure 1: Top view of the HP Compaq DC5850 SFF Motherboard (MS-7500 VER:1.1). This image displays the CPU socket, RAM slots, PCI/PCIe slots, and various connectors.
2. Physical Installation
- Prepare the Chassis: Ensure your computer chassis is compatible with the Small Form Factor (SFF) motherboard. Install standoffs in the appropriate locations.
- Install the Motherboard: Carefully place the motherboard into the chassis, aligning it with the standoffs and the rear I/O shield. Secure it with screws.
- Install the CPU: Open the CPU socket lever, align the AMD Socket AM2 processor with the socket, gently place it, and close the lever. Apply thermal paste and install the CPU cooler.
- Install RAM: Open the clips on the DDR2 memory slots. Align the memory modules with the notch and press firmly until the clips lock into place. This motherboard has 2 memory slots.
- Connect Power: Connect the 24-pin ATX power connector and the 4-pin CPU power connector from your power supply to the motherboard.
- Connect Storage Devices: Connect SATA data cables from your hard drives or SSDs to the SATA ports on the motherboard. Connect power cables from the power supply to the drives.
- Connect Front Panel Cables: Connect the power switch, reset switch, HDD LED, power LED, and front USB/audio headers to their respective pins on the motherboard. Refer to the motherboard's silkscreen labels for correct orientation.
- Install Expansion Cards: If using discrete graphics cards or other PCI/PCIe expansion cards, insert them into the appropriate slots and secure them.
3. Rear I/O Panel
The rear I/O panel provides various ports for connecting peripherals.

Figure 2: Rear I/O panel of the HP Compaq DC5850 SFF Motherboard. This image shows the USB ports, VGA, DVI, PS/2 ports, and audio jacks.
- USB 2.0 Ports: For connecting USB devices such as keyboards, mice, and external storage. (6 ports available)
- VGA Port: For connecting a display monitor.
- DVI Port: For connecting a digital display monitor.
- PS/2 Ports: For connecting legacy PS/2 keyboards and mice.
- Ethernet Port: For network connectivity.
- Audio Jacks: For connecting speakers, headphones, and microphones.
Operating Instructions
1. Initial Boot and BIOS Configuration
Upon first power-on, the system will perform a Power-On Self-Test (POST). You may need to enter the BIOS/UEFI setup to configure boot order, date/time, and other system settings. Typically, pressing Del, F2, or F10 during startup will access the BIOS setup utility.
2. Operating System Installation
This motherboard supports various operating systems, including Windows 10. Insert your operating system installation media (USB drive or DVD) and follow the on-screen prompts. Ensure the boot order in BIOS is set to prioritize your installation media.
3. Driver Installation
After installing the operating system, install the necessary drivers for the chipset, integrated graphics, audio, and network adapter. These drivers are typically available on the manufacturer's website (HP or MSI) or can be automatically installed by the operating system.
Maintenance
1. Cleaning
Regularly clean dust from the motherboard and CPU cooler to prevent overheating. Use compressed air and a soft brush. Ensure the system is powered off and unplugged before cleaning.
2. BIOS Updates
BIOS updates can improve system stability, add support for new hardware, or fix bugs. Check the official HP or MSI support websites for the latest BIOS versions for your specific model (MS-7500 VER:1.1). Follow the provided instructions carefully to avoid system damage.
3. CMOS Battery Replacement
The CMOS battery (CR2032) maintains BIOS settings and the system clock when the computer is off. If you experience incorrect date/time or persistent BIOS setting loss, the battery may need replacement. Power off the system, unplug it, and carefully replace the battery.

Figure 3: Close-up view showing the MS-7500 VER:1.1 model number and the location of the CMOS battery on the motherboard.
Troubleshooting
- No Power:
- Check all power connections (24-pin ATX, 4-pin CPU, power supply to wall outlet).
- Ensure the power supply is switched on.
- Test with a known good power supply if possible.
- No Display:
- Verify monitor is connected to the correct video output (VGA or DVI on the motherboard, or discrete graphics card).
- Ensure RAM modules are properly seated. Try reseating them or testing with one module at a time.
- Check if the CPU cooler is properly installed and connected.
- System Beeps:
- Refer to the motherboard's beep codes (often found in a more detailed technical manual or online) to diagnose the issue. Common codes indicate RAM, CPU, or graphics card problems.
- Peripheral Not Detected:
- Ensure the device is properly connected.
- Check device drivers in the operating system.
- Test the device on another port or another computer.
Specifications
| Feature | Detail |
|---|---|
| Brand | HP |
| Manufacturer | MSI COMPUTER |
| Model Number | MS-7500 VER:1.1 |
| Part Number | 461537-001 |
| CPU Socket | Socket AM2 |
| Chipset Type | AMD 780V |
| RAM Memory Technology | DDR2 |
| Memory Slots Available | 2 |
| Memory Clock Speed | 800 MHz |
| Maximum Memory Capacity | 8 GB |
| Graphics Card Interface | Integrated, PCI, PCI-Express x16 |
| USB 2.0 Ports | 6 (rear) |
| System Bus Standard Supported | SATA 3 |
| Platform | Windows 10 (compatible) |
| Product ID (from image) | PARMB0KP1XH0VX |

Figure 4: Close-up view of the motherboard's label, showing the part number 461537-001 and product ID PARMB0KP1XH0VX.
Warranty and Support
For warranty information and technical support, please refer to the documentation provided with your HP Compaq DC5850 system or visit the official support websites for HP and MSI. The manufacturer of this specific motherboard component is MSI COMPUTER.
- HP Support: www.hp.com/support (General HP system support)
- MSI Support: www.msi.com/support (For motherboard component specific inquiries, search for MS-7500)


