
1. Introduction
This manual provides essential instructions for the installation, operation, maintenance, and troubleshooting of your Power4Laptops replacement cooling fan, designed for compatibility with the HP Envy 4-1210TU laptop model. Please read this guide thoroughly before proceeding with any installation or maintenance.
2. Safety Information
- Always disconnect the laptop from its power source and remove the battery before attempting any internal component replacement.
- Electronic components can be sensitive to static electricity. Use appropriate anti-static precautions (e.g., anti-static wrist strap) when handling the fan.
- This fan may require soldering for proper installation. It is strongly advised that installation be performed by a qualified computer technician to prevent damage to your laptop or the new component.
- Ensure the replacement fan matches the original fan in your laptop. Many fans share part numbers but may have subtle differences. Compare the physical appearance of the new fan with your old one before installation.
3. Setup and Installation
3.1 Pre-Installation Checks
- Verify that the replacement fan is the correct model for your HP Envy 4-1210TU laptop by comparing it to the original fan.
- Gather necessary tools, which may include small screwdrivers, prying tools, anti-static wrist strap, and soldering equipment if required.
3.2 Installation Steps
- Power off your HP Envy 4-1210TU laptop completely and disconnect the AC adapter.
- Remove the laptop battery.
- Carefully open the laptop casing to access the internal components, following your laptop's specific service manual for disassembly.
- Locate the existing faulty or damaged fan.
- Disconnect the fan's power cable from the motherboard. If the fan is soldered, carefully desolder the connections.
- Remove any screws securing the old fan and gently lift it out.
- Position the new Power4Laptops replacement fan in the same location.
- Secure the new fan with the screws previously removed.
- Connect the fan's power cable to the motherboard. If soldering is required, carefully solder the connections, ensuring proper polarity and secure joints.
- Reassemble the laptop casing, ensuring all screws are tightened and components are properly seated.
- Reinsert the battery and connect the AC adapter.
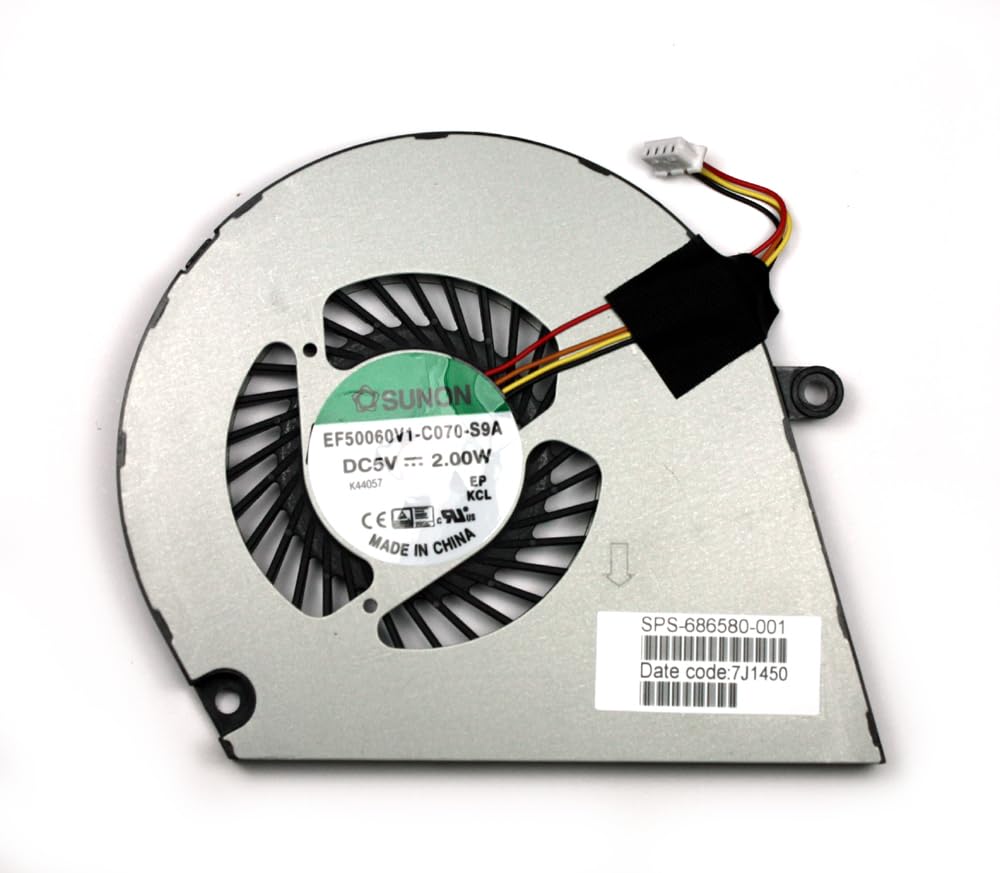
Image 1: Power4Laptops Replacement Laptop Fan. This image shows the general appearance of the replacement fan, which should be compared to your original fan for compatibility.
4. Operating and Function Verification
After installation, it is important to verify that the fan is functioning correctly.
- Power on your laptop.
- Listen for the fan to spin up. A gentle whirring sound is normal.
- Monitor your laptop's temperature using system monitoring software. The fan should activate as the CPU/GPU temperature rises under load, helping to maintain optimal operating temperatures.
- Ensure there are no unusual noises (e.g., grinding, rattling) coming from the fan area.
5. Maintenance
Proper maintenance can extend the life of your laptop fan and ensure efficient cooling.
- Dust Removal: Periodically, and especially if you notice increased noise or reduced cooling performance, carefully open your laptop (following safety guidelines) and use compressed air to gently remove dust buildup from the fan blades and heatsink fins. Hold the fan blades to prevent them from spinning excessively during cleaning.
- Avoid Obstructions: Ensure that the laptop's air vents are not blocked by surfaces like blankets or clothing, as this can impede airflow and cause the fan to work harder.
6. Troubleshooting
6.1 Fan Not Spinning
- Check Connection: Ensure the fan's power cable is securely connected to the motherboard. If soldered, inspect the solder joints for integrity.
- Power Cycle: Perform a full power cycle (remove battery, hold power button for 15 seconds, reinsert battery, power on).
- BIOS/UEFI Settings: Check if there are any fan control settings in your laptop's BIOS/UEFI that might be preventing it from spinning.
- Overheating: If the laptop is not overheating, the fan may not spin until a certain temperature threshold is reached.
6.2 Unusual Noises
- Dust/Obstruction: Dust or small debris caught in the fan blades can cause rattling or grinding. Clean the fan as described in the Maintenance section.
- Improper Seating: Ensure the fan is securely mounted and not touching any other components.
- Bearing Issue: If the noise persists after cleaning and checking seating, the fan's bearings may be faulty, requiring a replacement.
6.3 Laptop Overheating
- Fan Function: Verify the fan is spinning when the laptop is under load.
- Airflow: Ensure laptop vents are clear and not obstructed.
- Thermal Paste: If the heatsink was removed during installation, ensure new thermal paste was applied correctly between the CPU/GPU and the heatsink.
7. Specifications
| Feature | Detail |
|---|---|
| Item Weight | 3.53 ounces |
| Manufacturer | Power4Laptops |
| Item Model Number | Envy 4-1210TU |
| ASIN | B00KNYFC0 |
8. Warranty Information
For specific warranty details regarding your Power4Laptops replacement fan, please refer to the documentation provided at the time of purchase or contact the seller directly. Warranty terms typically cover manufacturing defects but may not cover damage due to improper installation or misuse.
9. Support
If you encounter issues that cannot be resolved using the troubleshooting steps provided, or if you require further assistance, please contact Power4Laptops customer support or the retailer from whom you purchased the product. Provide your product model number (Envy 4-1210TU) and ASIN (B00KNYFC0) when seeking support.