
1. Introduction
The Signstek TL866PLUS is a universal USB MiniPro programmer designed for reading, erasing, and programming a wide range of integrated circuits. It supports EEPROM, Flash, BIOS, AVR, GAL, PIC, and SPI devices, offering high-speed programming for high-capacity memories. This device features a unified user interface, high-density SMD technology, and supports multiprogramming mode for up to four devices simultaneously. This manual provides essential information for the proper setup, operation, and maintenance of your TL866PLUS programmer.
2. What's in the Box
Carefully unpack the contents and ensure all items are present. If any items are missing or damaged, please contact customer support.
- Signstek TL866PLUS Universal USB MiniPro Programmer Unit
- USB Cable for PC connection
- Software CD (or download link)
- ICSP Cable
- Various adapters (e.g., SOP8, PLCC32, TSOP48, depending on package)

Image: The Signstek TL866PLUS programmer package contents, showing the main device, USB cable, ICSP cable, and several common adapters.
3. Key Features
- High-Speed Programming: Significantly faster programming for high-capacity memories compared to previous models.
- Wide Device Support: Compatible with a broad range of EEPROM, Flash, BIOS, AVR, GAL, PIC, and SPI devices.
- Multiprogramming Mode: Supports programming up to four devices simultaneously.
- Unified User Interface: Easy-to-use software interface for efficient operation.
- ICSP Interface: In-Circuit Serial Programming support for certain microcontrollers.
- Compact Design: Ultra-small code and high-density SMD technology for a professional and reliable tool.
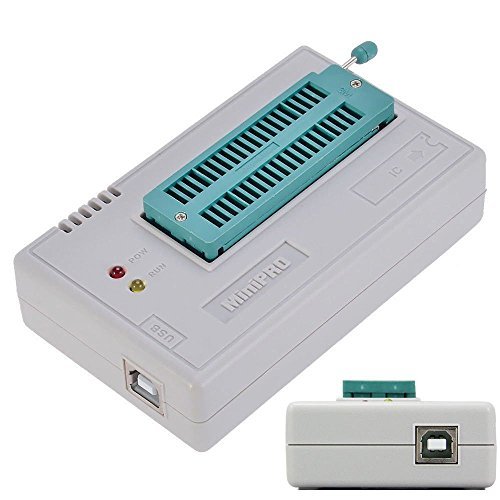
Image: The Signstek TL866PLUS programmer unit, showcasing its compact design and multiple adapter options.
4. Setup Guide
4.1 Software Installation
- Obtain Software: Do not use outdated software from the included mini-CD. Download the latest XGPro TL866II Plus software from the official Signstek website or a trusted source.
- Installation: Run the installer. It is recommended to install the software in a default directory.
- Administrator Privileges: After installation, locate the software executable (e.g., XGPro.exe), right-click, select 'Properties', go to the 'Compatibility' tab, and check 'Run this program as an administrator'. Apply and OK. This is crucial for proper operation, especially on Windows 10.
- Driver Installation: The software installation typically includes the necessary USB drivers. If prompted, allow the driver installation. If issues arise, manually install drivers from the software directory.
- Firmware Update: Connect the TL866PLUS programmer to your computer via the USB cable. Launch the XGPro software. The software may prompt you to update the programmer's firmware. Follow the on-screen instructions to complete the firmware update. Ensure a stable USB connection during this process.
4.2 Hardware Connection
- Connect the provided USB cable to the TL866PLUS programmer and then to an available USB port on your computer.
- The programmer's power indicator should illuminate, indicating it is receiving power.
- For programming DIP (Dual In-line Package) chips, insert the chip into the ZIF (Zero Insertion Force) socket on the programmer. Ensure the chip's pin 1 (indicated by a dot or notch) aligns with the socket's pin 1. Gently push down the ZIF socket lever to secure the chip.
- For other package types (e.g., SOP, PLCC, TSOP), use the appropriate adapter. Insert the chip into the adapter, then insert the adapter into the ZIF socket, ensuring correct orientation.
- For In-Circuit Serial Programming (ICSP), connect the ICSP cable from the programmer to the target circuit board's ICSP header. Refer to the target device's datasheet for correct pinout.

Image: The TL866PLUS programmer in use, demonstrating a chip inserted into the ZIF socket and connected to a computer.
5. Operating Instructions
5.1 Launching the Software
After successful installation, launch the XGPro software. The main interface will display options for device selection, file operations, and programming functions.
5.2 Device Selection
- Click the 'Select IC' or 'Device' button in the software.
- A dialog box will appear, allowing you to search for your specific chip by manufacturer and model number.
- Alternatively, you can use the 'Auto Detect' function if your chip supports it.
- Once selected, the software will display the chip's properties and available operations.
5.3 Basic Programming Workflow
The typical workflow for programming a chip involves reading, erasing, and then writing data.
- Read: To read data from an inserted chip, click the 'Read' button. The data will be displayed in the software's buffer. You can then save this data to a file (e.g., .bin, .hex).
- Erase: Before writing new data to an EPROM or Flash chip, it often needs to be erased. Click the 'Erase' button. The software will perform a full erase cycle.
- Load File: To program new data, first load the desired data file (e.g., .bin, .hex) into the software's buffer using the 'Load File' option.
- Program: With the data loaded and the chip properly inserted, click the 'Program' button. The software will write the buffer data to the chip.
- Verify: After programming, it is highly recommended to click the 'Verify' button to compare the data on the chip with the data in the software's buffer, ensuring a successful write operation.
5.4 Advanced Options
- Check ID: Some chips have a manufacturer ID. The software may attempt to read this ID. If you encounter 'ID Error' messages, try unchecking the 'Check ID' option in the software settings before programming.
- Configuration Bits/Fuses: For microcontrollers (like PIC, AVR), the software provides options to set configuration bits or fuse settings. Refer to the chip's datasheet for correct settings.
- Blank Check: Verifies if a chip is completely erased.

Image: A detailed view of the TL866PLUS ZIF socket, illustrating how a chip is securely placed, potentially with an adapter.
6. Maintenance
- Cleaning: Keep the programmer and its ZIF socket clean and free from dust and debris. Use a soft, dry cloth for cleaning. Avoid liquid cleaners.
- Storage: Store the programmer in a dry, cool environment away from direct sunlight and extreme temperatures.
- Handle with Care: The ZIF socket is a precision component. Avoid applying excessive force when inserting or removing chips or adapters.
- Software Updates: Regularly check the official Signstek website for software and firmware updates to ensure compatibility with new chips and improved performance.
7. Troubleshooting
| Problem | Possible Cause | Solution |
|---|---|---|
| Software does not launch or crashes. | Incorrect installation, missing drivers, insufficient permissions. | Ensure software is the latest version. Run as administrator. Reinstall drivers. |
| 'ID Error' during chip detection or programming. | Chip ID not recognized, incorrect chip selection, faulty chip. | Verify chip model. Try unchecking 'Check ID' option in software. Ensure chip is correctly inserted. |
| Programming fails or data is incorrect. | Chip not erased, incorrect voltage, poor contact, faulty chip. | Perform a full erase before programming. Ensure chip is seated correctly. Verify power supply via USB. |
| Programmer not detected by computer. | USB cable issue, driver issue, faulty USB port. | Try a different USB port or cable. Reinstall USB drivers. Check Device Manager for unrecognized devices. |
8. Specifications
- Model: TL866PLUS
- Interface: USB
- Supported Devices: EEPROM, Flash, BIOS, AVR, GAL, PIC, SPI (40-pin support)
- Multiprogramming: Up to 4 devices simultaneously
- Package Dimensions: 4.8 x 4.3 x 2.4 inches (approximate)
- Item Weight: 6.4 ounces (approximate)
- Date First Available: August 13, 2016
9. Warranty and Support
Signstek products are designed for reliability and performance. For specific warranty information, please refer to the documentation included with your purchase or visit the official Signstek website. For technical support, software updates, or troubleshooting assistance, please contact Signstek customer service through their official channels.
Website: www.signstek.com (Please verify the actual official website for support.)