
1. Introduction
This manual provides comprehensive instructions for the installation, testing, and maintenance of the FLYLINKTECH Replacement LCD Display Screen for the Apple iPad Mini 1. Please read all instructions carefully before beginning the installation process to ensure proper function and to avoid damage to your device or the replacement part.
2. Product Overview
The FLYLINKTECH Replacement LCD Display Screen is designed to replace a damaged or non-functional LCD screen on compatible Apple iPad Mini 1 devices. This product is the LCD display only; it does not include the touch screen digitizer or any installation tools.
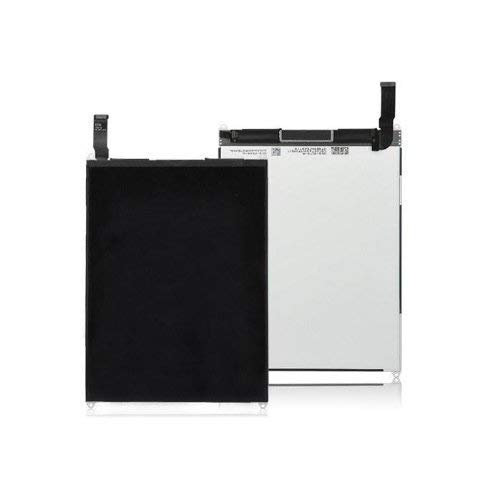
Figure 1: FLYLINKTECH Replacement LCD Display Screen. This image shows the front view of the replacement LCD panel, which is a crucial component for displaying visuals on the iPad Mini 1.
3. Compatibility
This replacement LCD display is compatible with the following Apple iPad Mini 1 models:
- Apple iPad Mini 1 (7.9-inch)
- Model Numbers: A1432, A1454, A1455
Important: This LCD display is NOT compatible with iPad Mini 2 or later models.
4. Safety Information
Before proceeding with any repair, observe the following safety precautions:
- Always power off your device completely before starting the repair.
- Disconnect the device's battery before installing or removing any internal components to prevent electrical shorts or damage.
- Handle all components, especially ribbon cables, with extreme care to avoid tearing or bending.
- Use appropriate tools for the repair.
- Work in a clean, well-lit, and static-free environment.
- If you are unsure about any step, seek professional assistance.
5. Installation Instructions
Follow these steps carefully for the successful installation of your new LCD display:
- Preparation: Ensure your iPad Mini 1 is completely powered off.
- Screen Separation: Carefully use a hairdryer or heat gun to gently warm the edges of the existing screen to loosen the adhesive. Slowly and carefully separate the screen assembly from the iPad chassis. Be extremely cautious of all ribbon cables connected to the logic board.
- Disconnect Battery: Locate and disconnect the battery connector from the logic board. This is a critical step to prevent damage during component replacement.
- Remove Old LCD: Disconnect the ribbon cable of the old LCD display from the logic board and carefully remove the old LCD.
- Pre-Installation Test: Before fully assembling the new LCD, connect its ribbon cable to the logic board. Do not remove the protective film yet. Reconnect the battery. Power on the iPad to test the new LCD's functionality (display quality, absence of lines or dead pixels). If the display functions correctly, power off the device and disconnect the battery again. If it does not function, release the ribbon cable and reconnect it, then retest.
- Protective Film Removal: Once the LCD is confirmed to be working, carefully peel off the protective film from the new LCD. This film often has markings or appears scratched, which can be mistaken for a defective product. These markings will disappear once the film is removed.
- Install New LCD: Carefully position the new LCD display into the iPad chassis. Ensure all ribbon cables are properly routed and connected without kinks or excessive tension.
- Reconnect Battery: Reconnect the battery connector to the logic board.
- Final Assembly: Reassemble the remaining components, including the digitizer (touch screen) and any brackets or covers, ensuring all connections are secure.
- Power On: Power on your iPad Mini 1 to confirm full functionality.
Note: The touch screen digitizer and tools are not included with this LCD display.
6. Testing
After installation, perform the following tests:
- Visual Inspection: Check the entire screen for any dead pixels, discoloration, or uneven backlighting.
- Display Functionality: Navigate through various apps and settings to ensure the display renders all content correctly.
- Touch Functionality: (If digitizer was also replaced) Test touch response across the entire screen.
7. Maintenance
To ensure the longevity of your new LCD display:
- Avoid exposing the device to extreme temperatures or direct sunlight.
- Clean the screen with a soft, lint-free cloth, preferably microfiber, and a screen-safe cleaning solution if necessary.
- Avoid applying excessive pressure to the screen.
- Protect your device with a case and screen protector to prevent future damage.
8. Troubleshooting
If you encounter issues after installation, consider the following:
- Screen Appears Scratched or Marked: Ensure the protective film has been completely removed from the LCD surface. This film is designed to protect the screen during shipping and installation.
- No Display or Partial Display:
- Power off the device and disconnect the battery.
- Carefully check that the LCD ribbon cable is securely and correctly seated in its connector on the logic board.
- Ensure the battery connector is properly seated.
- Reconnect the battery and power on the device to retest.
- Display Issues (e.g., lines, flickering): This could indicate a damaged ribbon cable or an improperly seated connector. Recheck connections carefully. If the issue persists, the LCD itself may be faulty.
For any persistent issues or further assistance, please contact FLYLINKTECH customer support.
9. Specifications
| Screen Display Size | 7.9 Inches |
| Brand | FLYLINKTECH |
| Item Model Number | LED-IPADMINI-A2 |
| Item Weight | 8 ounces |
| Product Dimensions | 12 x 8 x 1.5 inches |
| Screen Finish | Glossy |
| Material | Plexi-Glass |
10. Warranty and Support
This FLYLINKTECH Replacement LCD Display Screen comes with a 1-Year Warranty from the date of purchase. This warranty covers manufacturing defects. Please retain your proof of purchase for warranty claims.
For technical support, warranty claims, or any other inquiries, please contact FLYLINKTECH customer service directly through the retailer where the product was purchased or via the official FLYLINKTECH website.