
1. Important Safety Information
To reduce the risk of fire, electrical shock, or injury when using your appliance, follow these basic precautions:
- Read all instructions before using the appliance.
- This appliance must be properly installed and located in accordance with the Installation Instructions before it is used.
- Do not allow children to climb, stand, or hang on the shelves in the appliance. They could damage the appliance and seriously injure themselves.
- Do not store or use gasoline or other flammable vapors and liquids in the vicinity of this or any other appliance.
- Unplug the appliance before cleaning or making any repairs.
- If the supply cord is damaged, it must be replaced by the manufacturer, its service agent, or similarly qualified persons in order to avoid a hazard.
- Ensure proper ventilation around the appliance.
2. Product Overview
The Midea WHS-169SE is a compact beverage cooler designed for efficient storage of up to 138 cans. It features a sleek design with a stainless steel door and handle.
Key Features:
- See-through glass door, stainless steel handle, single door, door open alarm
- LED temperature display
- Interior light
- Glass shelves
Components:
The cooler includes a main cabinet, a reversible stainless steel door with a glass panel, a stainless steel handle, multiple glass shelves for organizing beverages, an internal LED light, and a control panel with an LED temperature display.
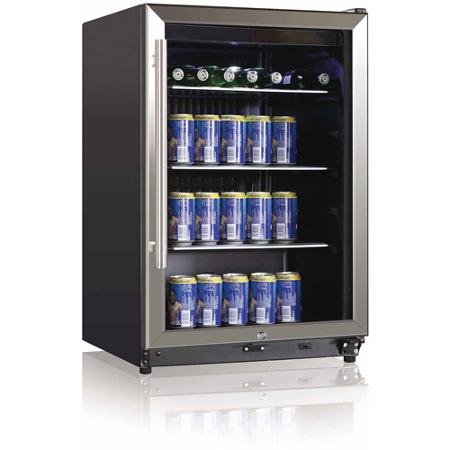
Image: Front view of the Midea WHS-169SE 138-Can Beverage Cooler, showcasing its stainless steel finish and glass door.
3. Setup and Installation
Unpacking:
- Remove all packaging materials, including the foam base and adhesive tape.
- Inspect the appliance for any damage. Report any damage to your dealer immediately.
- Keep packaging materials out of reach of children.
Placement:
- Place the cooler on a flat, solid surface strong enough to support it when fully loaded.
- Allow at least 5 inches (12.7 cm) of space between the back and sides of the cooler and any adjacent walls to ensure proper air circulation.
- Avoid placing the cooler in direct sunlight or near heat sources (e.g., oven, radiator).
- This appliance is designed for freestanding installation only.
Leveling:
Adjust the leveling legs at the bottom of the cooler to ensure it is stable and level. A level appliance operates more efficiently and prevents the door from swinging open or closing improperly.
Electrical Connection:
- Plug the appliance into a dedicated, grounded 120 Volt, 60 Hz AC outlet.
- Do not use an extension cord or adapter plug.
- Allow the cooler to stand upright for at least 2-4 hours before plugging it in to allow the refrigerant to settle.
Door Reversal:
The door on this appliance is reversible. If you wish to change the door swing direction, refer to the detailed instructions in the separate door reversal guide or contact customer support for assistance. This process typically involves removing hinges and reinstalling them on the opposite side.
4. Operating Instructions
Initial Startup:
After plugging in the appliance, allow it to operate for approximately 2-3 hours before placing beverages inside. This allows the interior to reach the desired temperature.
Temperature Control:
- The cooler features an LED temperature display and control buttons, usually located near the top of the door frame or inside the unit.
- Use the 'Up' and 'Down' arrows or '+' and '-' buttons to adjust the desired temperature.
- The temperature range is typically between 34°F (1°C) and 50°F (10°C).
- The LED display will show the set temperature and then revert to displaying the actual internal temperature.
Interior Light:
The interior light can be turned on or off using a dedicated button on the control panel. This light helps illuminate the contents of the cooler.
Loading the Cooler:
- Arrange beverages on the glass shelves to allow for proper air circulation.
- Avoid overloading the shelves, as this can impede cooling performance.
- Ensure the door closes completely after each use to maintain temperature. The door open alarm will sound if the door is left ajar.
5. Care and Maintenance
Cleaning:
- Interior: Unplug the appliance. Wash the interior surfaces with a solution of warm water and baking soda (2 tablespoons of baking soda to 1 quart of water). Rinse and dry thoroughly.
- Exterior: Clean the exterior with a mild detergent and warm water. Wipe dry with a soft cloth. For stainless steel surfaces, use a stainless steel cleaner.
- Door Gasket: Clean the door gasket regularly to ensure a proper seal.
- Do not use harsh chemicals, abrasive cleaners, or scouring pads, as they can damage surfaces.
Defrosting:
This appliance is designed with an automatic defrost system. Frost on the evaporator will melt during the compressor's off cycle and drain into a drip tray at the back of the unit, where it evaporates. Manual defrosting is generally not required.
Power Interruption:
In case of a power outage, keep the door closed to maintain the internal temperature for as long as possible. Avoid opening the door unnecessarily.
Vacation and Storage:
- Short Vacations: Leave the cooler operating.
- Long Vacations/Storage: Remove all contents, unplug the appliance, clean it thoroughly, and leave the door slightly ajar to prevent odors and mold growth.
6. Troubleshooting
Before contacting customer service, review the following common issues and solutions:
| Problem | Possible Cause | Solution |
|---|---|---|
| Appliance does not operate | Not plugged in; circuit breaker tripped; temperature control set to 'OFF' or too high. | Ensure plug is secure; reset circuit breaker; adjust temperature setting. |
| Temperature is not cold enough | Door opened too frequently; door not closed completely; warm beverages added; poor ventilation; excessive frost. | Minimize door openings; ensure door seals; allow warm beverages to cool before loading; ensure proper clearance around unit; check for frost buildup. |
| Vibrations or excessive noise | Appliance not level; loose parts; contact with wall. | Adjust leveling legs; check for loose components; move appliance away from walls. |
| Door will not close properly | Appliance not level; door gasket dirty or damaged; shelves out of position. | Level the appliance; clean or replace gasket; reposition shelves. |
| Interior light not working | Light switch off; LED bulb failure. | Ensure light switch is on; contact service for bulb replacement. |
7. Specifications
Detailed technical specifications for the Midea WHS-169SE beverage cooler:
| Specification | Value |
|---|---|
| Brand | Midea |
| Model Number | WHS-169SE |
| Capacity | 4.9 Cubic Feet / 138 Cans |
| Color | Black |
| Installation Type | Freestanding |
| Number of Doors | 1 |
| Voltage | 120 Volts |
| Finish Type | Stainless Steel |
| Door Material Type | Stainless Steel |
| Shelf Type | Glass Shelves |
| Cooling Method | Compressor |
| Door Orientation | Reversible |
| Item Weight | 97 Pounds |
| UPC | 814982016535 |
8. Warranty Information
This Midea appliance comes with a comprehensive warranty:
- Full 1-Year Warranty: Covers parts and labor for the entire appliance for one year from the date of purchase.
- Compressor 2-Year Warranty: Covers the compressor for two years from the date of purchase.
Please retain your proof of purchase for warranty claims. For full terms and conditions, refer to the warranty card included with your product or visit the Midea official website.
9. Customer Support
If you have any questions, require technical assistance, or need to schedule service, please contact Midea Customer Support:
- Refer to the contact information provided in your product packaging.
- Visit the official Midea website for support resources, FAQs, and contact details.
- When contacting support, please have your model number (WHS-169SE) and serial number ready.


