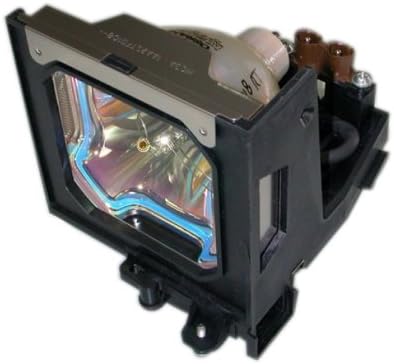
This manual provides essential information for the safe and effective installation, operation, and maintenance of your Boxlight replacement lamp module. This module is designed for use with Boxlight LC-XG110, LC-XG210, and LX32 projector models. Please read these instructions carefully before proceeding with installation.
Image: Boxlight replacement lamp module, showing the bulb encased in its housing with electrical connectors.
The Boxlight replacement lamp module (Part Number: ACTG042) includes an original bulb and housing, ensuring compatibility and optimal performance with your projector. It features a 250-watt bulb with an average lamp life of 2000 hours under normal operating conditions.
Important Safety Information
The bulb in this lamp contains Mercury (Hg). Please dispose of in accordance with local, state, or federal laws. Do not dispose of with regular household waste.
Always disconnect the projector from the power outlet before attempting any installation or maintenance.
Allow the projector to cool down completely (at least 30 minutes) before replacing the lamp. Hot lamps can cause severe burns.
Avoid touching the glass surface of the new lamp directly with bare hands. Oils from your skin can reduce lamp life. Use gloves or a clean cloth if necessary.
Do not force the lamp module into place. If it does not fit easily, recheck the orientation and ensure it is the correct lamp for your projector model.
Never operate the projector with the lamp cover removed.
Keep the lamp module out of reach of children.
Installation Instructions
Power Off and Disconnect: Ensure your Boxlight projector is turned off and completely unplugged from the power source.
Cool Down: Allow the projector to cool down for at least 30 minutes. The lamp operates at high temperatures and can cause burns if handled while hot.
Locate Lamp Cover: Refer to your projector's user manual to locate the lamp compartment cover. This is typically secured by one or more screws.
Remove Lamp Cover: Using a suitable screwdriver, carefully remove the screw(s) securing the lamp cover and then remove the cover.
Unscrew Old Lamp: The old lamp module will be secured by one or more screws. Unscrew these fasteners.
Remove Old Lamp: Gently pull the handle on the old lamp module to slide it out of the projector. Be careful not to drop it.
Insert New Lamp: Carefully insert the new Boxlight replacement lamp module into the projector, ensuring it slides smoothly into place. Do not force it.
Secure New Lamp: Fasten the new lamp module with the screw(s) you removed earlier. Ensure it is securely seated.
Replace Lamp Cover: Reattach the lamp compartment cover and secure it with its screw(s).
Reconnect Power: Plug the projector back into the power outlet.
Reset Lamp Timer: Consult your projector's user manual for instructions on how to reset the lamp timer. This is crucial for accurate lamp life tracking.
Operating Guidelines
Proper Shutdown: Always allow the projector to complete its cooling cycle after use before unplugging it. Abrupt power cuts can shorten lamp life.
Ventilation: Ensure the projector has adequate ventilation. Blocked vents can lead to overheating and reduced lamp life.
Avoid Frequent On/Off Cycles: Turning the projector on and off frequently can stress the lamp and reduce its lifespan.
Eco Mode (if available): If your projector has an "Eco Mode" or similar power-saving setting, using it can extend lamp life.
Maintenance
Air Filter Cleaning: Regularly clean or replace your projector's air filter as per your projector's manual. A clogged filter can cause the projector to overheat, negatively impacting lamp life.
Dust Removal: Keep the projector free from dust. Use a soft, dry cloth to wipe the exterior. Do not use abrasive cleaners or solvents.
Lamp Handling: When handling the lamp module, always hold it by its housing, not the bulb itself.
Troubleshooting
If you encounter issues after installing the new lamp, consider the following:
Lamp Not Lighting Up:
Ensure the lamp module is fully seated and secured with its screws.
Verify the lamp cover is correctly installed and secured. Many projectors have a safety switch that prevents operation if the cover is open.
Check that the projector is properly plugged into a working power outlet.
Dim Image or Poor Color:
Confirm the lamp timer has been reset. If not, the projector might still be operating under the assumption of an old, worn-out lamp.
Check projector settings for brightness or picture modes.
Ensure the projector lens is clean.
"Lamp Error" Message:
This often indicates the lamp is not properly installed or the lamp cover is not secured. Re-check installation steps.
If the error persists, the lamp itself might be faulty. Contact customer support.
For further assistance, refer to your projector's original user manual or contact Boxlight customer support.
Product Specifications
Brand
Boxlight
Model Number
ACTG042
Compatible Projector Models
LC-XG110, LC-XG210, LX32
Lamp Part Numbers
03-000712-01P; 610 305 5602; MP56T-930; POA-LMP59
Wattage
250 watts
Lamp Life (Normal)
2000 hours
Light Type
Xenon
Lamp Technology
LCD
Item Weight
13.3 ounces (0.83 Pounds)
Product Dimensions
5.32 x 4.53 x 4.13 inches
UPC
840398106805
Warranty Information
This Boxlight replacement lamp module is covered by a 180-Day Warranty from the date of purchase. This warranty covers defects in materials and workmanship under normal use. Please retain your proof of purchase for warranty claims.
For warranty service or inquiries, please contact the seller or manufacturer directly.
Customer Support
If you require further assistance, have questions about installation, or need to report an issue, please contact the retailer where you purchased this product or the manufacturer, Arclyte Tech. (Boxlight's manufacturer).
When contacting support, please have your product model number (ACTG042) and proof of purchase readily available.
Ask a question about this manual
Ask about setup, troubleshooting, compatibility, parts, safety, or missing instructions. Manuals+ will review the question and use this page’s manual context to help answer it.