
Pyle PLMR61W
Pyle 6.5" Waterproof Marine Stereo Speaker System User Manual
Model: PLMR61W
1. Introduction
Thank you for choosing the Pyle PLMR61W 6.5-inch Waterproof Marine Stereo Speaker System. This manual provides essential information for the proper installation, operation, and maintenance of your new speakers. Please read this manual thoroughly before installation and keep it for future reference to ensure optimal performance and longevity of your product.
2. Safety Information
To prevent injury or damage to the speakers, please observe the following precautions:
- Ensure all wiring is correctly connected and insulated to prevent short circuits.
- Do not expose the speakers to extreme temperatures or direct sunlight for prolonged periods.
- While waterproof, avoid submerging the speakers. They are designed for marine environments with splash and spray resistance.
- Always disconnect power before performing any installation or maintenance.
- Use appropriate tools and wear safety gear during installation.
- Consult a professional installer if you are unsure about any part of the installation process.
3. Package Contents
Verify that all items are present in the package:
- (2) 6.5-inch Waterproof Marine Speakers
- Mounting Hardware (screws, nuts, washers)
- Speaker Grilles (pre-attached or separate)

Figure 3.1: The retail packaging for the Pyle PLMR61W speaker system, showing the product and key features on the box.
4. Setup and Installation
Proper installation is crucial for optimal sound quality and speaker longevity. Follow these steps carefully:
4.1 Choosing a Mounting Location
Select a flat, stable surface that can support the weight of the speakers and is free from obstructions. Ensure there is sufficient depth behind the mounting surface for the speaker magnet and wiring. The mounting depth required is approximately 1.5 inches (1 1/2").
4.2 Preparing the Mounting Hole
- Mark the desired mounting location.
- Using a template (often provided with the speakers or available online) or by carefully measuring the speaker's cutout diameter (approximately 5.5 inches), draw the cutting line on the mounting surface.
- Carefully cut the hole using an appropriate cutting tool (e.g., jigsaw, hole saw). Ensure the edges are smooth and free of debris.
- Drill pilot holes for the mounting screws around the perimeter of the cutout.
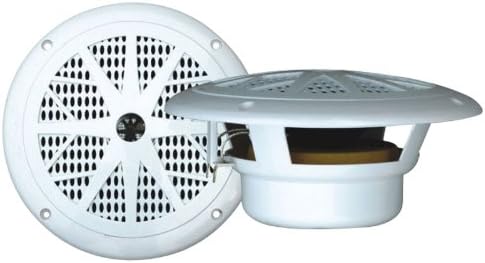
Figure 4.1: Front view of the Pyle PLMR61W speaker with its grille, alongside a side profile view illustrating its depth.
4.3 Wiring the Speakers
The PLMR61W speakers are passive and require an external amplifier or head unit for power. Each speaker has two terminals for audio input.
- Identify the positive (+) and negative (-) terminals on the speaker. These are typically marked.
- Connect the positive (+) wire from your amplifier/head unit to the positive (+) terminal on the speaker.
- Connect the negative (-) wire from your amplifier/head unit to the negative (-) terminal on the speaker.
- Ensure all connections are secure and properly insulated to prevent corrosion and short circuits, especially in a marine environment.

Figure 4.2: Rear view of the Pyle PLMR61W speaker, showing the magnet structure and the positive and negative wiring terminals.
4.4 Mounting the Speakers
- Carefully insert the speaker into the prepared mounting hole.
- Align the mounting holes on the speaker frame with the pilot holes drilled earlier.
- Secure the speaker using the provided mounting screws. Do not overtighten, as this can damage the speaker frame or mounting surface.
- If separate, attach the speaker grille securely.

Figure 4.3: Side profile of the Pyle PLMR61W speaker, highlighting its shallow mounting depth and the design of the speaker basket.
5. Operation
Once properly installed and wired to an appropriate amplifier or head unit, the Pyle PLMR61W speakers will reproduce audio from your connected source. Ensure your amplifier's power output matches the speaker's power handling capabilities to prevent damage.
- Turn on your audio source (e.g., marine stereo, receiver).
- Adjust the volume gradually to a comfortable listening level.
- Avoid prolonged listening at extremely high volumes, which can cause hearing damage and speaker distortion.
6. Maintenance
Regular maintenance will help prolong the life and performance of your marine speakers:
- Cleaning: Periodically wipe down the speaker grilles and surrounds with a soft, damp cloth. For stubborn dirt, a mild soap solution can be used, followed by rinsing with fresh water and drying thoroughly.
- Inspection: Regularly inspect the speaker cones, surrounds, and grilles for any signs of damage or wear. Check wiring connections for corrosion or looseness.
- Protection: While waterproof, consider covering the speakers when the vessel is not in use for extended periods, especially in harsh marine environments, to protect against UV exposure and salt spray buildup.
7. Troubleshooting
| Problem | Possible Cause | Solution |
|---|---|---|
| No Sound from Speakers |
|
|
| Distorted Sound |
|
|
| Intermittent Sound |
|
|
8. Specifications
| Model Name | PLMR61W |
| Speaker Size | 6.5 Inches |
| Speaker Type | Dual-Cone, Full Range |
| Peak Power Handling | 120 Watts |
| Impedance | 4 Ohms |
| Frequency Response | 45Hz - 16kHz |
| Magnet Structure | 20 oz. Circuit Magnet |
| Voice Coil | 1" Aluminum Voice Coil |
| Mounting Depth | 1.5 Inches (1 1/2") |
| Water Resistance Level | Waterproof |
| Construction Material | Molded ABS Basket, Polypropylene Cone with Cloth Surround |
| Connectivity Technology | Auxiliary (Note: Bluetooth is listed as a protocol, but for passive speakers, auxiliary connection to an amplifier is the primary method) |
9. Warranty and Support
Pyle products are designed and manufactured to the highest quality standards. For detailed warranty information, please refer to the warranty card included with your product or visit the official Pyle website. If you encounter any issues or have questions regarding your PLMR61W speakers, please contact Pyle customer support.
Pyle Customer Support:
- Website: www.pyleusa.com
- Contact information typically available on the website.
Related documentsPLMR61W


Ask a question about this manual
Ask about setup, troubleshooting, compatibility, parts, safety, or missing instructions. Manuals+ will review the question and use this page’s manual context to help answer it.