1. Introduction
The iClock-360 is an advanced biometric fingerprint reader designed for Time & Attendance and access control applications. It utilizes a high-performance algorithm and a ZK optical fingerprint sensor to ensure reliable and precise user identification. This manual provides essential information for the setup, operation, maintenance, and troubleshooting of your iClock-360 device.
2. Key Features
- Stores up to 30,000 users and 8,000 fingerprint templates.
- Supports communication with a PC via Ethernet (TCP/IP) and USB port for data transmission.
- Functions as both a Time & Attendance and an access control device.
- Incorporates a ZK fingerprint sensor and optionally an RFID reader.
- Features a 3.5-inch TFT display for vivid information display, including user photo, fingerprint image quality, and verification results.
- Eight function keys provide shortcuts for attendance status changes, work-code entry, or short message browsing, and are user-definable.
3. Product Overview
The iClock-360 terminal features a user-friendly interface with a display screen, keypad, function keys, and a fingerprint sensor. Below are images illustrating the device's components and various views.

Figure 1: Front view of the iClock-360 terminal, showing the 3.5-inch TFT display, numeric keypad, function keys (F1-F8), and the illuminated fingerprint sensor.

Figure 2: Various perspectives of the iClock-360 device, illustrating its front panel, rear connections, and side profiles for installation planning.

Figure 3: Side view of the iClock-360 terminal, highlighting its compact design and profile when mounted.
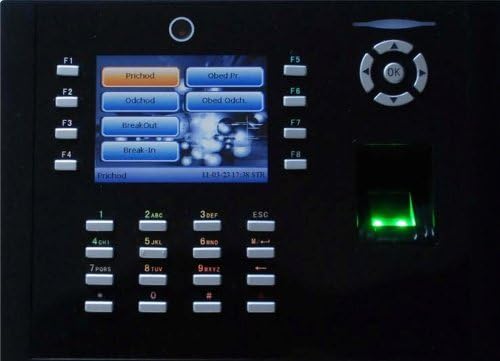
Figure 4: The iClock-360 display showing typical attendance menu options such as 'Prichod' (Clock In), 'Odchod' (Clock Out), 'Break Out', and 'Break In', accessible via the function keys.
4. Setup Guide
4.1 Unpacking and Inspection
Carefully unpack the iClock-360 device and all accessories. Inspect for any signs of damage during transit. Report any damage to your supplier immediately.
4.2 Power Connection
- Connect the provided power adapter to the power input port on the back of the iClock-360 terminal.
- Plug the power adapter into a standard electrical outlet.
- The device will power on automatically. Wait for the system to initialize.
4.3 Network Connection
The iClock-360 supports both TCP/IP (Ethernet) and USB communication.
4.3.1 Ethernet (TCP/IP)
- Connect an Ethernet cable from your network router or switch to the LAN port on the iClock-360.
- Access the device's menu (usually by pressing 'M/<-' or 'ESC' and entering administrator credentials) to configure network settings such as IP address, subnet mask, and gateway. Refer to the on-screen menu for specific navigation.
4.3.2 USB Communication
For direct data transfer, connect the iClock-360 to a computer using a USB cable. The device can function as a USB host for data export or as a USB client for direct PC communication, depending on the model and firmware.
4.4 Initial Configuration
Upon first power-on or after a factory reset, you may need to set the date, time, and administrator password. Follow the on-screen prompts or navigate through the system menu to configure these basic settings.
5. Operating Instructions
5.1 User Registration
To use the Time & Attendance or access control features, users must first be registered.
- Access the main menu (typically by pressing 'M/<-' or 'ESC' and authenticating as an administrator).
- Navigate to 'User Management' or 'Enroll User'.
- Select 'Enroll Fingerprint' or 'Enroll User ID'.
- Follow the on-screen instructions to enter a User ID, name, and register the fingerprint by placing the finger on the sensor multiple times until successful.
- Save the user information.
5.2 Time & Attendance Functions
Users can record their attendance using their registered fingerprint.
- At the main screen, place a registered finger on the fingerprint sensor.
- The device will verify the fingerprint and display a confirmation message.
- To change attendance status (e.g., Clock In, Clock Out, Break In, Break Out), use the designated function keys (F1-F8) as configured. The screen will display the available options (refer to Figure 4).
5.3 Menu Navigation
Use the numeric keypad and navigation buttons (up, down, left, right, OK) to move through the device's menu system. The 'ESC' or 'M/<-' button typically serves as a back or menu access key.
6. Maintenance
6.1 Cleaning
Regular cleaning helps maintain optimal performance.
- Fingerprint Sensor: Gently wipe the sensor surface with a soft, lint-free cloth. Do not use abrasive materials or harsh chemicals.
- Device Casing: Use a soft, damp cloth to clean the exterior of the device. Avoid getting moisture into any ports or openings.
6.2 Software Updates
Periodically check the manufacturer's website for firmware updates. Updates can improve performance, add features, or address security vulnerabilities. Follow the provided instructions carefully when performing any firmware update.
7. Troubleshooting
7.1 Fingerprint Not Recognized
- Ensure your finger is clean and dry.
- Place your finger flat and centered on the sensor.
- Try re-enrolling your fingerprint if the issue persists, ensuring a clear and complete scan.
- Clean the fingerprint sensor surface as described in Section 6.1.
7.2 Network Connectivity Issues
- Verify that the Ethernet cable is securely connected to both the device and the network switch/router.
- Check the network settings (IP address, subnet mask, gateway) on the device to ensure they are correct for your network.
- Confirm that your network infrastructure (router, switch) is functioning correctly.
7.3 Device Not Powering On
- Ensure the power adapter is correctly connected to the device and the electrical outlet.
- Verify that the electrical outlet is functional by testing it with another device.
- Check the power adapter for any visible damage.
8. Technical Specifications
| Specification | Detail |
|---|---|
| Item Model Number | iClock-360 |
| Item Weight | 3.08 pounds |
| Manufacturer | ZKsoftware |
| ASIN | B00JDP5AMG |
| Date First Available | March 31, 2014 |
9. Warranty Information
Specific warranty details for the iClock-360 are not provided in this manual. Please refer to the warranty documentation included with your purchase or visit the official ZKsoftware website for comprehensive warranty terms and conditions.
10. Customer Support
For technical assistance, product inquiries, or further support, please contact your vendor or refer to the official ZKsoftware support channels. Contact information can typically be found on the manufacturer's website or in your product packaging.


