Introduction
This manual provides essential instructions for the safe operation, assembly, maintenance, and troubleshooting of your Stanley SL18116P 6-Gallon 4.0 Peak HP Wet/Dry Vacuum. Please read this manual thoroughly before using the appliance and retain it for future reference.
Important Safety Information
WARNING:
To reduce the risk of fire, electric shock, or injury, always follow basic safety precautions. Keep the vacuum away from fire or high-temperature environments. Do not operate in the presence of flammable liquids or gases.
Always unplug the vacuum from the electrical outlet before performing any adjustments, changing accessories, or storing the unit.
Package Contents
Verify that all items listed below are included in your package. If any parts are missing or damaged, contact customer service.
- Stanley SL18116P Wet/Dry Vacuum Unit
- 1-1/4" x 6' Super Flexible Hose
- Extension Wands (x3)
- Crevice Nozzle
- Gulper Nozzle
- Floor Nozzle
- Foam Filter (for wet use)
- Dust Bag (disposable)
- Reusable Dry Filter with Clamp Ring
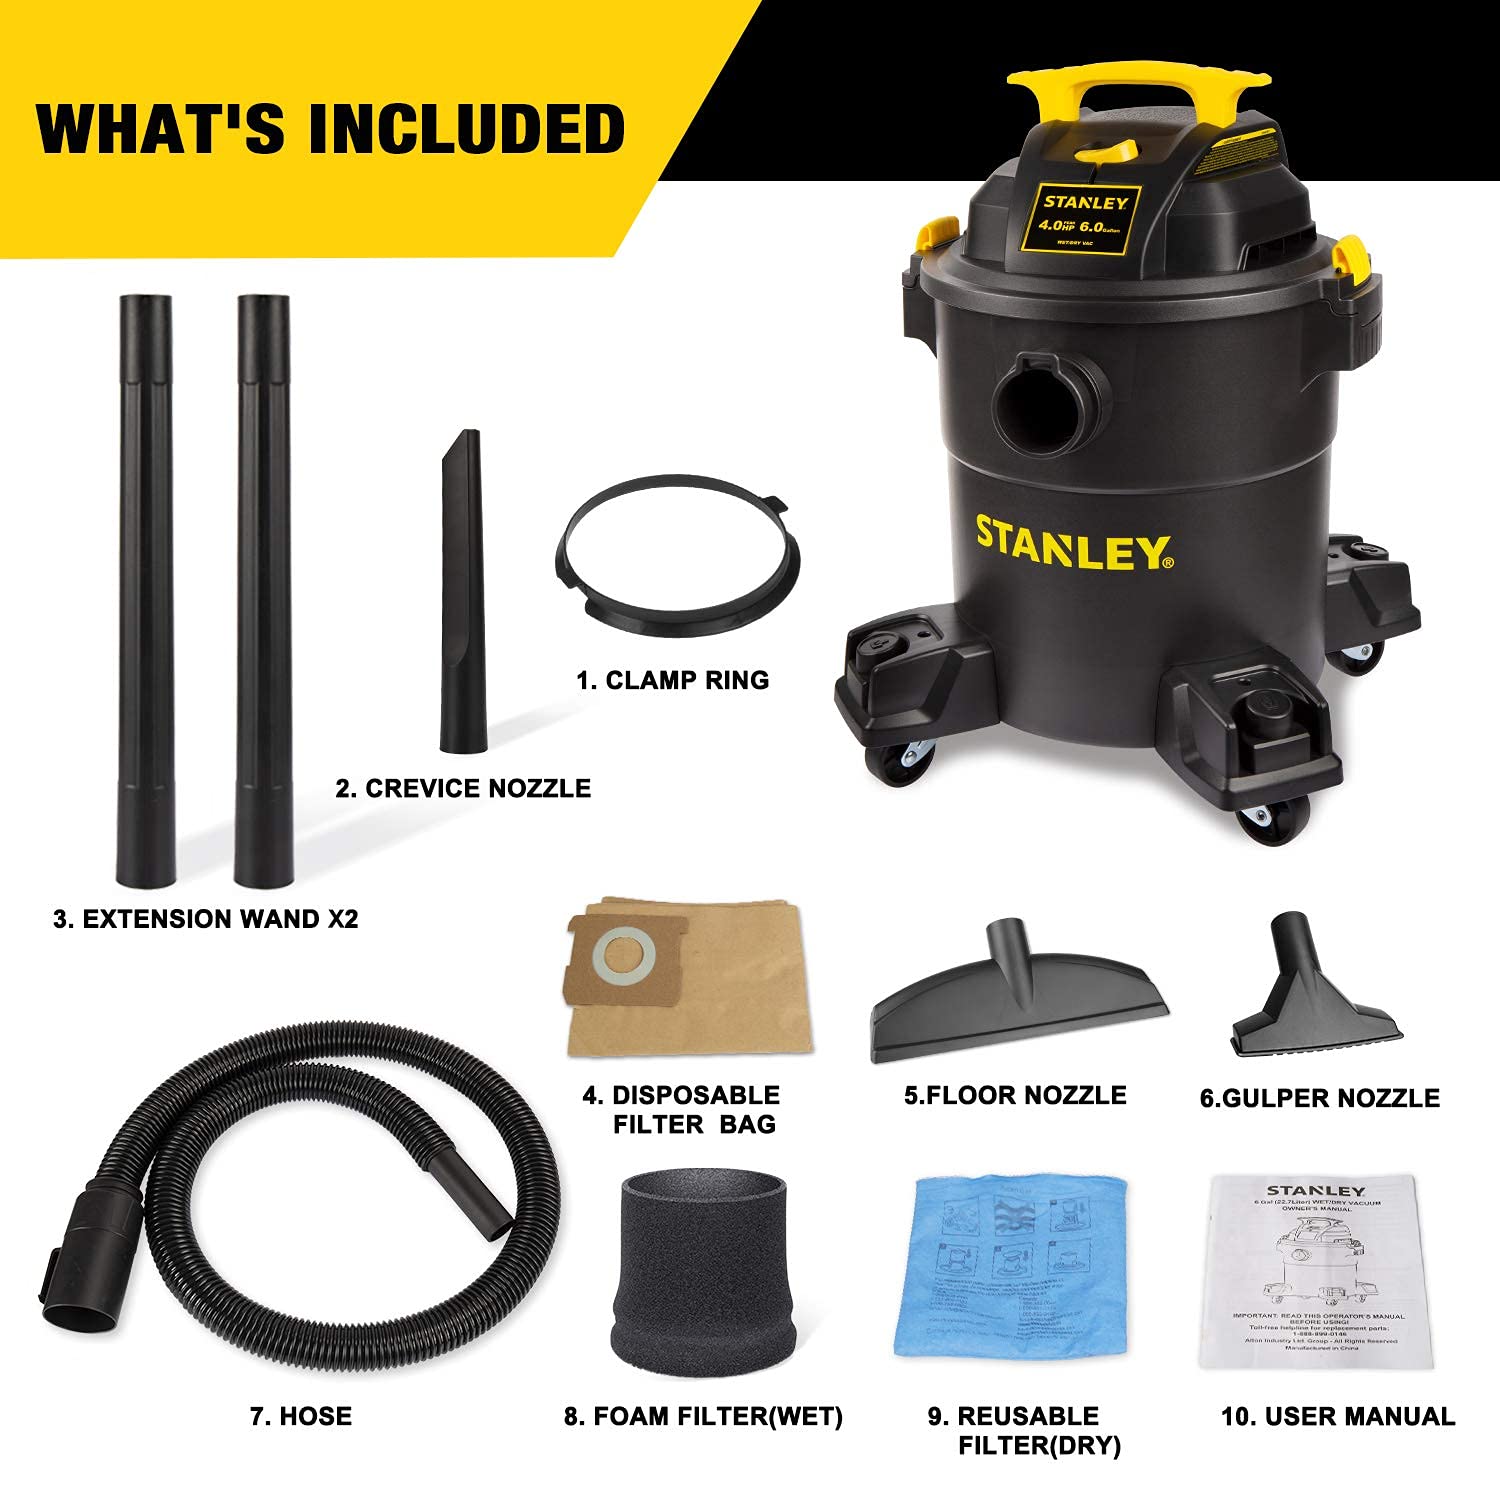
Image: All components included with the Stanley SL18116P Wet/Dry Vacuum, laid out for identification.
Assembly Instructions
- Attach Casters: Turn the tank upside down. Insert the four swivel casters into the slots on the bottom of the tank until they click securely into place.
- Connect Hose: Insert the larger end of the flexible hose into the vacuum port on the front of the tank until it is firmly seated. For blower function, connect the hose to the rear blower port.
- Install Filters: Refer to the "Operating Instructions" section for specific filter installation based on wet or dry use.
- Attach Accessories: Connect desired extension wands and nozzles to the free end of the hose for specific cleaning tasks.

Image: The Stanley SL18116P Wet/Dry Vacuum fully assembled, ready for operation.
Operating Instructions
1. Dry Vacuuming
- Filter Installation: For dry vacuuming, ensure the reusable dry filter (with clamp ring) is securely installed over the filter cage. For fine dust, a disposable dust bag can be used in conjunction with the dry filter for improved filtration and easier disposal.
- Connect Hose: Attach the hose to the front vacuum port.
- Power On: Plug the power cord into a suitable electrical outlet. Turn the vacuum on using the large on/off switch.
- Vacuuming: Use the appropriate nozzle (e.g., floor nozzle for large areas, crevice nozzle for tight spaces) to collect dry debris.
- Power Off: When finished, turn off the vacuum and unplug it.

Image: Demonstrates dry vacuuming on a carpeted surface using the floor nozzle.
2. Wet Vacuuming
- Filter Installation: For wet vacuuming, remove the reusable dry filter and dust bag. Install the foam filter over the filter cage. Ensure it is properly seated.
- Connect Hose: Attach the hose to the front vacuum port.
- Power On: Plug the power cord into a suitable electrical outlet. Turn the vacuum on using the large on/off switch.
- Vacuuming: Use the gulper nozzle or floor nozzle to pick up liquid spills. The vacuum will automatically shut off when the tank is full.
- Power Off: When finished, turn off the vacuum and unplug it. Empty the tank immediately after wet use.
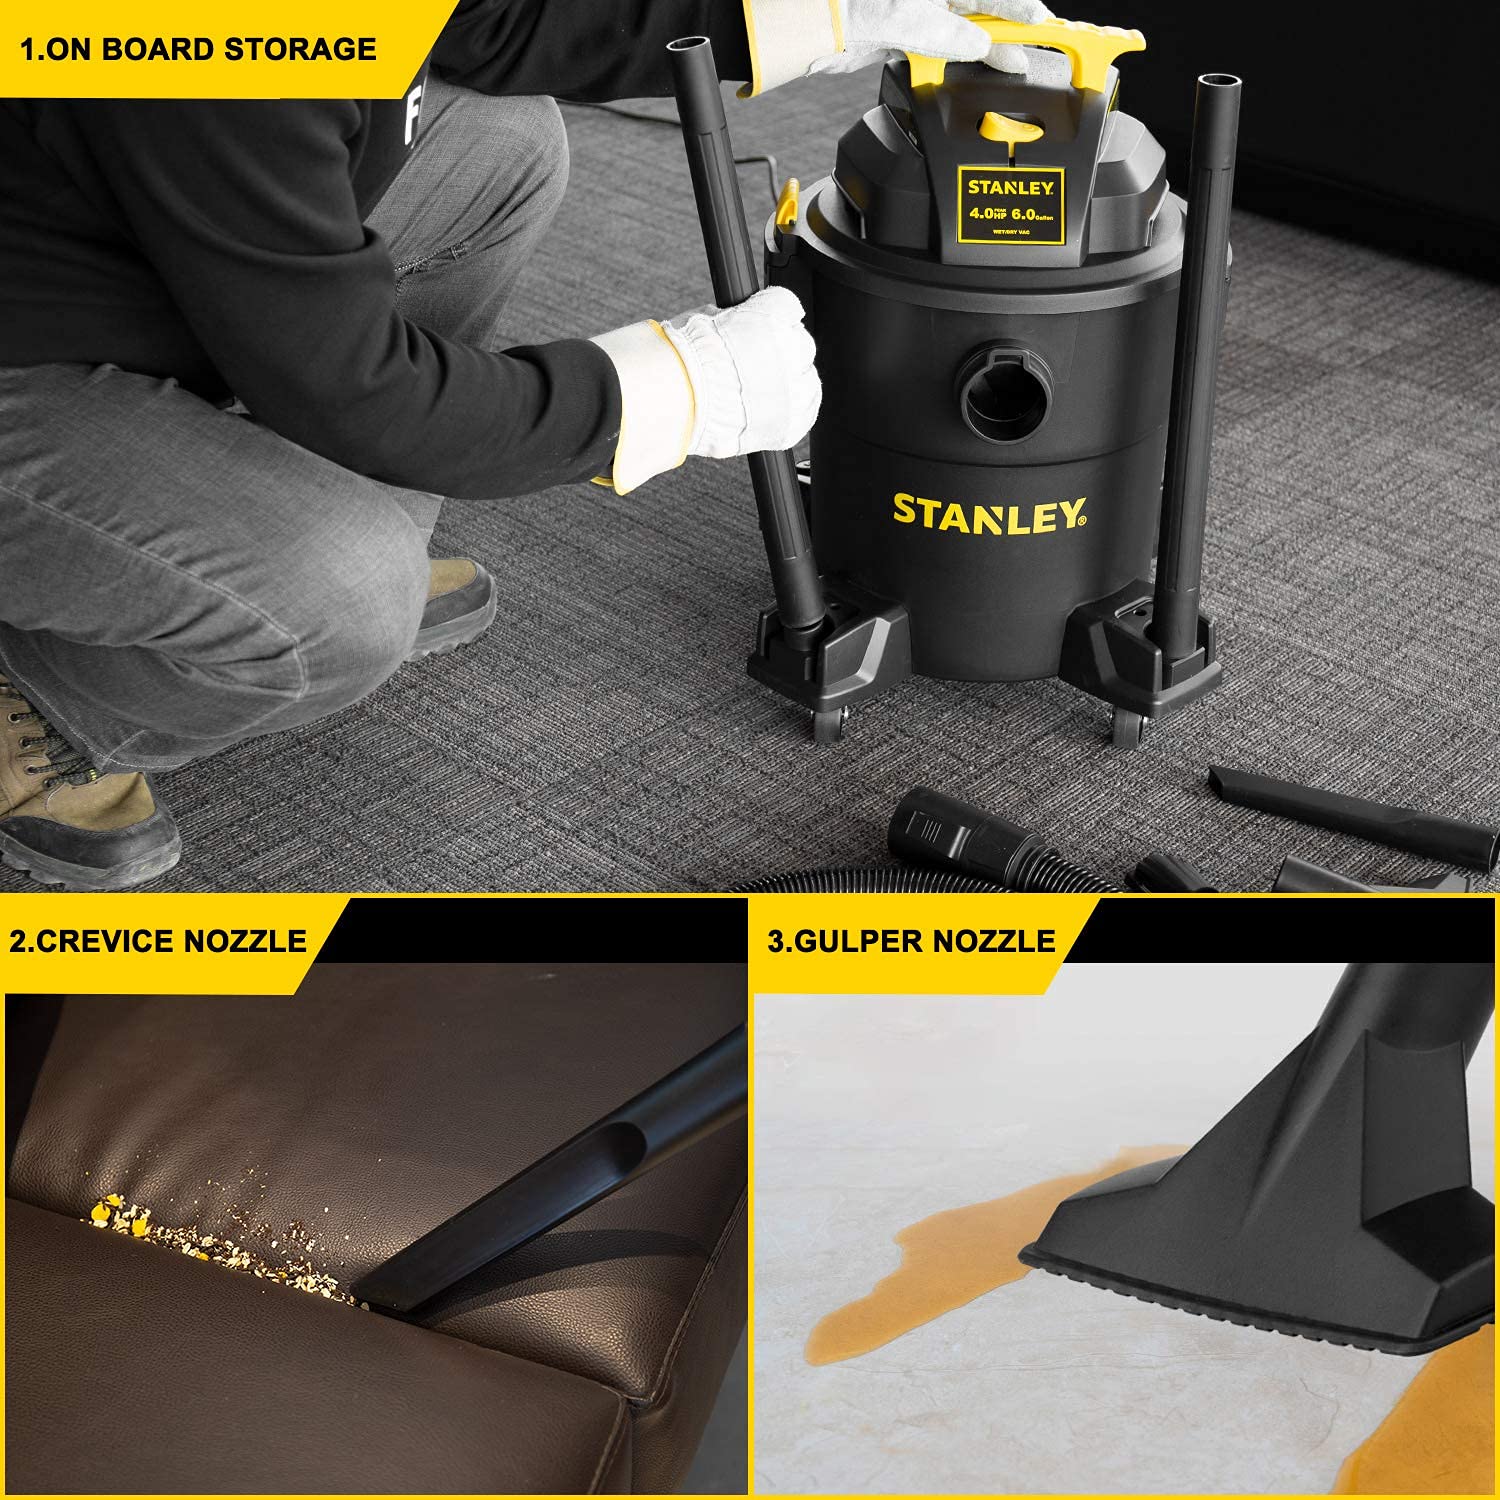
Image: Illustrates wet pickup of a liquid spill using the gulper nozzle.
3. Blower Function
- Connect Hose: Detach the hose from the front vacuum port and securely insert it into the rear blower port.
- Power On: Plug the power cord into a suitable electrical outlet. Turn the vacuum on using the large on/off switch.
- Blowing: Use the air stream to clear debris from surfaces or inflate items.
- Power Off: When finished, turn off the vacuum and unplug it.
Maintenance
Regular maintenance ensures optimal performance and extends the life of your vacuum.
1. Emptying the Tank
- Always unplug the vacuum before emptying.
- Release the latches on the side of the tank and lift off the motor head.
- Carefully empty the contents of the tank into a suitable receptacle.
- Clean the inside of the tank with water and mild soap if necessary, then dry thoroughly before reassembly.
2. Filter Cleaning and Replacement
- Reusable Dry Filter: Tap the filter gently to dislodge dust. For heavier dirt, rinse with water and allow to air dry completely before reinstallation. Do not use the vacuum with a wet dry filter.
- Foam Filter: Rinse the foam filter with water and mild soap. Squeeze out excess water and allow to air dry completely before reinstallation.
- Disposable Dust Bag: Replace the dust bag when it is full or when suction performance decreases.
Troubleshooting
| Problem | Possible Cause | Solution |
|---|---|---|
| Vacuum does not start | No power supply; Faulty power cord/plug; On/Off switch faulty | Check power outlet and circuit breaker; Inspect power cord for damage; Contact customer service if switch is faulty. |
| Loss of suction | Hose or nozzle clogged; Tank full; Filter dirty or improperly installed; Air leak | Clear any obstructions; Empty the tank; Clean or replace filter, ensure proper installation; Check all connections for tightness. |
| Water leaks from tank | Tank not properly sealed; Foam filter missing or damaged (during wet use) | Ensure motor head latches are secure; Check foam filter for proper installation and condition. |
| Motor overheats | Blocked airflow; Prolonged heavy use | Check for and clear any blockages in hose or filters; Allow vacuum to cool down before resuming use. |
Specifications
| Feature | Detail |
|---|---|
| Model Number | SL18116P |
| Tank Capacity | 6 Gallons (22+ Liters) |
| Peak Horsepower | 4.0 HP |
| Airflow | 85 CFM |
| Suction Power | 14 kPa |
| Power Cord Length | 10 feet |
| Hose Length | 6 feet (1-1/4 inch diameter) |
| Product Dimensions | 13.8 x 13.8 x 20.47 inches |
| Item Weight | 13.4 Pounds |
| Special Feature | Converts vacuum to power blower |
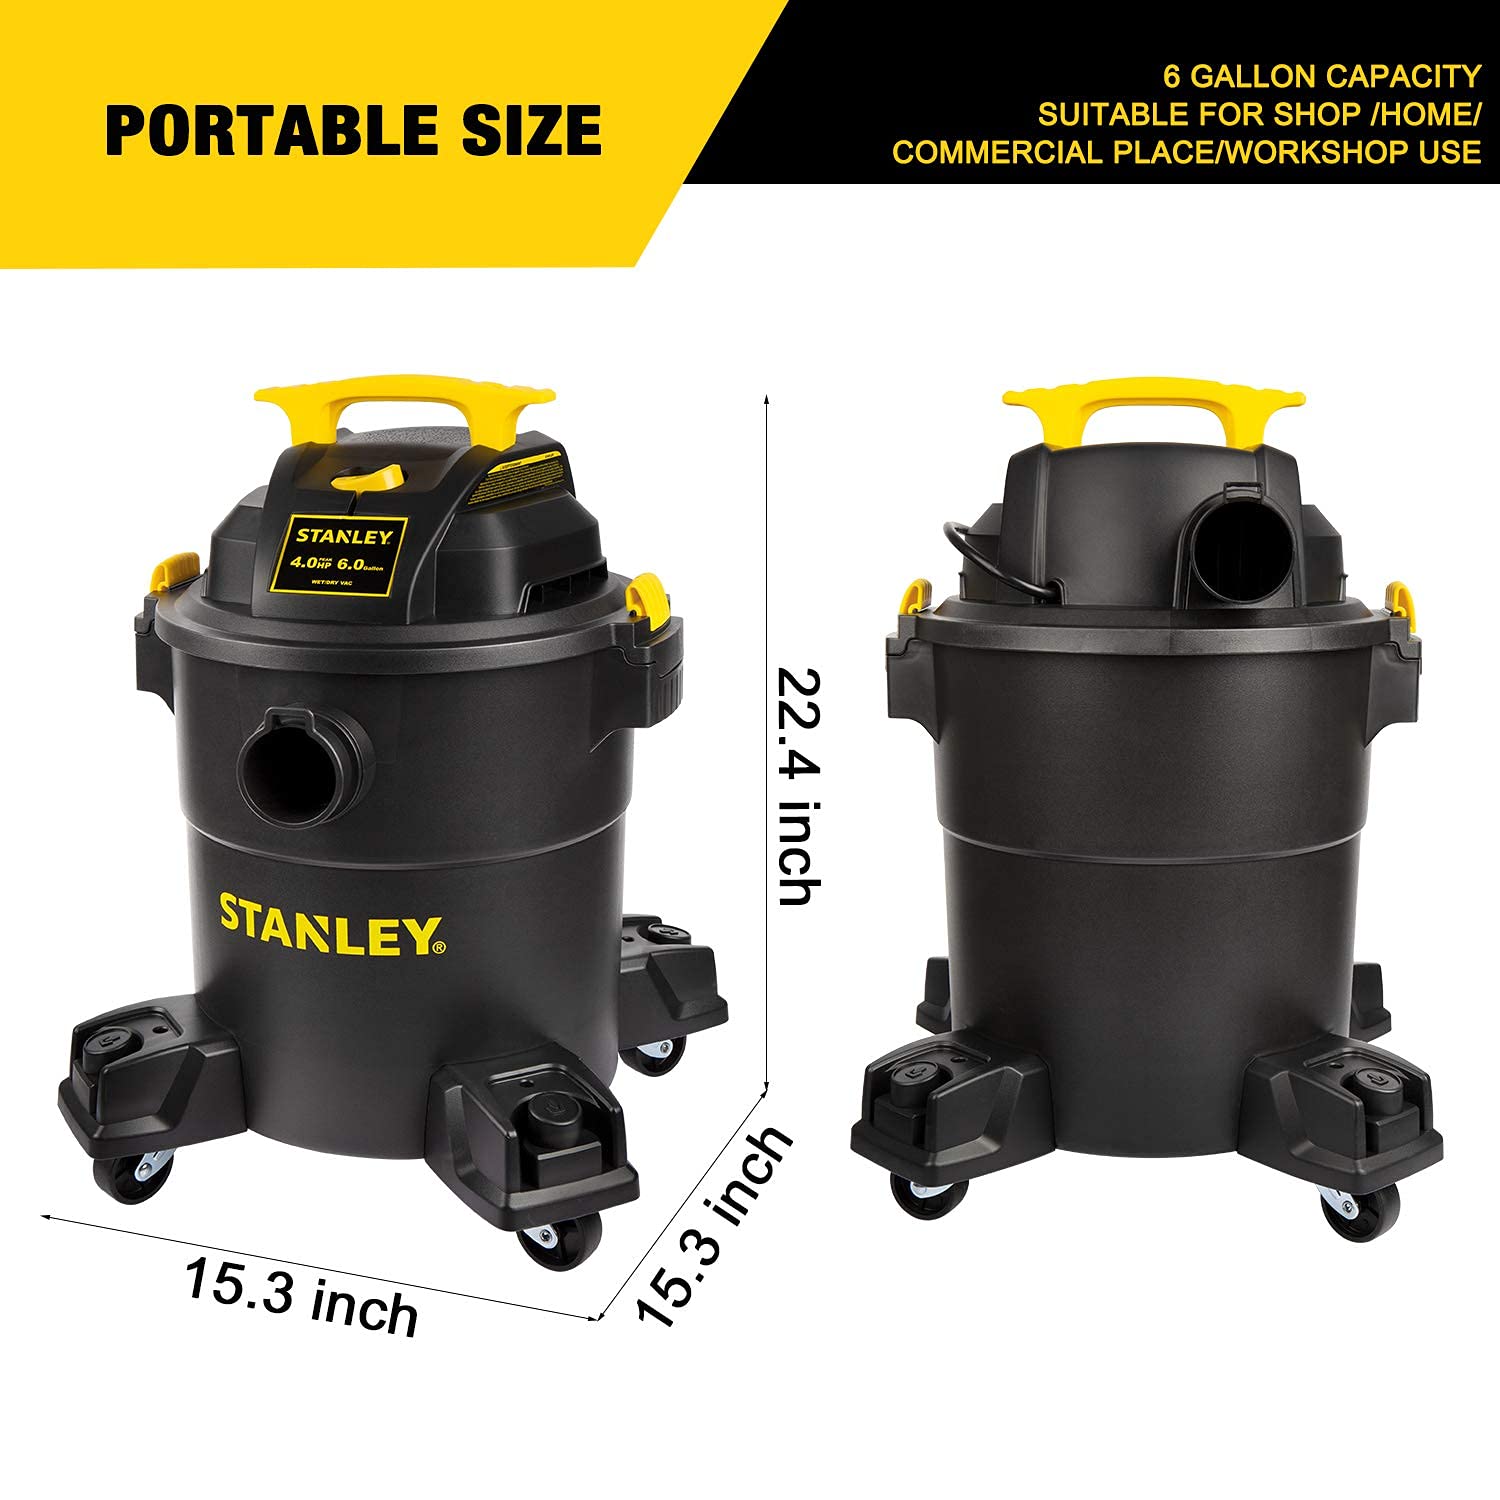
Image: Visual representation of the vacuum's dimensions.
Warranty and Support
This Stanley SL18116P Wet/Dry Vacuum comes with a 12-month warranty from the date of purchase, covering defects in materials and workmanship under normal use. For warranty claims, technical support, or replacement parts, please contact Stanley customer service.
Keep your purchase receipt as proof of purchase for warranty purposes.


