1. Introduction
Thank you for purchasing the Roadstar HIF-1937TUMPK Retro All-in-One Music System. This versatile unit combines a turntable, FM/MW radio, CD player, cassette player, MP3 playback, and USB connectivity, all housed in a classic wooden design. This manual provides essential information for the safe and efficient operation of your new music system. Please read it thoroughly before use and retain it for future reference.
Included Components:
- Roadstar HIF-1937TUMPK Music System
- Remote Control + Battery
- User Manual
2. Safety Instructions
To ensure safe operation and prevent damage, please observe the following safety precautions:
- Power Source: Connect the unit only to an AC 230V, 50Hz power outlet.
- Ventilation: Ensure adequate ventilation. Do not block ventilation openings. Maintain a minimum distance of 10 cm around the unit for proper airflow.
- Water and Moisture: Do not expose the unit to rain, moisture, dripping, or splashing. Do not place objects filled with liquids, such as vases, on the unit.
- Heat: Keep the unit away from heat sources such as radiators, heat registers, stoves, or other apparatus (including amplifiers) that produce heat.
- Cleaning: Unplug the unit from the wall outlet before cleaning. Use a soft, dry cloth. Do not use liquid cleaners or aerosol cleaners.
- Servicing: Do not attempt to service this product yourself. Refer all servicing to qualified service personnel. Opening or removing covers may expose you to dangerous voltage or other hazards.
- Object and Liquid Entry: Never push objects of any kind into this product through openings as they may touch dangerous voltage points or short-out parts that could result in a fire or electric shock.
- Placement: Place the unit on a stable, flat surface. Avoid placing it in direct sunlight or near strong magnetic fields.
3. Product Overview
Familiarize yourself with the main components and controls of your Roadstar HIF-1937TUMPK music system.
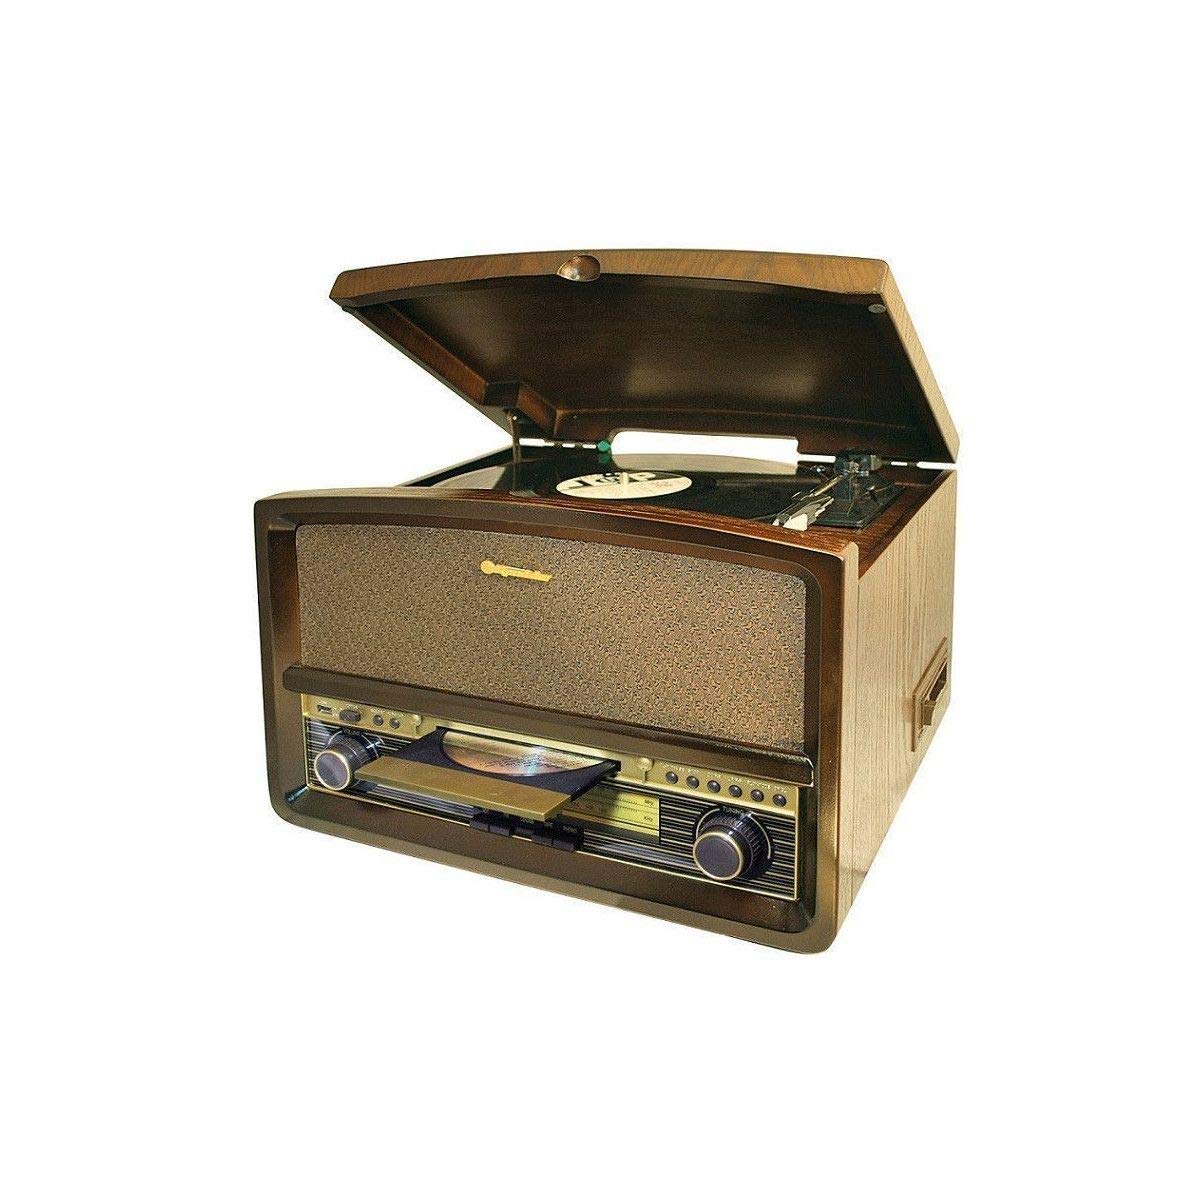
Figure 3.1: Front view of the Roadstar HIF-1937TUMPK Retro All-in-One Music System, showcasing its wooden cabinet, turntable, radio dial, CD tray, and control buttons.
3.1 Front Panel Controls
- Power Button: Turns the unit on or off.
- Function Selector: Switches between Turntable, CD, Radio, Cassette, and USB modes.
- Volume Control: Adjusts the audio output level.
- Tuning Knob: For selecting radio stations in FM/MW mode.
- Display: Shows current mode, track number, or radio frequency.
- CD Tray/Door: For inserting and removing CDs.
- Cassette Deck: For playing audio cassettes.
- USB Port: For connecting USB storage devices for MP3 playback.
- Play/Pause, Stop, Skip Buttons: Control playback for CD, USB, and Cassette.
3.2 Rear Panel Connections
- AC Power Input: Connects to the main power supply.
- FM Antenna Terminal: For connecting an external FM antenna (if required for better reception).
4. Setup
4.1 Unpacking
- Carefully remove the unit from its packaging.
- Remove all protective materials, including any tape or cardboard inserts.
- Place the unit on a stable, level surface.
4.2 Power Connection
- Ensure the unit's power switch is in the OFF position.
- Connect the AC power cord to the AC power input on the rear of the unit.
- Plug the other end of the power cord into a standard AC 230V, 50Hz wall outlet.
4.3 Initial Power On
- Press the Power button on the front panel to turn on the unit.
- The display will illuminate, indicating the unit is active.
5. Operating Instructions
5.1 Turntable Operation
- Select the 'PHONO' or 'TURNTABLE' function using the Function Selector.
- Carefully place a record on the turntable platter.
- Set the speed selector (if available) to the appropriate speed (e.g., 78 RPM).
- Release the tone arm lock.
- Gently lift the tone arm and position the stylus over the desired track on the record.
- Lower the tone arm slowly onto the record. Playback will begin automatically.
- Adjust the volume to your desired level.
- At the end of the record, the tone arm may return automatically or need to be manually returned to its rest.
5.2 CD Player Operation
- Select the 'CD' function using the Function Selector.
- Press the 'OPEN/CLOSE' button to open the CD tray.
- Place a CD with the label side facing up into the tray.
- Press the 'OPEN/CLOSE' button again to close the tray. The unit will read the CD.
- Press the 'PLAY/PAUSE' button to start playback.
- Use the 'SKIP' buttons to navigate between tracks.
5.3 Cassette Player Operation
- Select the 'TAPE' or 'CASSETTE' function using the Function Selector.
- Open the cassette deck door.
- Insert a cassette tape with the exposed tape facing downwards.
- Close the cassette deck door.
- Press the 'PLAY' button to start playback.
- Use 'REWIND' and 'FAST FORWARD' buttons to navigate the tape.
5.4 Radio Operation (FM/MW)
- Select the 'RADIO' function using the Function Selector.
- Choose between 'FM' or 'MW' band (if applicable).
- Rotate the 'TUNING' knob to search for radio stations.
- Adjust the volume to your desired level.
5.5 USB/MP3 Playback
- Insert a USB flash drive containing MP3 files into the USB port.
- Select the 'USB' function using the Function Selector.
- The unit will automatically detect and begin playing MP3 files.
- Use the 'PLAY/PAUSE', 'STOP', and 'SKIP' buttons to control playback.
5.6 Remote Control
The included remote control allows for convenient operation of various functions from a distance. Refer to the remote control diagram (not pictured) for specific button functions, which typically include power, volume, function selection, and playback controls for CD/USB/Cassette.
6. Maintenance
6.1 Cleaning
- Cabinet: Wipe the cabinet with a soft, dry cloth. Do not use abrasive cleaners or solvents.
- Turntable Stylus: Gently clean the stylus with a soft brush, brushing from back to front.
- CD Lens: Use a specialized CD lens cleaner disc to clean the CD player's optical lens.
6.2 Stylus Replacement
The turntable stylus is a consumable part and will wear out over time. A worn stylus can damage your records and degrade sound quality. Replace the stylus when you notice a decrease in sound quality or visible wear. Consult your dealer for compatible replacement styli and replacement instructions.
7. Troubleshooting
If you experience issues with your music system, refer to the table below for common problems and their solutions.
| Problem | Possible Cause | Solution |
|---|---|---|
| No power | Power cord not connected; Power outlet faulty | Ensure power cord is securely plugged in; Try a different power outlet. |
| No sound | Volume too low; Incorrect function selected; Headphones connected | Increase volume; Select the correct function (e.g., CD, PHONO); Disconnect headphones. |
| Turntable not spinning | Tone arm lock engaged; Drive belt dislodged (internal) | Release the tone arm lock; Contact service for internal issues. |
| CD not playing | CD inserted incorrectly; CD dirty or scratched; Incorrect function selected | Insert CD with label side up; Clean or replace CD; Select 'CD' function. |
| Poor radio reception | Antenna not extended/connected; Weak signal | Extend the built-in antenna or connect an external FM antenna; Reposition the unit. |
| USB not recognized | USB drive not formatted correctly; Files not MP3 format; USB drive faulty | Ensure USB is FAT32 formatted; Verify files are MP3; Try a different USB drive. |
8. Specifications
- Model: HIF-1937TUMPK
- Brand: Roadstar
- Product Dimensions: 46 x 40 x 33 cm
- Item Weight: 8.33 kg
- Material: Wood
- Power Input: AC 230V, 50Hz
- Wattage: 4 Watt (input)
- Output Wattage: 2 Watt
- Supported Media: Turntable (Max. 78 RPM), CD, Cassette, USB (MP3)
- Radio Bands: FM, MW
- Special Features: Built-in speaker, Remote control, Display backlight
- Number of USB Ports: 1
- Included Components: Remote control + battery, Compact system with turntable, User manual
9. Warranty and Support
This Roadstar product is covered by a standard manufacturer's warranty. Please refer to the warranty card included with your purchase for specific terms and conditions, including the warranty period and coverage details. Keep your proof of purchase for any warranty claims.
For technical support, service, or inquiries regarding your product, please contact your local Roadstar dealer or authorized service center. Contact information can typically be found on the Roadstar official website or in the packaging materials.


