
1. Introduction
This manual provides detailed instructions for the setup, operation, and maintenance of your TechniSat DIGITRADIO 51 DAB+ Alarm Clock Radio. Please read this manual thoroughly before using the device to ensure proper functionality and safety.
2. Safety Information
- Ensure the power adapter is connected to a readily accessible power outlet.
- Do not expose the device to dripping or splashing water.
- Do not place objects filled with liquids, such as vases, on the device.
- Avoid placing the device near heat sources or in direct sunlight.
- Only use the power adapter supplied with the device.
- Do not attempt to open or repair the device yourself. Refer all servicing to qualified personnel.
- Clean the device only with a dry, soft cloth.
3. Package Contents
Verify that all items are present in the package:
- TechniSat DIGITRADIO 51 Alarm Clock Radio (Black)
- Power Adapter
- Wired Antenna
- Instruction Manual
4. Product Overview
4.1 Front View

Figure 1: Front view of the DIGITRADIO 51, featuring the central speaker and the clear LCD display.
4.2 Top Control Panel

Figure 2: Top control panel with various buttons for radio functions, alarm settings, and volume control.
- DAB/FM Button: Switches between DAB+ and FM radio modes.
- Presets (1, 2): Stores and recalls favorite radio stations.
- < / > Buttons: Navigates menus or tunes radio frequencies.
- Select/Menu Button: Confirms selections or accesses the menu.
- Volume +/- Buttons: Adjusts the audio volume.
- Alarm (1, 2) Buttons: Sets and activates Alarm 1 or Alarm 2.
- Sleep Button: Activates the sleep timer function.
- Snooze Buttons: Temporarily silences an active alarm.
- Power Button: Turns the device on or off.
4.3 Rear Connections
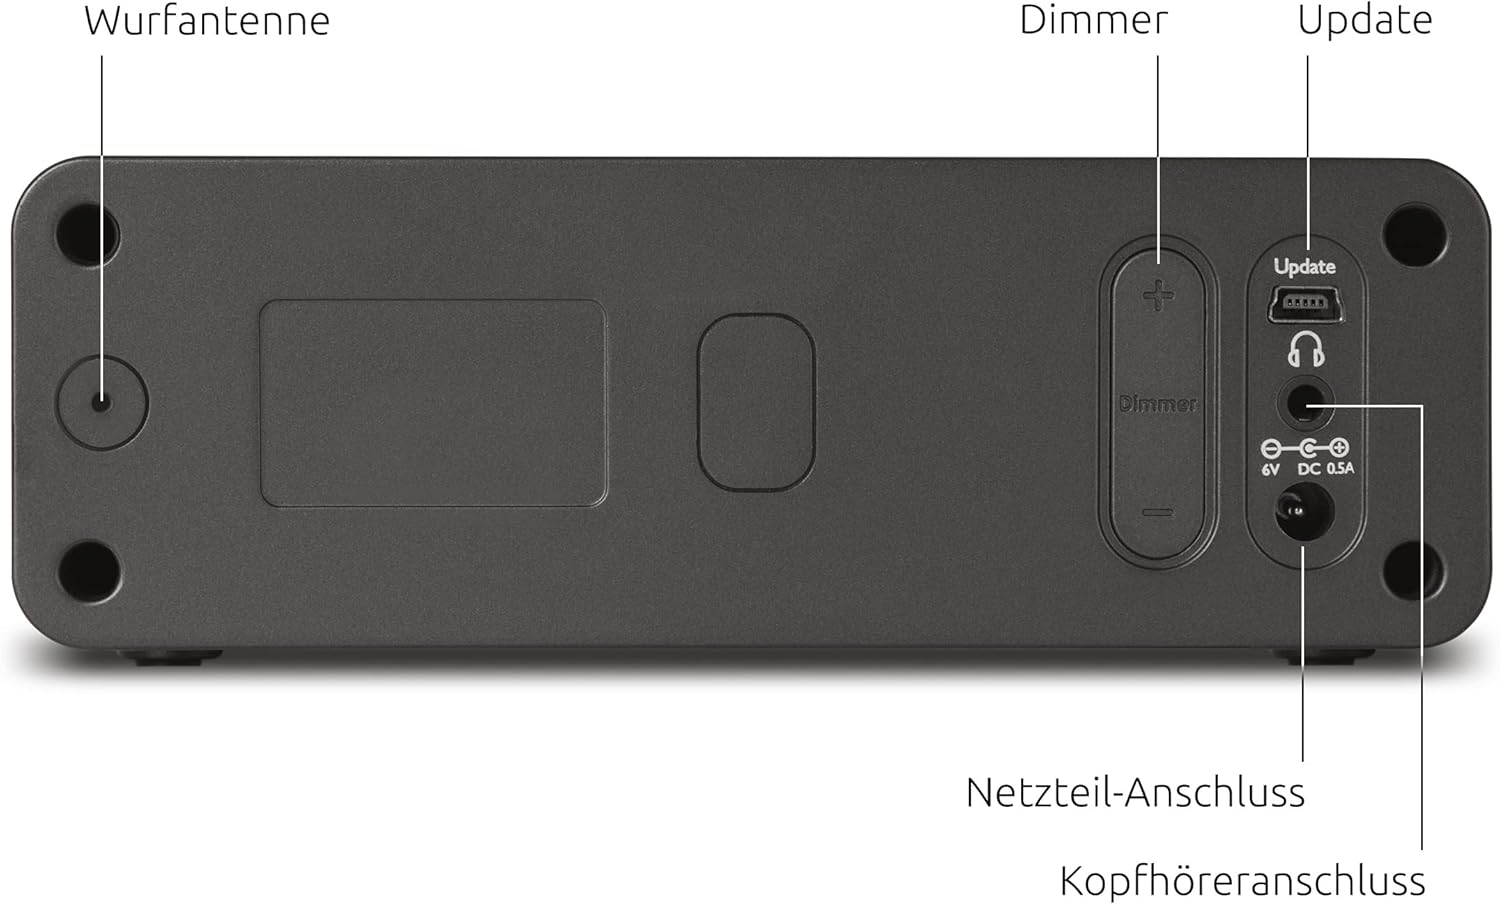
Figure 3: Rear panel connections, including the wired antenna, dimmer controls, USB port for updates, headphone jack, and power input.
- Wired Antenna Input: Connect the supplied wired antenna for optimal radio reception.
- Dimmer Controls (+/-): Adjusts the brightness of the LCD display.
- Update (USB) Port: For future firmware updates.
- Headphone Connection: 3.5mm jack for private listening.
- Power Adapter Connection: Connect the external power adapter here.
4.4 Display Features

Figure 4: Detailed view of the LCD display, highlighting its dimmable feature, time display, and information about the current radio program.
- Dimmable: The display brightness can be adjusted.
- Time Display: Shows the current time.
- LCD Technology: Provides clear text and icons.
- Information Display: Shows radio station name, program details, and alarm status.
4.5 Key Features Overview

Figure 5: Overview of comfort functions including dual alarm, customizable alarm schedules, sleep timer, and multiple snooze options.
5. Setup
5.1 Power Connection
- Connect the power adapter cable to the 'Power Adapter Connection' port on the rear of the radio.
- Plug the power adapter into a standard wall outlet (230V, 50Hz).
5.2 Antenna Connection
- Uncoil the wired antenna completely.
- Insert the antenna connector into the 'Wired Antenna Input' on the rear of the radio.
- Position the antenna for optimal reception.
5.3 Initial Power On and Station Scan
- Press the Power button on the top panel to turn on the radio.
- The radio will typically perform an automatic scan for DAB+ stations upon first use. This may take a few minutes.
- The time and date will usually be set automatically via the DAB+ signal.
6. Operating Instructions
6.1 Switching Between DAB+ and FM
Press the DAB/FM button to toggle between DAB+ digital radio and FM analog radio modes.
6.2 Tuning Radio Stations
- DAB+ Mode: Use the < and > buttons to browse available DAB+ stations. Press Select/Menu to confirm your choice.
- FM Mode: Use the < and > buttons to manually tune to FM frequencies. The radio may automatically stop at strong signals.
6.3 Saving and Recalling Presets
- Tune to the desired radio station.
- Press and hold one of the Preset (1 or 2) buttons until the display confirms the station has been saved.
- To recall a saved station, simply press the corresponding Preset (1 or 2) button briefly.
6.4 Adjusting Volume
Press the Volume + or Volume - buttons to increase or decrease the audio output.
6.5 Setting Alarms
The DIGITRADIO 51 features two independent alarms (Alarm 1 and Alarm 2).
- Press and hold either the Alarm 1 or Alarm 2 button to enter alarm setup.
- Use the < and > buttons to adjust the hour and minute, then press Select/Menu to confirm each setting.
- Set the alarm source (DAB, FM, or Buzzer).
- Choose the alarm frequency (Daily, Weekdays, Weekends, or Once).
- Adjust the alarm volume.
- Press Select/Menu to save the alarm settings.
- To activate/deactivate an alarm, briefly press the corresponding Alarm 1 or Alarm 2 button. An alarm icon will appear on the display when active.
6.6 Snooze Function
When an alarm sounds, press any Snooze button to temporarily silence the alarm for a set period (e.g., 9 minutes). The alarm will sound again after the snooze period.
6.7 Display Dimming
Use the Dimmer + and Dimmer - buttons on the rear of the device to adjust the brightness level of the LCD display.
6.8 Sleep Timer
The sleep timer allows the radio to play for a set duration before automatically turning off.
- Press the Sleep button.
- Repeatedly press the Sleep button to cycle through the available sleep timer durations (e.g., 15, 30, 45, 60, 90 minutes, or Off).
- The radio will automatically turn off after the selected time.
6.9 Headphone Use
Connect standard 3.5mm headphones to the 'Headphone Connection' jack on the rear of the device for private listening. The internal speaker will be muted automatically.
7. Maintenance
7.1 Cleaning
- Always unplug the device from the power outlet before cleaning.
- Use a soft, dry, lint-free cloth to wipe the exterior surfaces.
- Do not use liquid cleaners, abrasive cleaners, or chemical sprays, as these can damage the finish or internal components.
8. Troubleshooting
| Problem | Possible Cause | Solution |
|---|---|---|
| No power / Display off | Power adapter not connected or faulty. | Check power adapter connection to the radio and wall outlet. Ensure the outlet is functional. |
| No DAB+ or FM reception / Poor sound quality | Antenna not connected or poorly positioned. Weak signal in your area. | Ensure the wired antenna is fully connected and uncoiled. Try repositioning the antenna or the radio. Perform a new station scan. |
| Alarm does not sound | Alarm not activated. Incorrect alarm time or source set. Volume too low. | Verify the alarm is activated (icon on display). Check alarm time, source, and volume settings. |
| Display is too bright/dim | Dimmer setting needs adjustment. | Use the Dimmer +/- buttons on the rear of the device to adjust brightness. |
9. Specifications

Figure 6: Product dimensions for placement reference.
- Brand: TechniSat
- Model: DIGITRADIO 51 (0000/4981)
- Tuner Technology: DAB+, FM
- Speaker Output Power: 1.5 Watts
- Display Type: LCD, Dimmable
- Power Source: Corded Electric
- Voltage: 230 Volts
- Frequency: 50 Hz
- Connectivity: 3.5mm Audio (Headphone)
- Product Dimensions (W x D x H): 14.9 x 12.6 x 4.9 cm
- Item Weight: 436 g
- Material: Plastic
- Special Features: Dual Alarm, Snooze Function, Auto Shut-Off Timer
10. Warranty and Support
For warranty information and technical support, please refer to the documentation provided with your purchase or visit the official TechniSat website. Keep your proof of purchase for any warranty claims.


