
Introduction
This manual provides essential instructions for the safe and efficient operation, setup, and maintenance of your Dahle 22084 Cross Cut Shredder. Please read this manual thoroughly before using the shredder and retain it for future reference.
Safety Instructions
To prevent injury or damage to the shredder, always observe the following safety precautions:
- Keep hands, loose clothing, hair, and jewelry away from the paper and media entry slots.
- Do not allow children to operate the shredder. Keep the shredder out of reach of children and pets.
- Do not insert more than the maximum specified sheet capacity into the paper entry slot.
- Do not shred metal objects, large paper clips, or adhesive labels, as these can damage the cutting mechanism.
- Ensure the shredder is placed on a stable, level surface.
- Unplug the shredder before moving, cleaning, or emptying the waste bin.
- Do not spray aerosols or flammable products into or near the shredder.
- Do not operate the shredder if the power cord is damaged. Contact qualified service personnel for repairs.
Product Overview
The Dahle 22084 is a cross-cut shredder designed for home and small office use, capable of shredding paper, CDs, DVDs, and credit cards. It features separate cutting mechanisms and waste bins for paper and media.
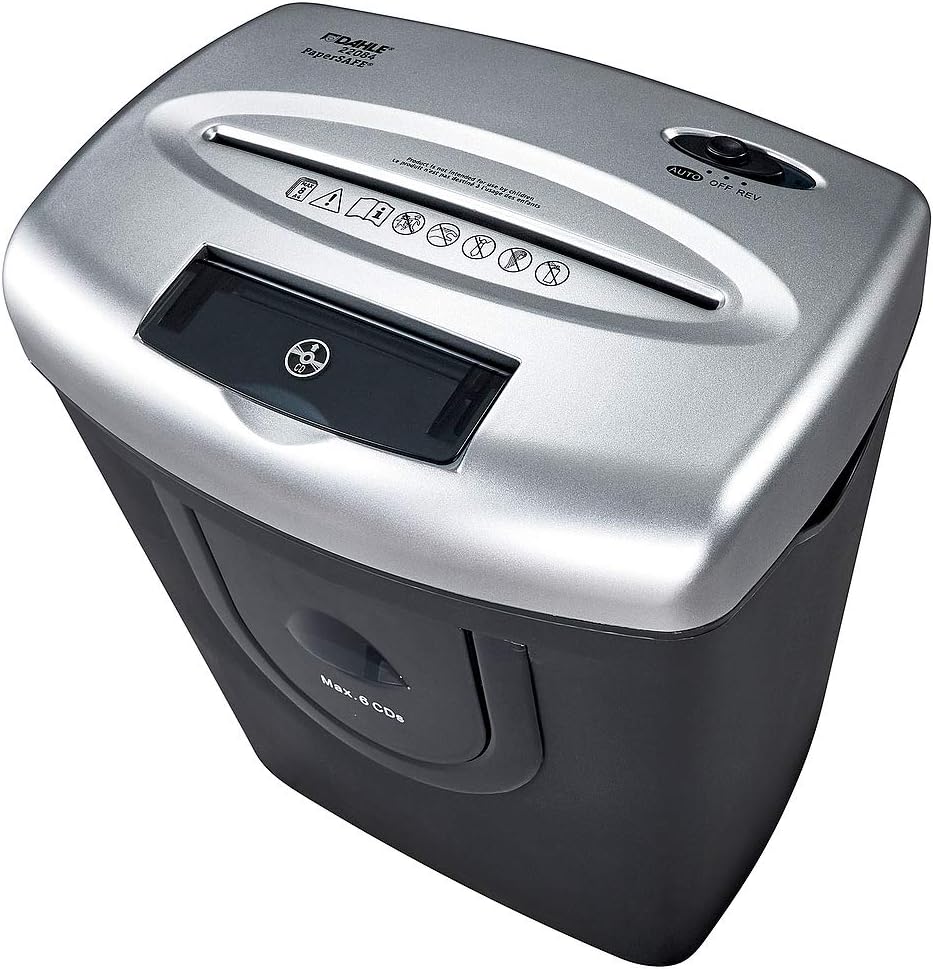
This image displays the Dahle 22084 Cross Cut Shredder. The top section, in silver, features two distinct entry slots: a wider slot for paper documents and a narrower slot for CDs, DVDs, and credit cards. A control switch with 'AUTO', 'OFF', and 'REV' settings is visible on the right side of the top panel. Below the CD/DVD slot, a transparent window allows viewing of the shredded media. The lower section of the shredder, in black, houses the waste bin.
Key Components:
- Paper Entry Slot: For shredding paper documents.
- Media Entry Slot: For shredding CDs, DVDs, and credit cards.
- Control Switch: Settings for AUTO (automatic operation), OFF (power off), and REV (reverse).
- Waste Bin: Collects shredded materials. Features separate compartments for paper and media.
- Transparent Window: Allows monitoring of shredded media level.
Setup
- Unpack: Carefully remove the shredder from its packaging.
- Position: Place the shredder on a flat, stable surface. Ensure there is adequate space around the unit for ventilation and access to the waste bin.
- Connect Power: Plug the power cord into a standard electrical outlet.
- Check Waste Bin: Ensure the waste bin is correctly seated in the shredder housing. The shredder will not operate if the bin is not properly inserted.
Operating Instructions
1. Power On
Set the control switch to the AUTO position. The shredder is now in standby mode and will activate automatically when material is inserted.
2. Shredding Paper Documents
- Gather up to 8 sheets of paper (70gsm). Do not exceed this capacity.
- Insert the paper straight into the wider paper entry slot.
- The shredder will automatically start, shred the paper, and then stop once the shredding is complete.
3. Shredding CDs, DVDs, and Credit Cards
- Insert one CD, DVD, or credit card at a time into the narrower media entry slot.
- The shredder will automatically start, shred the media, and then stop.
- Shredded media will fall into a separate compartment within the waste bin.
4. Reverse Function (REV)
If paper jams occur, set the control switch to the REV position. This will reverse the cutting blades, helping to clear the jam. Once the jam is cleared, return the switch to AUTO or OFF.
5. Power Off
When not in use, set the control switch to the OFF position to conserve energy and for safety.
Maintenance
1. Emptying the Waste Bin
- Regularly check the waste bin through the transparent window.
- When the bin is full, set the control switch to OFF and unplug the shredder.
- Carefully pull out the waste bin.
- Empty the shredded contents. Note the separate compartments for paper and media.
- Reinsert the waste bin securely until it clicks into place.
2. Oiling the Shredder (Recommended)
To maintain optimal performance and extend the life of your shredder, it is recommended to oil the cutting blades periodically, especially after emptying the waste bin multiple times or after heavy use. Use shredder oil specifically designed for cross-cut shredders.
- Apply a thin line of shredder oil across the paper entry slot.
- Set the control switch to AUTO and feed a few sheets of paper through to distribute the oil.
- Alternatively, you can apply oil to a sheet of paper and feed it through the shredder.
3. Cleaning
- Unplug the shredder before cleaning.
- Wipe the exterior of the shredder with a soft, dry cloth.
- Do not use abrasive cleaners or solvents.
Troubleshooting
| Problem | Possible Cause | Solution |
|---|---|---|
| Shredder does not start. |
|
|
| Paper jam. |
|
|
| Shredder runs continuously. |
|
|
Specifications
| Model | Dahle 22084 |
| Cut Type | Cross Cut |
| Shred Size (Paper) | 4 x 45 mm |
| Security Level (DIN 66399) | P-3 |
| Sheet Capacity (70gsm) | 8 sheets |
| Entry Width (Paper) | 226 mm |
| Media Shredding | CDs, DVDs, Credit Cards (6 strips, 2 cm width) |
| Waste Bin Capacity | 25 Liters |
| Dimensions (H x W x D) | 420 x 335 x 250 mm |
| Weight | 6.3 kg |
| Noise Level | 68 dB |
| Special Features | Automatic Start-Stop, Reverse Function, Motor Auto Shut-off |
Warranty and Support
For warranty information and technical support, please refer to the documentation included with your purchase or visit the official Dahle website. Keep your proof of purchase for warranty claims.


