
Signstek MESR-100 V2
Signstek MESR-100 V2 ESR Meter Instruction Manual
Model: MESR-100 V2 | Brand: Signstek
1. Introduction
The Signstek MESR-100 V2 is an auto-ranging ESR (Equivalent Series Resistance) meter designed for in-circuit testing of capacitors and low ohm resistance measurements. This device is crucial for evaluating the health and performance of capacitors in electronic circuits without the need for desoldering, making troubleshooting and repair more efficient.
It features a wide measurement range and a dual terminal for fast and easy inspection. The meter operates at 100KHz, providing accurate readings for ESR values. Understanding ESR is vital as it indicates the internal resistance of a capacitor, which can degrade over time due to various factors like heat and chemical changes, impacting circuit stability and performance.

Figure 1.1: Signstek MESR-100 V2 ESR Meter in a typical electronics repair environment, surrounded by capacitors and tools.
2. Safety Information
- Always ensure the circuit under test is powered off and capacitors are fully discharged before testing, especially high-voltage capacitors. Residual charge can damage the meter or cause electric shock.
- Do not apply voltage to the input terminals. This meter is designed for passive component testing.
- Use the correct test leads and ensure they are in good condition.
- Keep the device dry and away from extreme temperatures.
- Do not attempt to disassemble or modify the meter. Refer all servicing to qualified personnel.
3. Product Overview and Components
The MESR-100 V2 ESR Meter features a clear display and intuitive controls for efficient operation.

Figure 3.1: Front view of the MESR-100 V2 with key components labeled.
- Product Model (MESR-100): Indicates the device model.
- Power Switch Button: Used to turn the device on/off.
- Manual Zeroing Button (ZERO): Resets the resistance reading to zero, compensating for test lead resistance.
- Automatic / Manual Mode Range Button (MODE RANGE): Toggles between auto-ranging and manual range selection.
- Positive Polar Hole (Red is Positive): Connection point for the positive test lead.
- Negative Polar Hole (Black is Negative): Connection point for the negative test lead.
- Line-Inset Socket of Capacitor: Input jacks for connecting test leads.
- ESR Parameter Table: A printed table on the device for quick reference of acceptable ESR values based on capacitor type and voltage.
4. Setup
4.1. Initial Power On and Zeroing
Before first use or after connecting new test leads, it is essential to zero the meter to ensure accurate readings by compensating for the resistance of the test leads themselves.
- Connect the red and black test leads to their respective polar holes on the meter.
- Turn on the meter using the Power Switch Button.
- Short the two test leads together (touch the metal tips of the red and black leads).
- Press the "ZERO" button. The display should show a reading close to 0.000 Ω. This removes the inherent resistance of the leads from future measurements.

Figure 4.1: Pressing the ZERO button to calibrate the meter.
4.2. Charging the Device
The MESR-100 V2 features a built-in lithium battery for portability. Charge the device using the Mini USB interface.
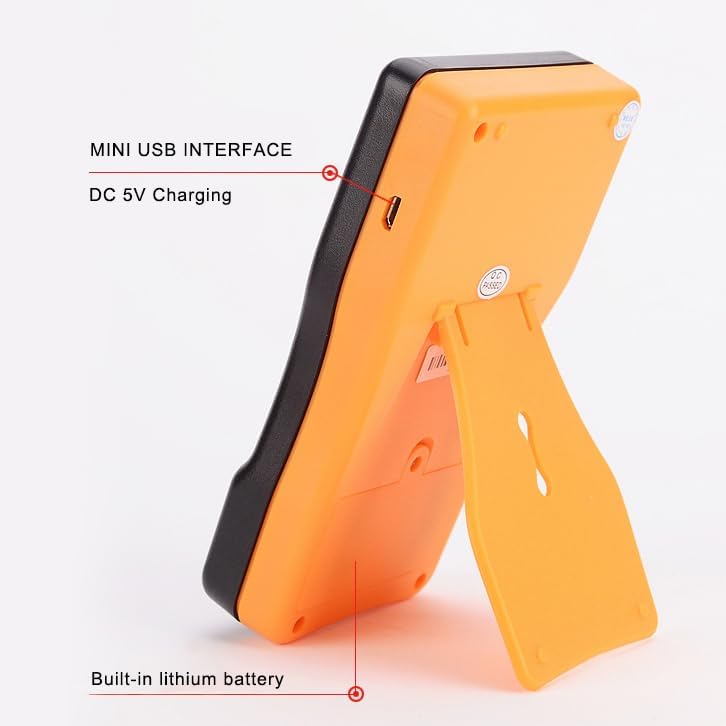
Figure 4.2: Mini USB charging port and internal battery location.
5. Operating Instructions
5.1. Understanding ESR and its Measurement
ESR (Equivalent Series Resistance) is a crucial parameter for assessing the health of capacitors. It represents the total internal resistance of a capacitor, including the resistance of the leads, plates, and electrolyte. A low ESR value indicates a healthy capacitor, while a high ESR value suggests degradation or failure.
The MESR-100 V2 measures ESR by applying a 100KHz test voltage. This high frequency is effective because the capacitive reactance of a healthy capacitor at 100KHz is very low, allowing the meter to primarily measure the resistive component (ESR).
Video 5.1: Detailed explanation of ESR principles and how the MESR-100 V2 measures it. This video covers the theoretical aspects of Equivalent Series Resistance in capacitors and the measurement methodology.
5.2. In-Circuit Testing
One of the primary advantages of the MESR-100 V2 is its ability to test capacitors while they are still in the circuit. This saves significant time and effort by eliminating the need to desolder components.

Figure 5.1: In-circuit testing of a capacitor on a circuit board.
The meter uses a low test voltage (approximately 0.25V) which is typically below the forward voltage drop of most semiconductors (like diodes and transistors). This prevents other components in the circuit from interfering with the ESR measurement of the capacitor.
Video 5.2: Demonstration of the MESR-100 V2 performing in-circuit ESR testing on various capacitors, highlighting its efficiency.
5.3. Interpreting Readings
The meter's display will show the ESR value in Ohms (Ω). For 25V capacitors, the display provides a direct indication of "GOOD" if the capacitance is less than 200µF. For other capacitor types or voltages, refer to the printed ESR Parameter Table on the device or a more comprehensive ESR chart for reference.
Generally, a lower ESR value indicates a healthier capacitor. A significantly higher ESR than expected for a given capacitor value and voltage suggests that the capacitor is failing or has failed.
5.4. Adjusting Display Brightness
The display brightness can be adjusted for optimal viewing in different lighting conditions.
Video 5.3: Instructions on how to adjust the brightness of the MESR-100 V2 display for better visibility.
6. Maintenance
- Keep the meter clean and free from dust and moisture. Use a soft, dry cloth for cleaning.
- Store the device in a cool, dry place when not in use.
- Regularly check the test leads for any signs of wear or damage. Replace them if necessary to ensure accurate readings and safety.
- Ensure the battery is charged regularly to maintain optimal performance.
7. Troubleshooting
| Problem | Possible Cause | Solution |
|---|---|---|
| Meter does not power on. | Low or discharged battery. | Charge the device using the Mini USB port. |
| Inaccurate readings. | Test leads not zeroed; damaged test leads; capacitor not fully discharged. | Perform zeroing procedure; inspect and replace leads; ensure capacitor is discharged. |
| "OL" (Overflow) reading. | Resistance is too high (open circuit); capacitor is completely open. | Check connections; capacitor is likely faulty and needs replacement. |
| Reading fluctuates. | Poor contact with component; component in circuit interfering. | Ensure firm contact; if in-circuit, consider desoldering one leg if interference is suspected. |
8. Specifications
- Model: MESR-100 V2
- Measurement Type: ESR (Equivalent Series Resistance)
- Measurement Range: 0.01Ω to 100Ω
- Test Frequency: 100KHz
- Display: Digital LCD
- Power Source: Built-in Lithium Battery (DC 5V charging via Mini USB)
- Color: Black
- Item Weight: 8 ounces (0.5 Pounds)
- Dimensions: Approximately 145mm (5.7 inches) x 73mm (2.9 inches) x 28mm (1.1 inches)

Figure 8.1: Physical dimensions of the MESR-100 V2.
9. Warranty and Support
For warranty information and technical support, please refer to the official Signstek website or contact their customer service directly. Keep your purchase receipt as proof of purchase.
Visit the official Signstek Store: Signstek Store on Amazon
Ask a question about this manual
Ask about setup, troubleshooting, compatibility, parts, safety, or missing instructions. Manuals+ will review the question and use this page’s manual context to help answer it.