1. Important Safeguards
Please read all instructions carefully before using your De'Longhi BDM1500 Bread Maker. Keep this manual for future reference.
- Electrical Safety: This appliance is designed for 220-240 Volt, 50 Hz electrical systems only. Do not attempt to use it with any other voltage or frequency. Using an incorrect power supply will damage the appliance and void the warranty.
- Do not immerse the appliance, cord, or plug in water or other liquids.
- Always unplug the bread maker from the outlet when not in use, before assembling or disassembling parts, and before cleaning.
- Do not operate any appliance with a damaged cord or plug, or after the appliance malfunctions or has been damaged in any manner.
- Keep hands, hair, clothing, as well as spatulas and other utensils away from moving parts during operation to prevent injury.
- Do not touch hot surfaces. Use oven mitts when handling the hot bread pan or hot bread.
- Ensure the appliance is placed on a stable, heat-resistant surface, away from edges.
- This appliance is for household use only.
2. Product Overview and Components
Familiarize yourself with the parts of your De'Longhi BDM1500 Bread Maker before first use.
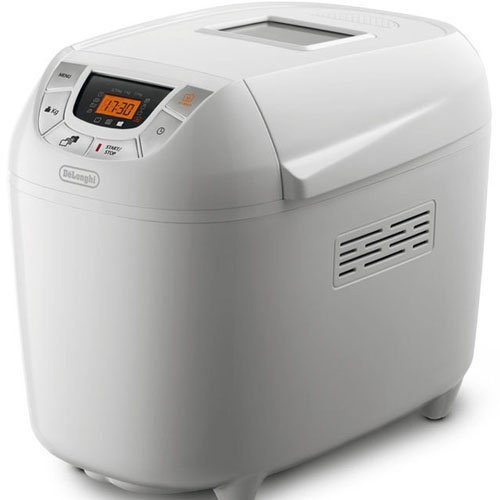
Image: The De'Longhi BDM1500 Bread Maker, showcasing its compact design, control panel, and large viewing window. This image helps users identify the appliance.
Key Components:
- Control Panel: Features buttons for program selection, crust color, timer, and start/stop.
- Large Viewing Window: Allows monitoring of the baking process without opening the lid.
- Lid: Covers the baking chamber.
- Baking Chamber: Houses the bread pan.
- Non-stick Removable Bread Pan: For easy bread removal and cleaning.
- Mixing Blades (2): Knead the dough.
- Measuring Cup and Spoon: Included accessories for accurate ingredient measurement.
3. Initial Setup and Preparation
3.1 Unpacking
Carefully remove the bread maker and all accessories from the packaging. Retain packaging for future transport or storage.
3.2 Initial Cleaning
- Wash the bread pan and mixing blades with warm, soapy water. Rinse thoroughly and dry completely.
- Wipe the exterior of the bread maker with a damp cloth. Do not use abrasive cleaners.
- Ensure all parts are dry before use.
3.3 Placement
Place the bread maker on a stable, flat, heat-resistant surface, ensuring adequate ventilation around the appliance. Keep it away from walls or cabinets to allow heat to dissipate.
3.4 Power Connection
Plug the power cord into a grounded 220-240 Volt, 50 Hz electrical outlet. The bread maker will emit a short beep, and the display will illuminate.
4. Operating Instructions
4.1 Adding Ingredients
- Insert the mixing blades onto the shafts at the bottom of the bread pan.
- Add ingredients to the bread pan in the order specified by your recipe (typically liquids first, then dry ingredients, with yeast last). Ensure accurate measurements using the provided measuring cup and spoon.
- Place the bread pan into the baking chamber and press down firmly until it clicks into place.
- Close the lid.
4.2 Program Selection
The De'Longhi BDM1500 features 14 automatic programs. Use the 'Menu' button on the control panel to cycle through the programs. The selected program number will be displayed.
- Standard Programs: For white, whole wheat, French, sweet bread, etc.
- Special Programs: Includes a Gluten-free bread baking system and dough-only cycles.
- "My Bread" Function: Allows for custom program settings. Refer to the recipe book for detailed instructions on using this function.
4.3 Crust Color and Loaf Size
- Use the 'Crust' button to select your desired crust color: Light, Medium, or Dark.
- Use the 'Loaf Size' button to select the bread capacity: 750g, 1Kg, or 1.5Kg.
4.4 Starting the Baking Process
Once the program, crust color, and loaf size are selected, press the 'Start/Stop' button to begin. The bread maker will start kneading.
4.5 Adding Fruits and Nuts
During certain programs, the bread maker will emit a series of beeps. This indicates the optimal time to add fruits, nuts, or other solid ingredients to the dough without affecting the bread's rising process. Open the lid carefully and add ingredients, then close the lid.
4.6 Turbo Function
The Turbo function allows you to bake bread in less than two hours. Select this program for quick baking when time is limited.
4.7 Keep Warm Function
After the baking cycle is complete, the bread maker will automatically switch to a one-hour keep warm function to maintain the bread's temperature. The display will show the remaining keep warm time.
4.8 Removing the Bread
- Once the cycle is complete and the keep warm function has ended (or you have manually stopped it), unplug the appliance.
- Using oven mitts, carefully remove the hot bread pan from the baking chamber.
- Invert the bread pan onto a wire rack and shake gently to release the bread. If the mixing blades remain in the bread, carefully remove them with a non-metallic utensil.
- Allow the bread to cool on a wire rack before slicing.
5. Care and Maintenance
5.1 Cleaning
Always unplug the bread maker and allow it to cool completely before cleaning.
- Bread Pan and Mixing Blades: Wash with warm, soapy water. The non-stick coating allows for easy cleaning. Do not use metal utensils or abrasive cleaners that could damage the non-stick surface.
- Exterior: Wipe the exterior of the appliance with a soft, damp cloth. Do not use harsh chemicals or abrasive pads.
- Lid and Viewing Window: Wipe with a damp cloth. For stubborn stains on the viewing window, use a mild glass cleaner.
- Ensure all parts are completely dry before reassembling or storing.
5.2 Storage
Store the bread maker in a clean, dry place. Ensure the power cord is neatly wrapped and not kinked.
6. Troubleshooting Guide
If you encounter issues with your bread maker, refer to the following common problems and solutions:
| Problem | Possible Cause | Solution |
|---|---|---|
| Bread does not rise | Expired yeast, incorrect water temperature, too much salt/sugar, incorrect program. | Check yeast freshness. Use lukewarm water (35-40°C). Ensure correct ingredient measurements. Select appropriate program. |
| Bread is too dense | Too much flour, not enough liquid, yeast issue. | Measure ingredients precisely. Ensure yeast is active. |
| Uneven crust color | Lid not closed properly, uneven heat distribution. | Ensure lid is fully closed. Check placement for proper ventilation. |
| Machine does not start | Not plugged in, power outage, incorrect voltage. | Check power connection. Verify power supply (220-240V, 50Hz). |
| Mixing blades stuck in bread | Common occurrence. | Carefully remove with a non-metallic utensil after bread has cooled slightly. |
7. Product Specifications
| Feature | Detail |
|---|---|
| Model Number | BDM1500 |
| Voltage | 220-240 Volts |
| Frequency | 50 Hz |
| Power Consumption | 920 Watts |
| Bread Capacity | 750g, 1Kg, 1.5Kg |
| Number of Programs | 14 Automatic Programs |
| Keep Warm Function | 1 Hour |
| Special Features | "My Bread" function, Turbo function, Gluten-free system, Beep indicator for additions. |
| Accessories | Measuring cup, measuring spoon. |
8. Warranty and Customer Support
For warranty information and customer support, please refer to the warranty card included with your product or contact your local De'Longhi service center. Ensure you have your model number (BDM1500) and proof of purchase available when contacting support.
Note: This product is designed for overseas use in 220-240 Volt, 50 Hz electrical systems and will not function in regions with different electrical standards, such as the US.


