
1. Introduction
This manual provides comprehensive instructions for the setup, operation, and maintenance of your Yorkville VGM14 Compact Live Sound Passive Mixer. Please read this manual thoroughly before operating the unit to ensure proper use and to maximize its performance and longevity.
2. Safety Instructions
To prevent electric shock, fire, or damage to the unit, please observe the following safety precautions:
- Power Source: Connect the unit only to the specified power supply voltage. Ensure the power cord is securely plugged into an outlet.
- Grounding: Always use a power cord with a grounded plug. Do not defeat the grounding purpose of the plug.
- Ventilation: Do not block ventilation openings. Ensure adequate airflow around the unit to prevent overheating.
- Water and Moisture: Do not expose the unit to rain or moisture. Do not place objects filled with liquids, such as vases, on the unit.
- Servicing: Do not attempt to service the unit beyond what is described in this manual. Refer all servicing to qualified service personnel.
- Cables: Route all cables carefully to prevent tripping hazards and damage.
3. Key Features
The Yorkville VGM14 mixer offers a robust set of features designed for live sound applications:
- 14-Channel passive mixer with integrated digital effects.
- Built-in Graphic Equalizer for main output shaping.
- Each channel strip includes a 3-band EQ for tone control.
- Individual channel gain, effects send, and monitor send controls.
- 60mm faders and mute buttons on each channel for precise level control.
4. Setup
4.1 Unpacking and Placement
Carefully remove the mixer from its packaging. Place the mixer on a stable, flat surface, ensuring adequate ventilation around the unit. Avoid placing it near heat sources or in direct sunlight.
4.2 Power Connection
Connect the supplied AC power cord to the mixer's power inlet on the rear panel and then to a suitable electrical outlet. Ensure the power switch is in the 'OFF' position before connecting. The mixer operates on standard AC voltage as indicated on the unit.
4.3 Connecting Inputs
The VGM14 features various input options:
- Microphone Inputs (Channels 1-10): Use XLR cables to connect microphones. These inputs provide phantom power (selectable) for condenser microphones.
- Line Inputs (Channels 1-14): Use 1/4-inch TRS or TS cables for line-level devices such as keyboards, drum machines, or other audio sources. Channels 11/12 and 13/14 are stereo line inputs.
- Insert Points (Channels 1-10): Use 1/4-inch TRS insert cables to connect external signal processors (e.g., compressors, gates) to individual channels.
- Media In (USB): Connect a USB cable from your computer for audio playback or recording.
4.4 Connecting Outputs
Connect your main speakers, monitors, and other output devices:
- Main Outputs (TRS): Connect these to your main power amplifier or powered speakers using 1/4-inch TRS cables.
- Monitor Output (TRS): Connect this to your monitor amplifier or powered monitor speakers.
- Effects Send (TRS): Connect to external effects processors if desired.
- Headphone Output: Connect stereo headphones for monitoring.

Figure 1: Rear Panel Connections. This image displays the rear panel of the Yorkville VGM14 mixer, highlighting the power input, USB media input/output, and the main and monitor TRS outputs. It also shows the phantom power switch and voltage information.
5. Controls and Functions
This section details the various controls and their functions on the VGM14 mixer.
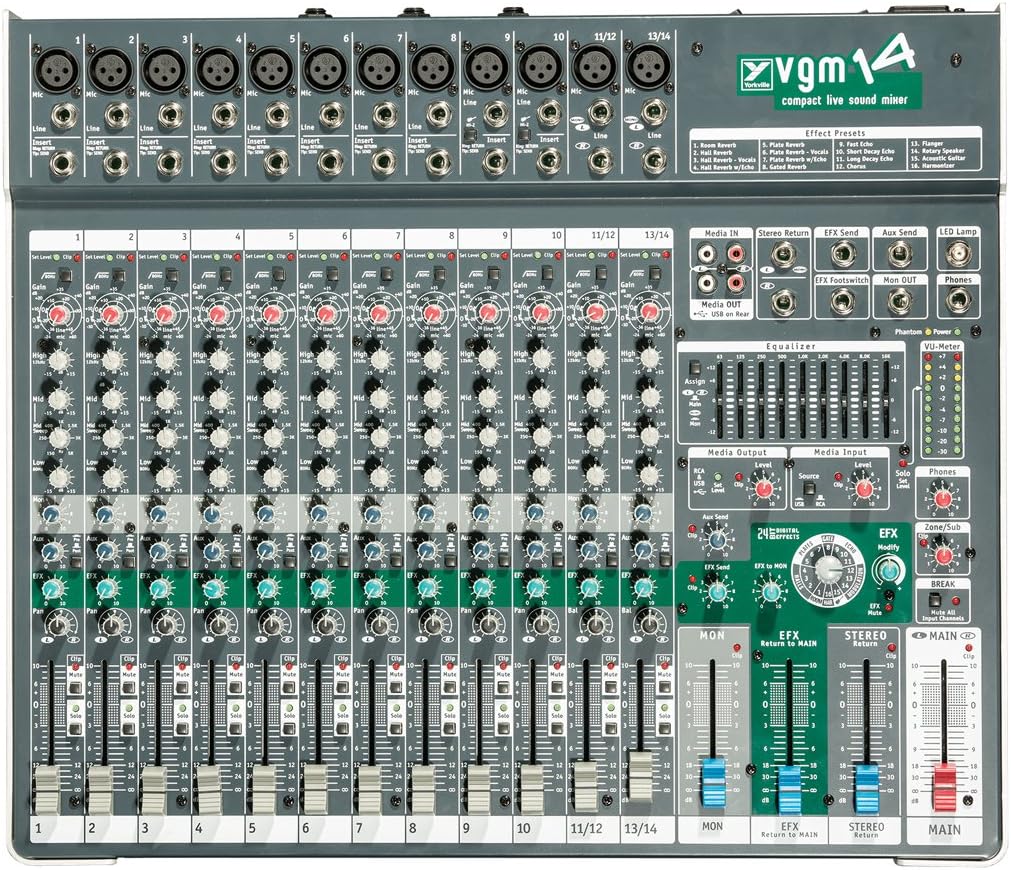
Figure 2: Mixer Control Surface. A detailed top-down view of the Yorkville VGM14 mixer, illustrating the layout of all 14 channels, their respective gain, EQ, send controls, and faders. The master section with the graphic EQ, effects, and main faders is also clearly visible.
5.1 Input Channels (1-14)
Each input channel features the following controls:
- Input Jack (XLR/TRS Combo): For connecting microphones (XLR) or line-level instruments (TRS/TS).
- Insert Jack (Channels 1-10): For connecting external signal processors.
- Gain Control: Adjusts the input sensitivity for the connected device. Set this to achieve a healthy signal level without clipping.
- Pad Button: Attenuates the input signal by a fixed amount (e.g., -20dB) for very hot signals.
- High EQ: Adjusts the treble frequencies (e.g., 12 kHz).
- Mid EQ: Adjusts the midrange frequencies (e.g., 2.5 kHz).
- Low EQ: Adjusts the bass frequencies (e.g., 80 Hz).
- MON (Monitor) Send: Controls the amount of signal sent to the monitor mix.
- EFX (Effects) Send: Controls the amount of signal sent to the internal effects processor.
- PAN (Panorama): Positions the channel's signal in the stereo field (left to right).
- MUTE Button: Silences the channel's output to the main mix, monitor, and effects sends.
- PFL (Pre-Fader Listen) Button: Sends the channel's signal to the headphones for solo monitoring, independent of the fader position.
- Channel Fader: Adjusts the overall level of the channel in the main mix.
5.2 Master Section
The master section provides overall control for the mixer:
- Graphic EQ: A multi-band graphic equalizer for shaping the overall frequency response of the main output.
- EFX Section:
- Effect Presets: A list of available digital effects (e.g., Reverbs, Delays, Chorus).
- Program/Parameter Control: Selects the effect program and adjusts its parameters.
- EFX Level: Controls the overall level of the effects return.
- MON (Monitor) Master Fader: Controls the overall level of the monitor mix.
- STEREO (Main) Master Faders: Controls the overall level of the main stereo output.
- Media In/Out (USB): Controls for USB audio input and output levels.
- Phones Level: Adjusts the volume for the headphone output.
- Phantom Power Switch: Activates +48V phantom power for condenser microphones on XLR inputs.
- VU Meters: Displays the output level of the main mix.
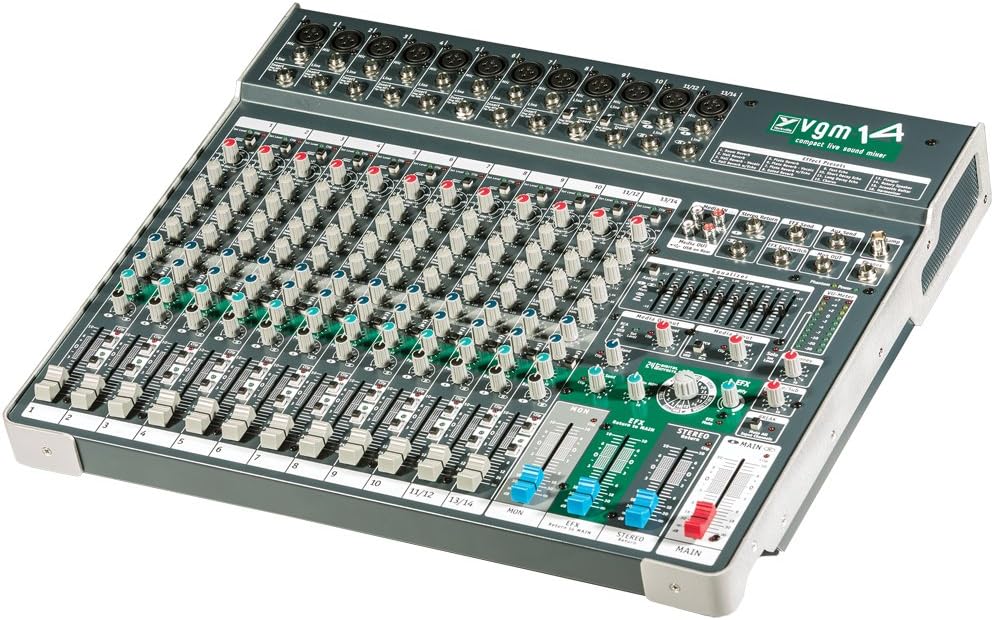
Figure 3: Angled View of Mixer. This image provides an angled perspective of the Yorkville VGM14 mixer, showcasing the overall design and the accessibility of its various controls, including the channel strips, master section, and graphic equalizer.
6. Operating Instructions
6.1 Initial Power-Up
- Ensure all channel faders and master faders are at their minimum (bottom) position.
- Turn on any connected power amplifiers or powered speakers last.
- Flip the power switch on the mixer to the 'ON' position. The power indicator LED will illuminate.
6.2 Setting Input Levels (Gain Staging)
- Select a channel with an active input.
- Press the PFL button for that channel to monitor its signal in headphones.
- While the source is playing (e.g., microphone speaking, instrument playing), slowly increase the channel's Gain control until the PFL meter (or main meter if PFL is not available) shows a strong signal, peaking around 0 dB, but not consistently clipping (red LED). If the signal is too hot even with gain at minimum, engage the Pad button.
- Release the PFL button.
6.3 Creating a Main Mix
- With input gains set, slowly raise the Main Stereo Master Faders to a comfortable listening level.
- Gradually raise the individual channel faders for each active input, balancing them to create your desired mix.
- Use the PAN control to position instruments in the stereo field.
- Adjust the Graphic EQ on the master section to fine-tune the overall sound of your mix.
6.4 Using Effects
- Select an effect program from the EFX section.
- Adjust the EFX Send control on individual channels to send signal to the effects processor.
- Increase the EFX Level control in the master section to blend the effect into the main mix.
6.5 Creating a Monitor Mix
- Ensure the Monitor Output is connected to your monitor system.
- Adjust the MON Send control on each channel to send the desired amount of that channel's signal to the monitor mix.
- Use the MON Master Fader to control the overall volume of the monitor mix.
7. Maintenance
7.1 Cleaning
Regularly clean the mixer's surface with a soft, dry cloth. For stubborn dirt, use a slightly damp cloth and then dry thoroughly. Avoid abrasive cleaners or solvents that could damage the finish or controls.
7.2 Storage
When not in use for extended periods, store the mixer in a cool, dry place, away from direct sunlight and extreme temperatures. Consider using a dust cover to protect the controls and faders.
8. Troubleshooting
If you encounter issues with your VGM14 mixer, refer to the following common problems and solutions:
- No Power:
- Check if the power cord is securely connected to both the mixer and the power outlet.
- Ensure the power switch is in the 'ON' position.
- Verify the power outlet is functional.
- No Sound Output:
- Check if the Main Stereo Master Faders are raised.
- Ensure individual channel faders are raised and not muted.
- Verify that input sources are active and connected correctly.
- Check connections to your power amplifier or powered speakers.
- Ensure the amplifier/speakers are powered on and their volume is up.
- Distorted Sound:
- Reduce the Gain control on the input channel if the signal is clipping (red LED).
- If using a microphone, ensure it's not too close to the sound source or that the Pad button is engaged if needed.
- Check the input level of connected devices to ensure they are not overdriving the mixer.
- Feedback (High-pitched squeal):
- Reduce the gain of the microphone channel causing feedback.
- Move microphones further away from speakers.
- Use the channel EQ or master Graphic EQ to cut problematic frequencies.
- Reduce the monitor send level for the problematic microphone.
9. Specifications
| Feature | Specification |
|---|---|
| Item Weight | 16.81 pounds |
| Package Dimensions | 22.7 x 19.5 x 6 inches |
| ASIN | B00GACXAK4 |
| Item Model Number | VGM14 |
| Date First Available | October 29, 2013 |
| Power Source | Corded Electric |
| Brand | Yorkville |
| Number of Channels | 14 |
| Connectivity Technology | Auxiliary, USB |
| Frequency | 20 Hz (typical low-end response) |
10. Warranty and Support
For warranty information and technical support, please refer to the official Yorkville website or contact your authorized Yorkville dealer. Keep your purchase receipt as proof of purchase for warranty claims.


