1. Introduction
Thank you for purchasing the ONKYO FR-V7 Center Unit Amplifier. This manual provides essential information for the safe and efficient operation of your audio system. Please read it thoroughly before use and retain it for future reference. The FR-V7 integrates a CD player, MD player, and tuner into a single compact unit, designed to deliver high-quality audio when connected to external speakers.
2. Safety Information
To ensure safe operation and prevent damage, observe the following precautions:
- Power Supply: Connect the unit only to an AC outlet of the voltage specified on the rear panel.
- Ventilation: Ensure adequate ventilation. Do not block ventilation openings or place the unit on soft surfaces that may impede airflow.
- Water and Moisture: Do not expose the unit to rain or moisture. Do not place objects filled with liquids, such as vases, on the unit.
- Foreign Objects: Do not insert any metal objects or flammable materials into the unit's openings.
- Servicing: Do not attempt to service the unit yourself. Refer all servicing to qualified service personnel.
- Placement: Place the unit on a stable, level surface away from direct sunlight, heat sources, and excessive dust or vibration.
3. Product Overview
The ONKYO FR-V7 is a compact audio system designed for high-fidelity sound reproduction. It features a front-loading CD player, a MiniDisc (MD) player/recorder, and an AM/FM tuner. The unit serves as the central hub for your audio setup, requiring external speakers for sound output.
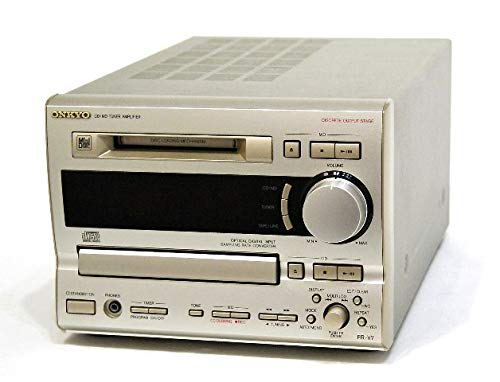
Figure 3.1: Front view of the ONKYO FR-V7 Center Unit Amplifier, showing the display, control buttons, and disc trays.
3.1 Front Panel Controls
- Power Button: Turns the unit on or off.
- Display: Shows current source, track information, and tuner frequency.
- Source Selector: Switches between CD, MD, Tuner, LINE 1, LINE 2, and TAPE inputs.
- Volume Control: Adjusts the overall sound level.
- CD Tray/MD Slot: For inserting CDs and MiniDiscs.
- Playback Controls: Play, Pause, Stop, Skip/Search for CD and MD.
- Tuner Controls: Tuning Up/Down, Preset selection.
3.2 Rear Panel Connections
- Speaker Terminals: Connects to passive speakers.
- LINE IN (1 & 2): Analog audio inputs for external devices (e.g., turntable pre-amp, auxiliary player).
- TAPE IN/OUT: Analog audio input and output for a tape deck or other recording device.
- OPTICAL DIGITAL OUT: Digital audio output for connecting to a digital recorder or DAC.
- FM/AM Antenna Terminals: For connecting radio antennas.
- AC Power Inlet: Connects to the main power supply.
4. Setup
4.1 Unpacking
- Carefully remove the FR-V7 unit and all accessories from the packaging.
- Retain the packaging materials for future transport or storage.
- Inspect the unit for any signs of damage. If damaged, contact your dealer.
4.2 Speaker Connection
The FR-V7 requires external passive speakers. Ensure your speakers are compatible with the amplifier's output specifications.
- Locate the speaker terminals on the rear panel of the FR-V7.
- Connect the positive (+) terminal of the left speaker to the left (+) terminal on the FR-V7.
- Connect the negative (-) terminal of the left speaker to the left (-) terminal on the FR-V7.
- Repeat steps 2 and 3 for the right speaker.
- Ensure all connections are secure and that no bare speaker wire strands are touching each other or the unit's chassis, which could cause a short circuit.
4.3 Audio Component Connection
Connect external audio sources using RCA cables.
- LINE IN 1/2: For connecting devices like a cassette deck, phono pre-amplifier, or another auxiliary audio source. Connect the RCA output cables from your device to the corresponding LINE IN jacks on the FR-V7.
- TAPE IN/OUT: For connecting a tape recorder. Connect the TAPE OUT of your recorder to the TAPE IN of the FR-V7, and the TAPE IN of your recorder to the TAPE OUT of the FR-V7.
- OPTICAL DIGITAL OUT: If you wish to record the digital output of the CD or MD player, connect an optical cable from this port to the digital input of a compatible recording device.
4.4 Antenna Connection
- FM Antenna: Connect the supplied FM indoor antenna or an external FM antenna to the FM antenna terminal. For optimal reception, extend the wire fully.
- AM Antenna: Connect the supplied AM loop antenna to the AM antenna terminals. Position the loop antenna for best reception.
4.5 Power Connection
- Ensure all audio and speaker connections are made correctly.
- Plug the power cord into the AC power inlet on the rear of the FR-V7.
- Plug the other end of the power cord into a suitable wall outlet.
5. Operating Instructions
5.1 Power On/Off
Press the POWER button on the front panel to turn the unit on or off. The display will illuminate when the unit is powered on.
5.2 Source Selection
Press the SOURCE button repeatedly to cycle through the available input sources: CD, MD, TUNER, LINE 1, LINE 2, TAPE. The selected source will be indicated on the display.
5.3 CD Playback
- Press the CD source button or select CD using the SOURCE button.
- Press the OPEN/CLOSE button to open the CD tray.
- Place a CD with the label side up into the tray.
- Press OPEN/CLOSE again to close the tray.
- Press the PLAY button to start playback.
- Use PAUSE, STOP, SKIP (▶▶| / |◀◀), and SEARCH (▶▶ / ◀◀) buttons to control playback.
5.4 MD Playback and Recording
- Press the MD source button or select MD using the SOURCE button.
- Insert a MiniDisc into the MD slot with the arrow pointing inwards.
- For Playback: Press the PLAY button. Use playback controls similar to CD.
- For Recording: Select the desired input source (e.g., CD, LINE 1). Insert a blank or erasable MD. Press the REC button, then press PLAY on the source device to begin recording. Refer to the display for recording status.
5.5 Tuner Operation
- Press the TUNER source button or select TUNER using the SOURCE button.
- Press the BAND button to switch between FM and AM bands.
- Use the TUNING UP/DOWN buttons to manually tune to a station.
- To automatically scan for stations, press and hold the TUNING UP/DOWN buttons.
- Preset Stations: To store a station, tune to it, then press MEMORY followed by a preset number button. To recall a preset, press the corresponding preset number button.
5.6 Volume and Tone Control
- Volume: Rotate the VOLUME knob on the front panel to adjust the output level.
- Tone Controls: If available, use the BASS and TREBLE knobs (or menu options) to adjust the low and high frequency response.
6. Maintenance
6.1 Cleaning the Unit
- Always disconnect the power cord before cleaning.
- Use a soft, dry cloth to wipe the exterior surfaces.
- For stubborn stains, lightly dampen the cloth with a mild, non-abrasive cleaner. Do not use harsh chemicals or solvents.
- Avoid spraying cleaning liquids directly onto the unit.
6.2 Disc Care (CD/MD)
- Handle discs by their edges to avoid fingerprints on the playing surface.
- Keep discs clean. Wipe them with a soft, lint-free cloth from the center outwards.
- Store discs in their cases when not in use to protect them from dust and scratches.
- Do not expose discs to direct sunlight or high temperatures.
7. Troubleshooting
If you experience problems with your FR-V7, consult the following table before seeking professional service.
| Problem | Possible Cause | Solution |
|---|---|---|
| No power | Power cord disconnected; Power outlet faulty | Check power cord connection; Try a different outlet |
| No sound | Incorrect source selected; Volume too low; Speakers not connected; Speaker wires shorted | Select correct source; Increase volume; Check speaker connections; Ensure no bare wires are touching |
| CD/MD does not play | Disc inserted incorrectly; Disc dirty or scratched; Disc format not supported | Reinsert disc correctly; Clean or replace disc; Ensure disc is standard audio CD/MD |
| Poor radio reception | Antenna not connected or poorly positioned | Connect antenna securely; Adjust antenna position for best reception |
8. Specifications
Specifications are subject to change without notice for improvement.
- Model: FR-V7
- Functions: CD Player, MD Player/Recorder, AM/FM Tuner, Amplifier
- Input Terminals:
- LINE Input: 2 systems (RCA)
- TAPE Input: 1 system (RCA)
- Output Terminals:
- Speaker Output: 1 system (Stereo, binding post type)
- TAPE Output: 1 system (RCA)
- Optical Digital Output: 1 system
- Dimensions (W x H x D): Approximately 40.7 x 16.7 x 23 cm (16.0 x 6.6 x 9.1 inches)
- Weight: Approximately 5.52 kg (12.17 lbs)
- Power Requirements: AC 100V, 50/60Hz (Japan model)
9. Warranty and Support
ONKYO products are manufactured to high quality standards. For warranty information, please refer to the warranty card included with your purchase or contact your local ONKYO dealer. For technical support or service inquiries, please visit the official ONKYO website or contact their customer service department.
ONKYO Official Website: www.onkyo.com


