
Product Overview
The Yamaha NS-SW300PN is a high-performance powered subwoofer designed to deliver clear, tight, and realistic bass. It incorporates Yamaha's advanced audio technologies, including the new Twisted Flare Port and Advanced YST II, to enhance your home audio experience. Its elegant design, featuring a piano black finish and gentle curved front, complements a wide range of speaker systems and interior decors.
Key Features:
- PWM digital drive high efficiency amplifier and dual feedback circuit for stable power output.
- New Twisted Flare Port technology for clear and accurate low frequency reproduction by reducing air turbulence noise.
- Advanced YST II (Yamaha Active Servo Technology II) for dynamic and stable low-range response.
- 10-inch woofer with square wire voice coil for high drive force and deep bass reproduction.
- Convenient front control panel for easy access to power and volume.
- System control and Auto Power Standby functions for energy efficiency.
Product Images

Image 1: Front view of the Yamaha NS-SW300PN Powered Subwoofer, showcasing its sleek black finish and front-mounted controls.
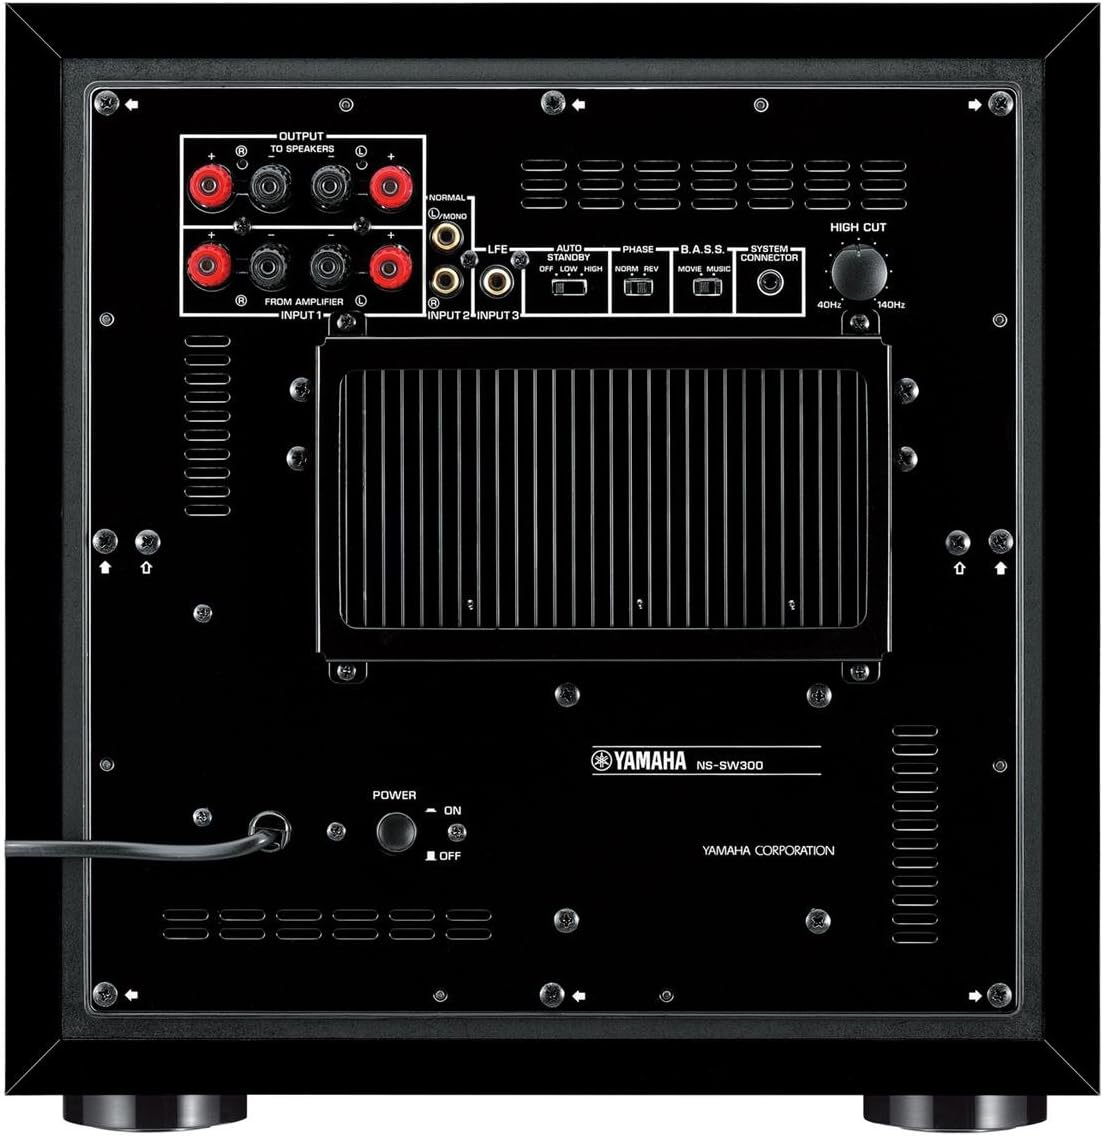
Image 2: Rear view of the Yamaha NS-SW300PN Powered Subwoofer, displaying the various input/output terminals, power switch, and control knobs.

Image 3: Angled view of the Yamaha NS-SW300PN Powered Subwoofer, highlighting its curved design and side-mounted Twisted Flare Port.
Setup
1. Placement
Optimal placement of the subwoofer is crucial for achieving the best bass response. Generally, placing the subwoofer in a corner of the room can enhance bass output. Experiment with different positions to find the spot that provides the most balanced and impactful sound for your listening environment.
2. Connections
Before making any connections, ensure that all audio components are turned off and unplugged from the power outlet.
- LFE Input: For receivers with a dedicated subwoofer (LFE) output, connect a single RCA cable from the receiver's LFE output to the subwoofer's LFE input.
- Line Inputs (Input 1, Input 2+3): For receivers without a dedicated LFE output, connect RCA cables from the receiver's front left and right pre-out outputs to the subwoofer's Line Inputs (Input 1 and Input 2+3).
- Speaker Level Inputs/Outputs: If your receiver does not have pre-out connections, you can use the speaker level inputs. Connect the speaker wires from your receiver's front left and right speaker outputs to the subwoofer's speaker level inputs. Then, connect speaker wires from the subwoofer's speaker level outputs to your main front left and right speakers. Ensure correct polarity (+ to + and - to -).
- Power Connection: Once all audio connections are made, connect the subwoofer's power cord to a suitable AC outlet.
3. Initial Power On
After connecting, turn on your audio receiver first, then turn on the subwoofer using the power button on the front control panel. The LED indicator above the power button will illuminate.
Operating
Front Control Panel
The NS-SW300PN features a convenient front control panel, inclined at a 45-degree angle for easy access, even when placed on the floor.
- Power Button: Press to turn the subwoofer on or off. A green LED indicates the unit is on.
- Volume Knob: Adjusts the overall output level of the subwoofer.
Rear Panel Controls
The rear panel provides additional controls for fine-tuning the subwoofer's performance.
- Auto Power Standby Switch / Sensitivity Selector: This switch allows you to select the standby mode and input sensitivity. Options typically include 'High', 'Low', and 'Off'. When set to 'High' or 'Low', the subwoofer will automatically enter standby mode if no audio signal is detected for a fixed period and power on when a signal is detected. 'Off' disables this feature.
- Phase Control (Normal/Reverse): Adjusts the phase of the subwoofer's output relative to your main speakers. Experiment with both settings to find the one that provides the most cohesive and impactful bass in your listening area.
- B.A.S.S. (Bass Action Selector System) Switch: This switch allows you to select between different bass modes, typically 'Movie' or 'Music', optimizing the subwoofer's performance for different types of audio content.
- High Cut (Frequency) Knob: This control allows you to set the upper frequency limit of the subwoofer's output. Adjust this to blend the subwoofer's bass seamlessly with your main speakers. A common starting point is to set it slightly above the lowest frequency your main speakers can reproduce.
- System Control Terminal: This terminal allows the subwoofer to be linked to a compatible Yamaha amplifier or receiver, enabling automatic power on/off synchronization.
Maintenance
Proper care and maintenance will ensure the longevity and optimal performance of your Yamaha NS-SW300PN subwoofer.
- Cleaning: Regularly wipe the cabinet with a soft, dry cloth. For stubborn dirt, slightly dampen the cloth with water and then wipe dry. Avoid using abrasive cleaners, waxes, or solvents as they can damage the finish.
- Ventilation: Ensure adequate ventilation around the subwoofer. Do not block the ventilation holes or place the unit in an enclosed space that restricts airflow, as this can lead to overheating.
- Placement Environment: Avoid placing the subwoofer in direct sunlight, near heat sources, or in areas with high humidity or extreme temperatures.
- Power Cord: Periodically check the power cord for any signs of damage. If damaged, discontinue use and contact qualified service personnel.
Troubleshooting
If you experience issues with your Yamaha NS-SW300PN subwoofer, please refer to the following common troubleshooting steps. For more detailed information, consult the official User Manual PDF.
- No Sound:
- Ensure the subwoofer is powered on and the power indicator light is illuminated.
- Check all audio cables for secure connections at both the subwoofer and your receiver/amplifier.
- Verify that the volume on the subwoofer and your receiver is turned up.
- Confirm that your receiver's subwoofer output is enabled and configured correctly in its settings.
- If using speaker level inputs, ensure correct wiring and polarity.
- Distorted or Unclear Bass:
- Adjust the subwoofer's volume level. Excessive volume can cause distortion.
- Experiment with the Phase Control (Normal/Reverse) switch to find the optimal setting for your room.
- Adjust the High Cut (Frequency) knob to ensure a smooth transition between the subwoofer and your main speakers.
- Check for any loose objects near the subwoofer that might be rattling.
- Subwoofer Not Turning On/Off Automatically:
- Ensure the Auto Power Standby switch is set to 'High' or 'Low', not 'Off'.
- Verify that a strong enough audio signal is being sent to the subwoofer.
- If using the System Control terminal, ensure it is properly connected to a compatible Yamaha component.
Specifications
| Feature | Specification |
|---|---|
| Model Name | NS-SW300PN |
| Speaker Type | Powered Subwoofer |
| Woofer Diameter | 10 Inches (with square wire voice coil) |
| Speaker Maximum Output Power | 250 Watts |
| Frequency Response | 20-160 Hz |
| Amplifier Type | PWM Digital Drive High Efficiency Amplifier with Dual Feedback Circuit |
| Bass Technology | Advanced YST II, Twisted Flare Port |
| Color | Black |
| Item Weight | 39.7 Pounds |
| Product Dimensions (L x W x H) | 18.2 x 20.2 x 19.3 inches |
| Power Source | Corded Electric |
| Connectivity Technology | Wired |
| Recommended Uses | Home Theater Systems, Music Players, Gaming Consoles, Laptops |
Warranty and Support
The Yamaha NS-SW300PN Powered Subwoofer comes with a Limited Warranty. For specific terms and conditions, please refer to the official warranty documentation included with your product or contact Yamaha customer support.
For comprehensive instructions, detailed diagrams, and further assistance, please download the official User Manual:
You can also visit the official Yamaha store for more product information and support:
