
1. Product Overview
This manual provides instructions for the Kyosho KE25 Engine Carburetor and Air Filter set, designed for the Kyosho 1/8 Inferno GT2 Race Spec (Model KYO31834B). This set includes the factory-assembled carburetor (Part # 74032-08) and the air filter assembly. These components are essential for the proper functioning of your nitro-powered remote control vehicle engine.
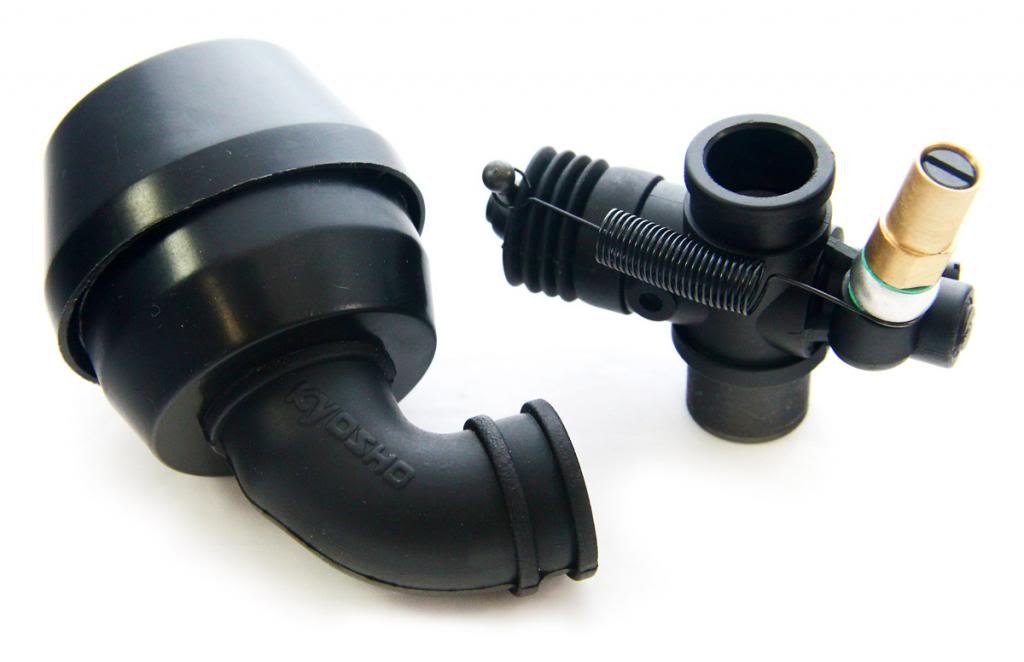
Image 1.1: The Kyosho KE25 engine carburetor and the associated air filter assembly. The carburetor, on the right, features a brass needle valve and throttle linkage. The air filter, on the left, is a black rubber housing designed to connect to the carburetor.
2. Setup and Installation
Proper installation of the carburetor and air filter is crucial for engine performance and longevity. Ensure the engine is cool before beginning any installation or maintenance procedures.
2.1 Carburetor Installation
- Prepare the Engine: Ensure the engine's carburetor mounting point is clean and free of debris.
- Mount the Carburetor: Carefully slide the carburetor into the engine's intake manifold. Ensure a snug fit.
- Secure the Carburetor: Tighten any retaining screws or clamps to hold the carburetor firmly in place. Do not overtighten.
- Connect Linkages: Attach the throttle linkage and any other necessary connections to the carburetor's throttle arm. Verify smooth operation.
- Fuel Line Connection: Connect the fuel line from the fuel tank to the carburetor's fuel inlet nipple. Secure with a fuel line clip if necessary.
2.2 Air Filter Installation
- Prepare the Air Filter: If not pre-oiled, apply a small amount of air filter oil to the foam element. Ensure even saturation without excessive dripping.
- Attach to Carburetor: Slide the air filter assembly onto the carburetor's air intake horn.
- Secure the Air Filter: Use the provided clamp or zip tie to secure the air filter firmly to the carburetor, preventing it from dislodging during operation.
Note: As these parts are sourced from a new, unused vehicle, some components may exhibit minor signs of prior assembly or disassembly. This does not affect their functionality.
3. Operating Considerations
The carburetor controls the air-fuel mixture entering the engine, while the air filter protects the engine from contaminants. Proper tuning and maintenance are key to optimal performance.
- Initial Carburetor Settings: Refer to your engine's specific manual for recommended initial needle settings. Typically, the high-speed needle, low-speed needle, and idle screw will require adjustment.
- Air Filter Function: The air filter prevents dust, dirt, and other particles from entering the engine, which can cause significant wear and damage. Always operate the vehicle with a clean, properly oiled air filter installed.
- Fuel Type: This carburetor is designed for use with nitro model engine fuel (Liquefied Petroleum Gas, as per specifications). Using incorrect fuel can damage the engine and carburetor.
4. Maintenance
Regular maintenance of your carburetor and air filter will ensure consistent engine performance and extend the lifespan of your engine.
4.1 Air Filter Maintenance
- Cleaning Frequency: Clean the air filter after every running session, especially when operating in dusty conditions.
- Removal: Carefully remove the air filter assembly from the carburetor.
- Washing: Wash the foam element with warm, soapy water or a specialized air filter cleaner. Rinse thoroughly until all dirt and soap residue are removed.
- Drying: Allow the foam element to air dry completely. Do not use heat, as this can damage the foam.
- Oiling: Once dry, apply a thin, even coat of air filter oil to the foam element. Gently squeeze out any excess oil.
- Reassembly: Reassemble the air filter and reinstall it onto the carburetor.
4.2 Carburetor Inspection
- Visual Check: Periodically inspect the carburetor for any signs of damage, cracks, or loose components.
- Linkage Check: Ensure all linkages operate smoothly and are free from binding.
- Fuel Line: Check the fuel line for cracks, kinks, or leaks. Replace if necessary.
- Cleaning: If the carburetor appears dirty, use a carburetor cleaner spray to remove residue. Avoid spraying directly into the engine's intake.
5. Troubleshooting
This section addresses common issues related to the carburetor and air filter.
- Engine Runs Poorly/Stalls:
- Dirty Air Filter: A clogged air filter restricts airflow, causing the engine to run rich. Clean and re-oil the air filter.
- Carburetor Tuning: Incorrect needle settings can lead to poor performance. Refer to your engine manual for tuning procedures.
- Fuel Delivery Issues: Check fuel lines for blockages or leaks. Ensure the fuel tank is properly pressurized (if applicable).
- Engine Overheating:
- Lean Mixture: A lean air-fuel mixture (too much air, not enough fuel) can cause overheating. Adjust carburetor needles to richen the mixture.
- Excessive Smoke:
- Rich Mixture: A rich air-fuel mixture (too much fuel, not enough air) can cause excessive smoke. Adjust carburetor needles to lean the mixture.
- Over-oiled Air Filter: Excess oil from the air filter can be drawn into the engine. Ensure the air filter is properly oiled and excess is squeezed out.
6. Specifications
| Manufacturer | Kyosho |
| Brand | Kyosho |
| Item Weight | 2.24 ounces |
| Manufacturer Part Number | DHZGT2Carburetor (also 74032-08 for carburetor) |
| ASIN | B00F1M8YG4 |
| Fuel Type | Liquefied Petroleum Gas (Nitro Fuel) |
| Exterior Material | Zinc (for carburetor components) |
7. Warranty Information
Warranty coverage for this product is typically provided by the manufacturer, Kyosho, or the original seller. Please refer to the documentation included with your original Kyosho 1/8 Inferno GT2 Race Spec vehicle or contact Kyosho directly for specific warranty terms and conditions. This manual does not constitute a warranty statement.
8. Support
For further assistance, technical support, or inquiries regarding replacement parts, please contact Kyosho customer service or your authorized Kyosho dealer. You may also find additional resources on the official Kyosho website.
Kyosho Official Website: www.kyosho.com