Introduction
This manual provides detailed instructions for the installation, operation, and maintenance of your COMTEC HDR-101 Drive Recorder. Please read this manual thoroughly before using the product to ensure correct usage and optimal performance. Keep this manual for future reference.
Safety Information
Always operate the device safely and responsibly. Do not attempt to install or operate the device in a way that obstructs your view of the road or interferes with the safe operation of your vehicle. Ensure all cables are securely routed and do not interfere with driving controls. Avoid exposing the device to extreme temperatures or direct sunlight for prolonged periods, as this may affect its performance and lifespan. Do not disassemble or modify the device, as this will void the warranty and may cause damage.
Package Contents
Verify that all items listed below are included in your package:
- COMTEC HDR-101 Drive Recorder Unit
- Mounting Bracket
- Cigarette Lighter Power Cable (DC12V/24V compatible)
- microSDHC Card (4GB)
- microSD Adapter
- Adhesive Mounting Tape
- Cable Clips
- Hex Wrench (for bracket adjustment)
- Cleaning Wipe

Image: The package contents include the main drive recorder unit, mounting bracket, power cable, 4GB microSDHC card with adapter, adhesive tape, cable clips, hex wrench, and a cleaning wipe.
Product Overview
The COMTEC HDR-101 is a compact drive recorder designed to capture high-definition video of your journeys. It features a front-facing camera, a rear LCD screen for live view and playback, and intuitive controls.
Front View

Image: The front of the drive recorder shows the main camera lens and the 'COMTEC Drive Recorder' branding. The AV OUT port and microSD card slot are visible on the left side.
Rear View and Controls

Image: The rear of the device features a 2.5-inch TFT LCD screen. To the right of the screen are control buttons: RESET, UP, DOWN, OK, and MENU. These buttons are used for navigation and settings adjustments.
Side Ports

Image: One side of the device features the DC12V/24V power input port, used to connect the drive recorder to your vehicle's power supply.

Image: The other side of the device includes the AV OUT port for connecting to an external display and the microSD card slot for inserting the recording media.
Setup
Installation
The HDR-101 offers flexible mounting options to suit your vehicle's interior. It can be installed either behind the rearview mirror or on the dashboard.
- Choose a Mounting Location: Select a position that does not obstruct your view of the road or interfere with airbags. Common locations are behind the rearview mirror for a discreet installation or on the dashboard for easier access.
- Clean the Surface: Use the provided cleaning wipe to ensure the mounting surface is free of dust and grease.
- Attach the Mounting Bracket: Apply the adhesive mounting tape to the bracket and firmly press it onto the chosen surface.
- Attach the Drive Recorder: Slide the drive recorder onto the mounting bracket. Adjust the camera angle using the hex wrench to ensure a clear view of the road ahead. The device features automatic display inversion, allowing for dashboard mounting without affecting screen orientation.

Image: The drive recorder discreetly mounted behind the rearview mirror, providing an unobstructed view for the driver.
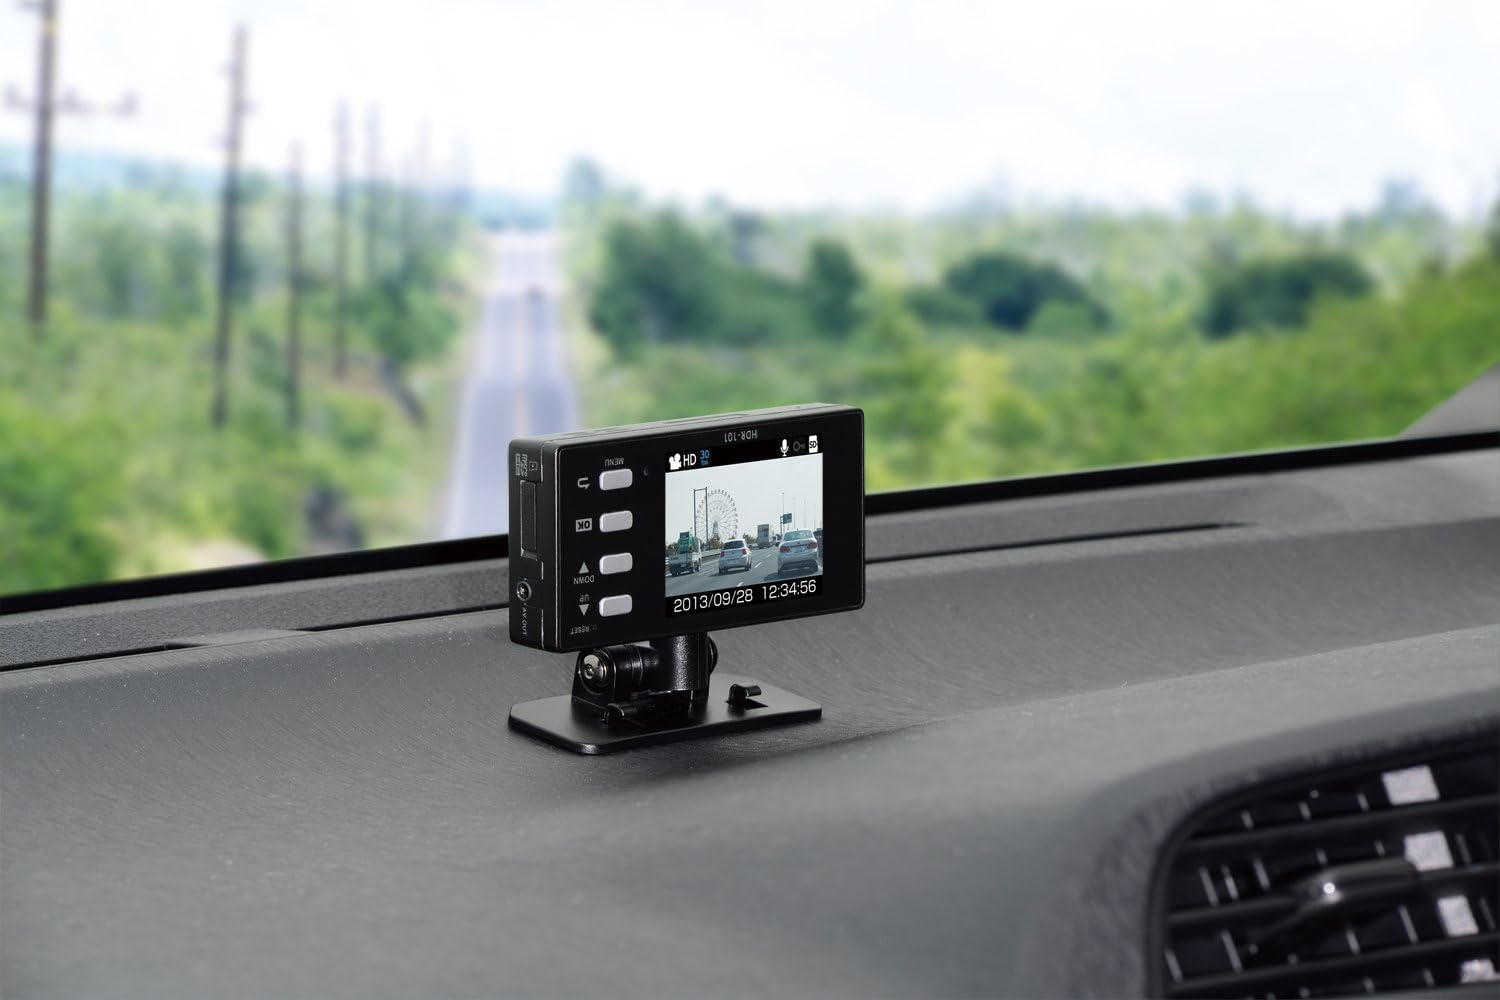
Image: The drive recorder mounted on the dashboard, showing its live view on the screen.
Power Connection
Connect the cigarette lighter power cable to the DC12V/24V port on the drive recorder and plug the other end into your vehicle's cigarette lighter socket. The device will power on automatically when the vehicle's ignition is turned on.
Initial Configuration
- microSD Card Insertion: Insert the provided microSDHC card into the microSD card slot until it clicks into place. Ensure the card is inserted correctly to prevent recording errors.
- Time and Date Setting: Upon first use or after a power reset, you may need to set the correct time and date. Navigate through the menu using the UP/DOWN buttons and confirm with OK.
Operating Instructions
Recording Modes
The HDR-101 supports multiple recording modes to capture various driving situations:
- Continuous Recording: The device automatically records video from the moment the power is turned on until it is turned off. When the microSD card is full, the oldest files are automatically overwritten.
- G-Sensor Impact Recording: In the event of an impact or sudden braking/acceleration, the built-in G-sensor detects the event and automatically saves the corresponding video segment as an impact recording. These files are protected from being overwritten by continuous recording. The G-sensor sensitivity can be adjusted (11 levels, including OFF).
- Manual Recording: You can manually initiate a recording by pressing a designated button. This allows you to capture specific events or moments on demand.
Viewing Recordings
- On-Device LCD: Recorded videos can be immediately viewed on the device's 2.5-inch LCD screen. This is useful for checking footage on the spot or adjusting the camera angle during installation.
- PC Playback: Remove the microSD card and insert it into a computer (using the adapter if necessary). The COMTEC PC viewer software (usually pre-loaded on the microSD card or available for download) allows for detailed playback, including G-sensor data and other recording information.
- TV Output: Connect the device to a TV using an optional AV cable to view recordings on a larger screen.

Image: A visual guide illustrating the process of recording (1), selecting a video (2), and viewing it on the device's LCD screen (3).

Image: The PC viewer software interface, showing recorded video footage alongside G-sensor information and other data, accessible via the microSD card.
Other Functions
- Audio Recording: The device supports simultaneous audio recording with video.
- Backup Function: In the event of a power interruption (e.g., engine off), the device has a backup power function to save the currently recording file, preventing data loss.
- LED Signal Light Compatibility: Designed to record LED traffic signals accurately.
- Calendar/Clock Display: The LCD screen displays the current date and time.
Maintenance
microSD Card Management
To ensure reliable recording and prevent data loss, it is recommended to periodically format the microSD card. The device performs a check on the microSDHC card upon startup. If an error is detected, a warning will be displayed on the LCD screen, helping to prevent recording omissions due to card damage.
Troubleshooting
If you encounter issues with your HDR-101, consider the following:
- No Recording/Recording Errors: Check if the microSD card is properly inserted and not damaged. Format the card if necessary.
- Interference with Other Devices (e.g., Digital TV, GPS): The HDR-101 is designed with noise countermeasures to minimize interference. If interference occurs, ensure the power cable is properly routed and not near sensitive antennas.
- Incorrect Time/Date: Reset the time and date through the device's menu.
- Poor Video Quality (Night): Night recording quality depends on ambient lighting. In very dark areas, visibility may be limited.
Specifications
| Feature | Specification |
|---|---|
| Recording Method | Continuous Recording / 3-axis G-sensor / Manual Recording |
| Power Supply | 12V / 24V |
| Mounting Position | Rearview Mirror Front Glass / Dashboard |
| Camera Pixels | Approx. 1 Million Pixels CMOS Camera |
| Camera Angle | Diagonal 170° (Horizontal 105° / Vertical 80°) |
| Recording Image Size | HD (1280 × 720) / SD (640 × 360) |
| LCD Size | 2.5 inch TFT |
| LCD Resolution | 320 × 240 |
| Recording Media | microSDHC Card (4GB included) |
| Recording Time | 30-360 minutes (with included 4GB microSDHC card) |
| Frame Rate | 30/15/10/5 fps |
| Image Verification Method | Device LCD / PC / TV |
| Body Size (W×H×D) | 102 × 50 × 20 mm |
| Weight | 95 g |
| Special Features | G-sensor, Noise Countermeasures, Backup Power, Automatic Display Inversion |
Warranty and Support
This product is manufactured by COMTEC. For official support and inquiries, please refer to the COMTEC official website or contact their customer service. Please note that some repair and maintenance services may be excluded for certain products, as indicated by the manufacturer.


