
NEC NP-V300X
NEC NP-V300X Data Projector User Manual
Model: NP-V300X
1. Introduction
This manual provides essential information for the safe and efficient operation of your NEC NP-V300X Data Projector. Please read it thoroughly before use and retain it for future reference.

Figure 1: Front view of the NEC NP-V300X Data Projector, showing the lens, NEC logo, and ventilation grilles.
2. Setup
2.1 Unpacking and Contents
Carefully remove the projector and all accessories from the packaging. Ensure all components are present:
- NEC NP-V300X Projector
- Power Cord
- Remote Control with Batteries
- VGA Cable
- User Manual (this document)
2.2 Projector Placement
Place the projector on a stable, level surface or mount it securely. Ensure adequate ventilation around the projector to prevent overheating. Maintain a clear path between the projector lens and the screen.
2.3 Connecting Devices
Connect your video and audio sources to the appropriate input terminals on the projector's rear panel.
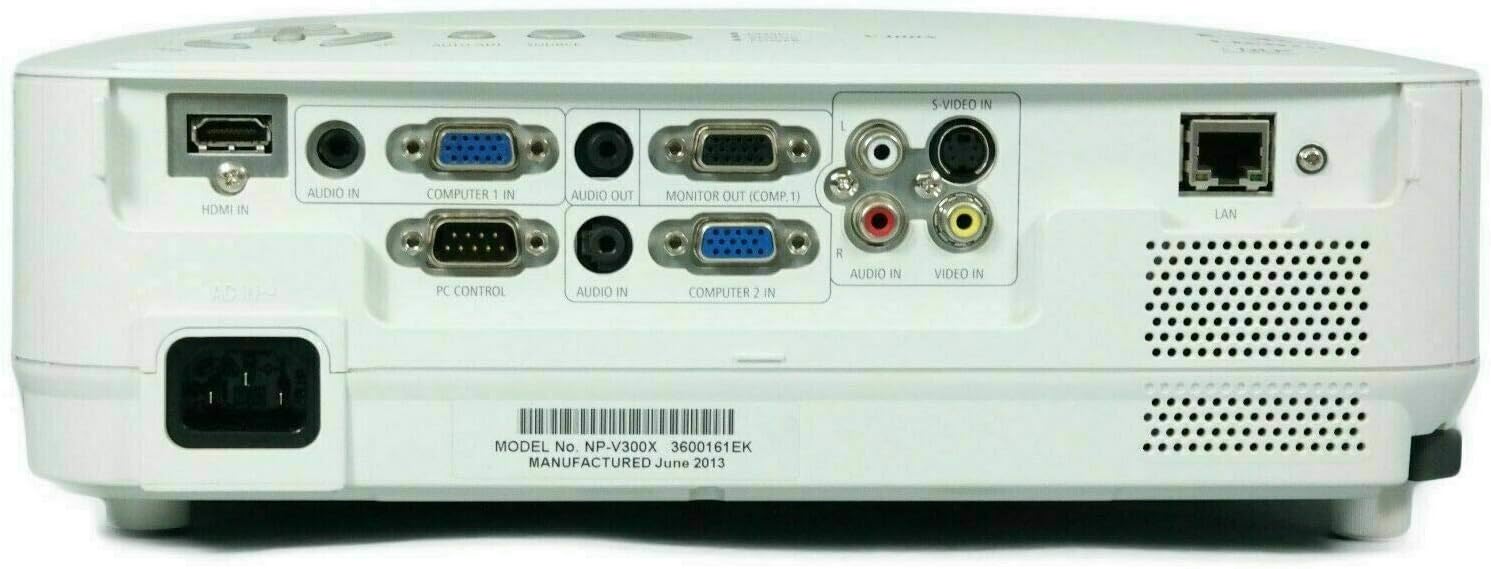
Figure 2: Rear panel of the NEC NP-V300X Data Projector, displaying various input and output ports including HDMI, VGA (COMPUTER 1 IN, COMPUTER 2 IN, MONITOR OUT), S-VIDEO IN, AUDIO IN/OUT, PC CONTROL, and LAN.
- HDMI Input: Connect an HDMI cable from your source device (e.g., Blu-ray player, laptop) to the HDMI IN port.
- VGA (Computer) Input: Connect a VGA cable from your computer to either COMPUTER 1 IN or COMPUTER 2 IN.
- Audio Input: Use the AUDIO IN ports for analog audio signals corresponding to your video input.
- LAN Port: For network control and monitoring.
- Power: Connect the supplied power cord to the AC IN socket and then to a power outlet.
2.4 Powering On
After connecting all cables, press the power button on the projector or remote control to turn on the unit. The power indicator light will change color.
3. Operating Instructions
3.1 Basic Operation
- Power On/Off: Press the POWER button once to turn on. Press twice to turn off.
- Source Selection: Press the SOURCE button to cycle through available input sources (HDMI, Computer 1, Computer 2, S-Video).
- Auto Adjust: Press AUTO ADJ. to automatically optimize the image for the current input source.

Figure 3: Top panel of the NEC NP-V300X Data Projector, showing the control buttons (Menu, Enter, Exit, directional arrows, Auto Adj., Source, Power), focus/zoom rings, and indicator lights (Lamp, Status, Power).
3.2 Image Adjustment
- Focus: Rotate the FOCUS ring on the lens barrel until the image is sharp.
- Zoom: Rotate the ZOOM ring on the lens barrel to adjust the image size.
- Keystone Correction: Use the menu system to correct trapezoidal distortion if the projector is not perfectly perpendicular to the screen.
3.3 Menu Navigation
Press the MENU button to access the on-screen display (OSD) menu. Use the directional arrow buttons to navigate and ENTER to select options. Press EXIT to close the menu.
3.4 3D Functionality
The NP-V300X supports 3D content. To view 3D, ensure your source device is outputting a compatible 3D signal and use active 3D glasses (sold separately) that are compatible with DLP Link technology.
4. Maintenance
4.1 Lamp Replacement
The projector lamp has a finite lifespan. When the lamp indicator lights up or the image becomes dim, the lamp may need replacement. The lamp type for this model is NP18LP.
- Turn off the projector and disconnect the power cord.
- Allow the projector to cool down for at least 60 minutes before attempting lamp replacement. CAUTION: HOT SURFACE!
- Locate the lamp cover (refer to the diagram in the full service manual).
- Unscrew the lamp cover and carefully remove the old lamp module.
- Install the new NP18LP lamp module, ensuring it is securely seated.
- Replace the lamp cover and tighten the screws.
- Reset the lamp timer through the projector's OSD menu.

Figure 4: Side view of the NEC NP-V300X Data Projector, showing ventilation grilles essential for cooling and preventing overheating. Proper airflow is crucial for lamp longevity.
4.2 Cleaning
- Projector Casing: Wipe with a soft, dry cloth. Do not use abrasive cleaners or solvents.
- Lens: Gently clean the lens with a lens cleaning cloth and lens cleaning solution. Avoid touching the lens directly.
- Air Filter: Regularly clean or replace the air filter to maintain optimal cooling performance. Refer to the full service manual for filter location and replacement instructions.
5. Troubleshooting
| Problem | Possible Cause | Solution |
|---|---|---|
| No image on screen |
|
|
| Image is blurry |
|
|
| Projector shuts down unexpectedly |
|
|
6. Specifications
Key technical specifications for the NEC NP-V300X Data Projector:
- Model: NP-V300X
- Brand: NEC
- Display Type: DLP
- Display Resolution Maximum: 1600 x 1200
- Connectivity Technology: HDMI, VGA
- Special Feature: 3D-Ready, Lightweight, Portable
- Item Weight: 5.5 pounds
- Speaker Type: Mono
- Lamp Type: NP18LP
- Power Supply: 100-240V~ 50/60Hz

Figure 5: Bottom view of the NEC NP-V300X Data Projector, showing the model number (NP-V300X) and electrical ratings.
7. Warranty and Support
For warranty information, technical support, or service inquiries, please refer to the warranty card included with your product or visit the official NEC website. Keep your purchase receipt as proof of purchase for warranty claims.
NEC Display Solutions, Ltd.
4-28, Mita 1-chome, Minato-ku, Tokyo, Japan
For US Residents: The lamp(s) in this product contains mercury. Please dispose according to Local, State or Federal Laws.
Related documentsNP-V300X


Ask a question about this manual
Ask about setup, troubleshooting, compatibility, parts, safety, or missing instructions. Manuals+ will review the question and use this page’s manual context to help answer it.