
Native Instruments 22494
Native Instruments Traktor Kontrol X1 MkII DJ Controller User Manual
Model: 22494
Brand: Native Instruments
1. Introduction
The Native Instruments Traktor Kontrol X1 MkII is a powerful and portable DJ controller designed for seamless integration with Native Instruments Traktor software. It offers intuitive control over essential DJ functions, including cue points, loops, track positioning, and effects, allowing DJs to focus on their performance rather than their laptop screen. Its compact design makes it an ideal companion for any Traktor setup, whether in the studio or on the go.
2. Important Safety Information
- Do not expose the device to rain or moisture.
- Avoid placing the device near heat sources such as radiators, heat registers, stoves, or other apparatus (including amplifiers) that produce heat.
- Only use attachments/accessories specified by the manufacturer.
- Unplug the device during lightning storms or when unused for long periods of time.
- Refer all servicing to qualified service personnel. Servicing is required when the apparatus has been damaged in any way.
3. Package Contents
Please check that all items are present in your package:
- Traktor Kontrol X1 MkII DJ Controller
- USB Cable
- Traktor Software Suite (download voucher or license information)
4. Initial Setup
4.1 System Requirements
- Compatible Devices: Laptop, Desktop PC, Mac
- Supported Software: Traktor (requires Traktor Pro 2.6.3 or higher)
- Hardware Platform: Windows, macOS
4.2 Connecting the Device
The Traktor Kontrol X1 MkII connects to your computer via a standard USB cable. Ensure your computer meets the minimum system requirements before connecting.
- Install the latest version of Traktor software and any necessary drivers from the Native Instruments website.
- Connect one end of the supplied USB cable to the USB port on the rear of the Traktor Kontrol X1 MkII.
- Connect the other end of the USB cable to an available USB port on your computer.
- The device will power on automatically and be recognized by your operating system and Traktor software.

This image displays the side profile of the controller, focusing on the USB port for connectivity and the Kensington lock slot.
5. Operating Instructions
5.1 Overview of Controls
The Traktor Kontrol X1 MkII features a logical layout designed for efficient workflow. It is divided into sections for effects, browsing, and deck control.
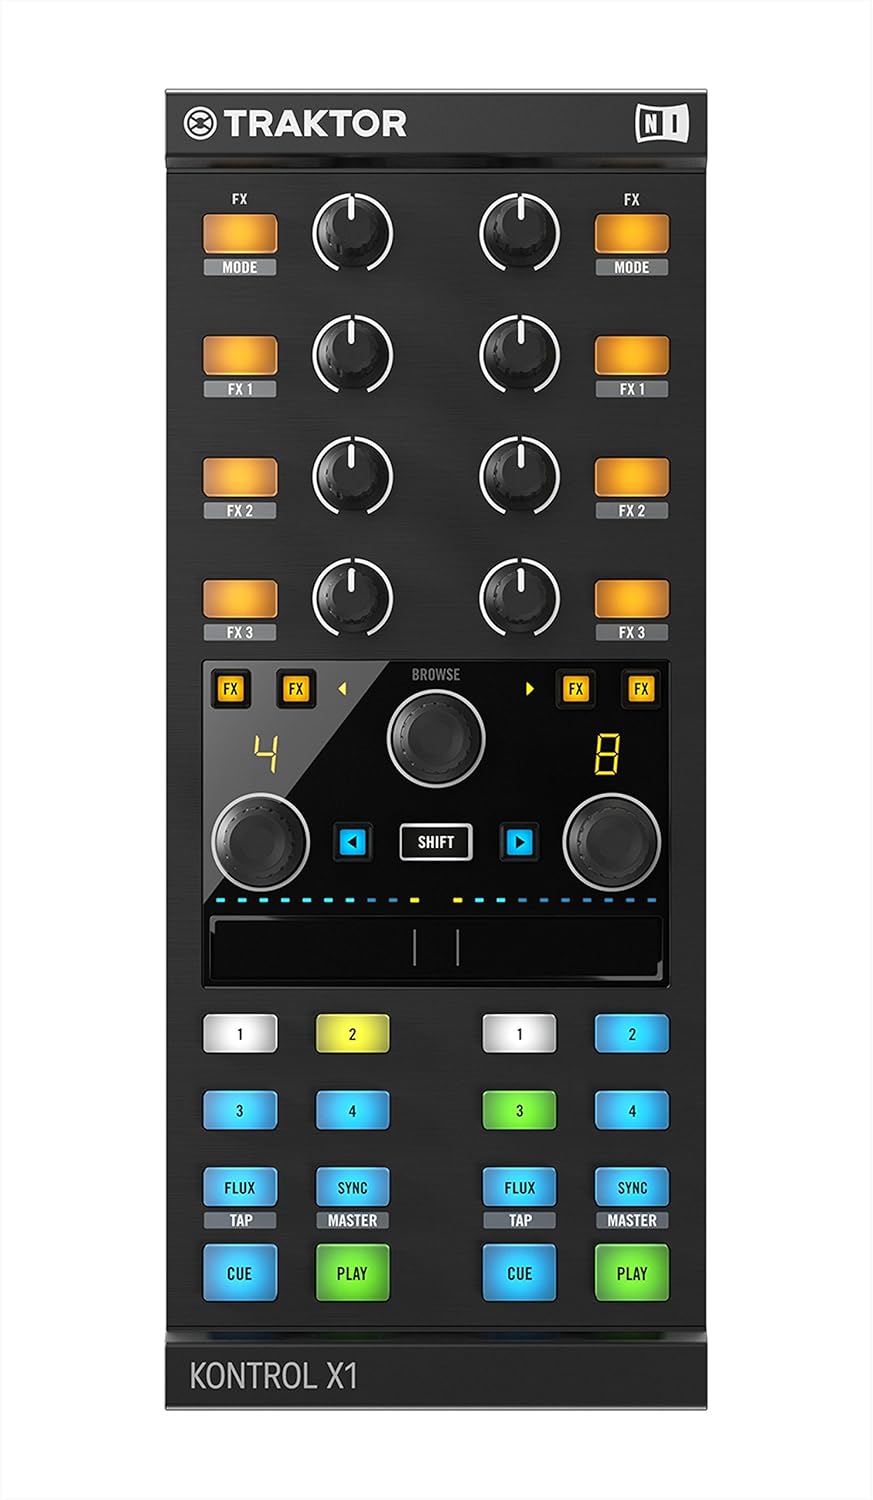
A direct overhead view of the Traktor Kontrol X1 MkII, clearly displaying the layout of all controls, including the FX knobs, browser encoder, touch strip, and performance buttons for two decks.
5.2 Using the Multi-Purpose Touch Strip
The innovative touch strip located in the center of the controller provides direct control without needing to reach for your turntable or CDJ. It can be used for:
- Track Positioning: Quickly navigate through tracks.
- Pitch Bending: Adjust the track's pitch for beatmatching.
- Effects Parameters: Control various parameters of your assigned effects.
5.3 Browser and Loop Controls
The X1 MkII features advanced, touch-sensitive browser and loop controls. The browser knob allows for quick navigation through your music library. Touching the browser knob can automatically maximize the browser window in Traktor, and releasing it returns the browser to its previous size. Dedicated loop controls enable precise loop setting and adjustment.
5.4 Controlling TRAKTOR FX Units
The controller provides comprehensive control over two freely assignable TRAKTOR FX units. Use the dedicated knobs and buttons to activate, adjust, and manipulate effects, adding creative flair to your mixes.
5.5 RGB Cue Point Trigger Buttons
The new RGB cue point trigger buttons help visually identify cue points from loops or load markers. Their color-coding provides clear feedback, enhancing performance in low-light environments.

This image shows the Traktor Kontrol X1 MkII DJ Controller from an elevated, angled perspective, highlighting its compact design and the arrangement of its various buttons, knobs, and the central touch strip.
6. Maintenance and Care
- Cleaning: Use a soft, dry cloth to clean the surface of the controller. Do not use abrasive cleaners, waxes, or solvents.
- Storage: Store the device in a cool, dry place away from direct sunlight and extreme temperatures.
- Handling: Avoid dropping or subjecting the controller to strong impacts.
7. Troubleshooting
| Problem | Possible Solution |
|---|---|
| Device not recognized by computer/Traktor. | Ensure the USB cable is securely connected to both the controller and the computer. Try a different USB port. Verify that Traktor software is updated to version 2.6.3 or higher. Reinstall drivers if necessary. |
| Buttons or knobs are unresponsive. | Check Traktor's Controller Manager settings to ensure the X1 MkII is properly configured and mapped. Restart Traktor and the controller. |
| LEDs are not lighting up. | Ensure the controller is receiving power via the USB connection. Check USB cable integrity. Verify software connection. |
| Audio issues (e.g., no sound, distorted sound). | This controller does not process audio. Ensure your audio interface and Traktor's audio settings are correctly configured. |
8. Technical Specifications
| Feature | Detail |
|---|---|
| Model Name | Traktor Kontrol X1 MkII |
| Item Model Number | 22494 |
| Item Weight | 2.64 pounds |
| Product Dimensions | 14 x 4 x 7 inches |
| Connectivity Technology | USB |
| Hardware Interface | USB 2.0 |
| Special Features | Backlit, Mute Controls, Compact |
| First Available Date | July 9, 2013 |
9. Warranty and Support
For warranty information and technical support, please refer to the official Native Instruments website or contact their customer service directly. Keep your proof of purchase for any warranty claims.
Native Instruments Support: Visit www.native-instruments.com for product registration, software downloads, FAQs, and contact information.
Related documents22494


Ask a question about this manual
Ask about setup, troubleshooting, compatibility, parts, safety, or missing instructions. Manuals+ will review the question and use this page’s manual context to help answer it.