
Introduction
This manual provides detailed instructions for the installation, operation, and maintenance of your Orion XTR Series XTR1000.4 4-Channel Amplifier. Please read this manual thoroughly before attempting installation or operation to ensure proper function and safety. The Orion XTR Series amplifiers are designed for high-performance car audio systems, offering robust power and precise sound control.
Key Features
- High Power Output: 1000W RMS, designed for significant audio performance.
- Stable Operation: 2/4 Ohm stable for versatile speaker configurations.
- Advanced Crossovers: Features high-pass (50Hz - 5kHz) and low-pass (50Hz - 400Hz) crossovers for precise frequency tuning.
- Bass Boost Control: Customizable bass boost (0-18dB) and phase shift control for enhanced low-frequency response.
- MOSFET Power Supply: Built-in protection circuitry guards against overheating, short circuits, and other potential issues.
- Included Bass Knob: Remote bass control for convenient adjustment.
- Compact Design: Dimensions of 14.3” x 9.3” x 2.5” (363.22mm x 236.22mm x 63.5mm) for flexible installation.
Specifications
| Feature | Detail |
|---|---|
| Model Number | XTR10004 |
| Output Power | 1000 Watts RMS |
| Number of Channels | 4 |
| Impedance Stability | 2/4 Ohm Stable |
| High-Pass Crossover | 50Hz - 5kHz |
| Low-Pass Crossover | 50Hz - 400Hz |
| Bass Boost Control | 0-18dB with Phase Shift Control |
| Signal-to-Noise Ratio | 95dB |
| Frequency Response | 20Hz to 35kHz |
| Power Supply Type | MOSFET |
| Dimensions (L x W x H) | 14.3” x 9.3” x 2.5” (363.22mm x 236.22mm x 63.5mm) |
| Voltage | 12 Volts |
| Material | Metal, Semiconductor |
| Item Weight | 6 pounds |
Setup and Installation
Proper installation is crucial for optimal performance and safety. If you are unsure about any steps, consult a professional installer.
1. Mounting the Amplifier
Choose a secure, dry location with adequate ventilation. Avoid mounting the amplifier directly to carpet or in enclosed spaces without airflow. Ensure the mounting surface is strong enough to support the amplifier's weight.

Figure 1: Top view of the Orion XTR1000.4 amplifier, showing its heatsink design.
2. Power Connections
Connect the power, ground, and remote turn-on wires as follows:
- Power (POSITIVE): Connect a fused power cable (minimum 4-gauge recommended) directly from the vehicle's positive battery terminal to the amplifier's "POSITIVE" terminal. The fuse should be located within 18 inches of the battery.
- Ground (NEGATIVE): Connect a ground cable of the same gauge as the power cable from the amplifier's "NEGATIVE" terminal to a clean, unpainted metal surface on the vehicle's chassis. Ensure a solid, low-resistance connection.
- Remote (REM): Connect a remote turn-on wire from your head unit's remote output to the amplifier's "REM" terminal. This wire signals the amplifier to turn on and off with your head unit.

Figure 2: View of the amplifier's power (NEGATIVE, REM, POSITIVE) and speaker output terminals.
3. Audio Input Connections
Connect your head unit's RCA outputs to the amplifier's "Line Input" terminals using high-quality RCA cables. For a 4-channel setup, connect front and rear RCA pairs.
4. Speaker Output Connections
Connect your speakers to the amplifier's "Speaker" terminals. Ensure correct polarity (+ to + and - to -) for each speaker. This 4-channel amplifier supports various configurations, including stereo and bridged modes. Refer to the wiring diagrams for specific speaker configurations.
5. Bass Knob Installation
Mount the included bass knob in a convenient location within reach of the driver. Connect the bass knob cable to the "Remote" port on the amplifier's control panel.
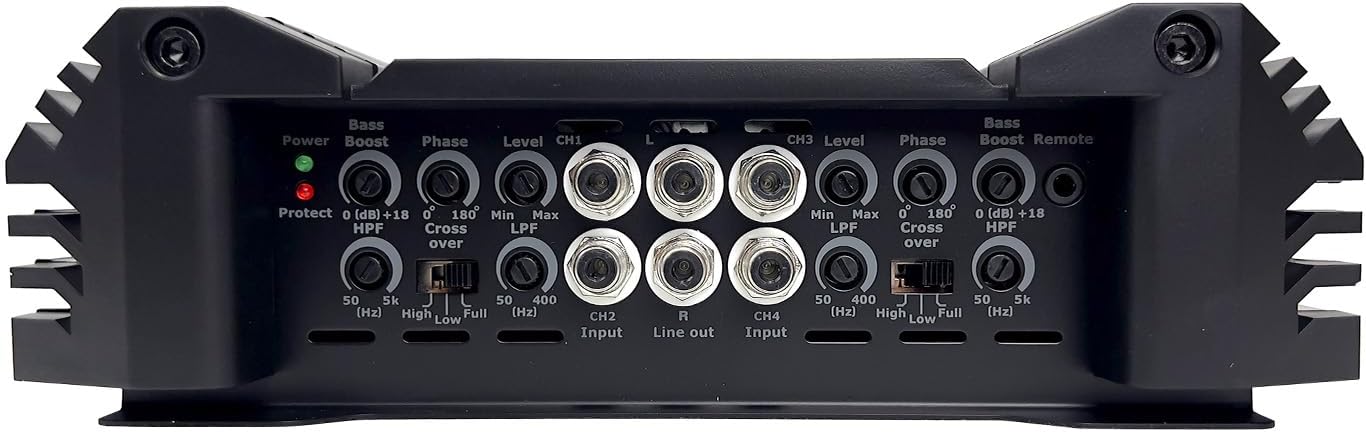
Figure 3: The included remote bass control knob with its connecting cable.
Operating Instructions
Once installed, adjust the amplifier settings for optimal sound performance.

Figure 4: Control panel of the Orion XTR1000.4 amplifier, showing various adjustment knobs and switches.
1. Initial Power-Up
- Ensure all connections are secure.
- Turn on your vehicle's ignition and head unit. The amplifier's power indicator light should illuminate. If the protect light illuminates, refer to the troubleshooting section.
2. Gain (Level) Adjustment
- Set the amplifier's gain (level) controls to minimum.
- Play a familiar music track with the head unit volume set to about 75% of maximum.
- Slowly increase the amplifier's gain control until you hear distortion, then back it off slightly. This sets the maximum clean output level.
3. Crossover Settings
- High-Pass Filter (HPF): Use for full-range speakers (mids/highs) to block low frequencies that can cause distortion. Adjust the frequency knob to the desired cutoff point (e.g., 80Hz-120Hz).
- Low-Pass Filter (LPF): Use for subwoofers to block high frequencies. Adjust the frequency knob to the desired cutoff point (e.g., 80Hz-120Hz).
- Full Range: For full-range signal output without filtering.
4. Bass Boost and Phase Control
- Bass Boost: Adjust the bass boost knob to enhance low frequencies. Use sparingly to avoid distortion and speaker damage.
- Phase Control: Adjust the phase (0° or 180°) to ensure the subwoofer's output is in phase with the main speakers, preventing cancellation and improving bass impact.
- Remote Bass Knob: Use the wired remote bass knob for convenient, real-time adjustment of bass levels from the driver's seat.
Maintenance
Regular maintenance helps ensure the longevity and performance of your amplifier.
- Cleaning: Periodically wipe the amplifier's exterior with a soft, dry cloth. Do not use harsh chemicals or abrasive cleaners.
- Ventilation: Ensure the amplifier's heatsink fins are free from dust and debris to maintain proper cooling.
- Connections: Occasionally check all power, ground, remote, and speaker connections to ensure they are secure and free from corrosion. Loose connections can lead to poor performance or damage.
Troubleshooting
If you experience issues with your amplifier, refer to the following common problems and solutions:
No Power / Amplifier Not Turning On
- Check Fuse: Verify the in-line fuse on the power cable near the battery and any fuses on the amplifier itself. Replace if blown.
- Power Connection: Ensure the positive power cable is securely connected to the battery and the amplifier.
- Ground Connection: Confirm the ground cable has a solid, clean connection to the chassis and the amplifier.
- Remote Turn-On: Check that the remote wire is connected to the head unit's remote output and the amplifier's "REM" terminal, and that the head unit is powered on.
No Sound Output
- RCA Cables: Ensure RCA cables are securely connected at both the head unit and amplifier. Test with a different set of RCA cables if possible.
- Speaker Wires: Check all speaker wire connections for proper polarity and secure contact. Ensure no bare wires are touching each other or the vehicle chassis.
- Gain Settings: Verify that the amplifier's gain controls are not set to minimum.
- Head Unit Output: Confirm the head unit is producing audio output.
Distorted Sound
- Gain Too High: Reduce the amplifier's gain control.
- Crossover Settings: Adjust crossover frequencies to ensure speakers are playing within their optimal range.
- Speaker Impedance: Verify that the speaker impedance matches the amplifier's capabilities.
- Power Supply: Ensure adequate power supply to the amplifier. Low voltage can cause distortion.
Amplifier Overheating / Protect Mode
- Ventilation: Ensure the amplifier has sufficient airflow around its heatsink. Clear any obstructions.
- Impedance: Check speaker impedance. Running the amplifier below its minimum rated impedance can cause overheating.
- Gain Setting: Reduce the gain setting. Excessive gain can cause the amplifier to work harder and overheat.
- Faulty Wiring: Inspect speaker wires for shorts to ground or between positive and negative terminals.
Warranty Information
For specific warranty terms and conditions, please refer to the warranty card included with your product or visit the official ORION website. Keep your proof of purchase for warranty claims.
Customer Support
If you require further assistance or have questions not covered in this manual, please contact ORION customer support through their official website or the contact information provided with your product.


