
BOYA BY-VM190
BOYA BY-VM190 Professional Directional Video Condenser Shotgun Microphone User Manual
Model: BY-VM190
Introduction
The BOYA BY-VM190 is a professional directional video condenser shotgun microphone designed for use with HDSLR cameras, camcorders, and audio recorders. Its compact and lightweight design, combined with an integrated shock mount, makes it suitable for various video recording applications. This manual provides essential instructions for setting up, operating, and maintaining your BY-VM190 microphone.
What's in the Box
Please verify that all items are present before proceeding with setup.
- BY-VM190 Microphone
- Foam Windshield
- Integrated Shock Mount (attached to microphone)
- Carrying Pouch
- User Manual (this document)

Image: The BY-VM190 microphone shown with its included accessories, including a foam windshield, a furry windshield, and a carrying pouch, mounted on a DSLR camera.
Setup
1. Battery Installation
The BY-VM190 microphone requires one 9V battery for operation.
- Locate the battery compartment on the underside of the microphone body.
- Slide open the battery compartment cover.
- Insert one 9V battery, ensuring correct polarity (+/-).
- Close the battery compartment cover securely.

Image: A detailed view of the battery compartment on the BY-VM190 microphone, illustrating the process of inserting a 9V battery.
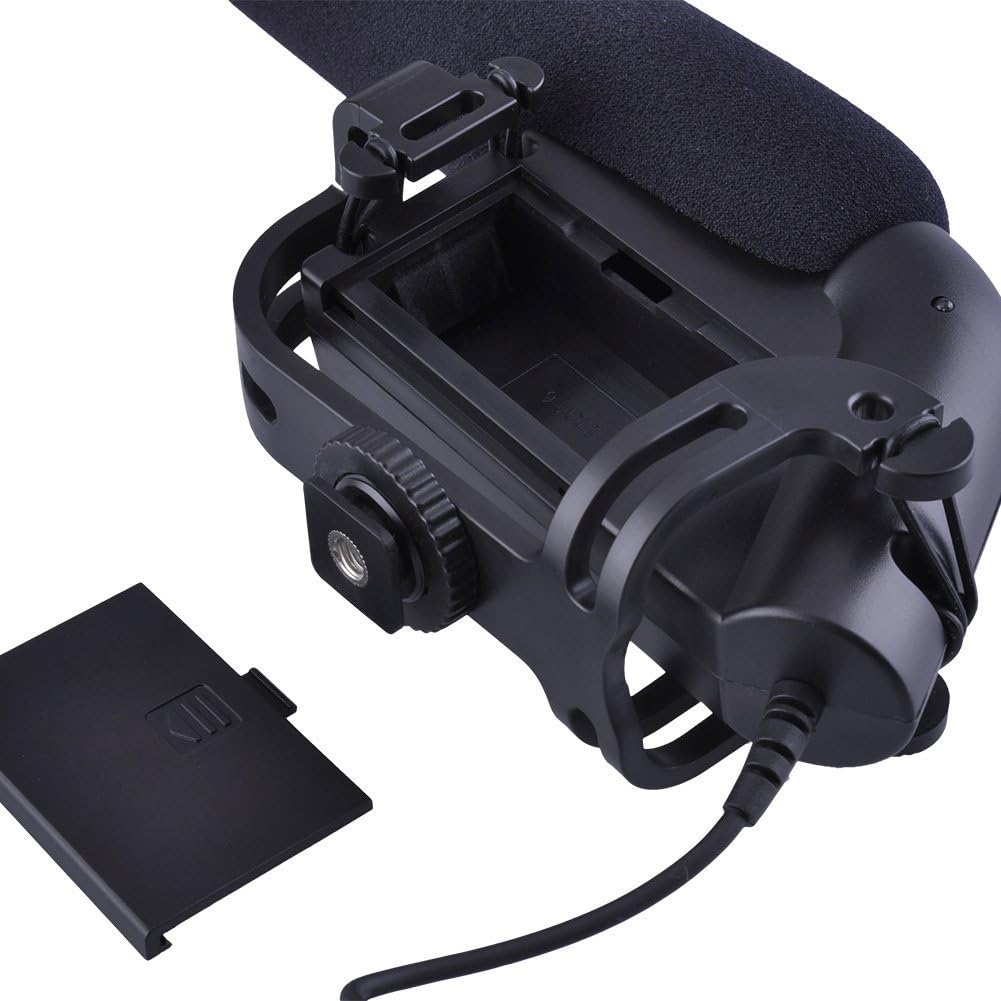
Image: An alternative perspective of the battery compartment, highlighting the 9V battery slot and its orientation.
2. Mounting the Microphone
The BY-VM190 features an integrated shock mount designed to attach to a camera's hot shoe or cold shoe.
- Slide the microphone's shoe mount into your camera's hot shoe or cold shoe.
- Tighten the locking wheel on the shoe mount to secure the microphone in place.
- For optimal audio, ensure the microphone is pointed towards your sound source.

Image: The BY-VM190 microphone securely mounted on a DSLR camera, demonstrating its typical setup for video recording.

Image: A view from beneath the microphone, illustrating the integrated shock mount and the shoe mount mechanism used for attachment to a camera.
3. Connecting to Camera/Camcorder
Connect the microphone to your recording device using the integrated 3.5mm mini-pin plug.
- Plug the 3.5mm connector from the microphone into the external microphone input jack on your camera or camcorder.
- Ensure the connection is secure to prevent audio interruptions.
Operating Instructions
1. Powering On/Off
The microphone features a power switch to conserve battery life when not in use.
- Locate the ON/OFF switch on the side of the microphone body.
- Slide the switch to the "ON" position to power on the microphone.
- Slide the switch to the "OFF" position when the microphone is not in use to save battery.

Image: A detailed view of the control panel on the microphone, showing the ON/OFF switch and the low-cut filter switch.
2. High-Pass Filter (Low-Cut Filter)
The BY-VM190 includes a selectable high-pass filter (also known as a low-cut filter) to reduce unwanted low-frequency noise.
- The filter has two settings: "Flat" and "80Hz".
- Flat: No low-frequency attenuation. Use for capturing the full frequency range.
- 80Hz: Activates the high-pass filter, cutting off frequencies below 80Hz. This is useful for reducing ambient noise such as air conditioners, traffic, or wind rumble.
- Adjust the switch according to your recording environment and desired audio quality.
3. Using the Windshield
The included foam windshield helps to reduce wind noise during outdoor recordings.
- Slide the foam windshield over the microphone capsule when recording in windy conditions.
- For more extreme wind, a furry windshield (often called a "dead cat") can be used for enhanced wind noise reduction.

Image: The BY-VM190 microphone with a furry windshield attached, demonstrating its use for reducing wind noise in outdoor recording environments.
Maintenance
- Cleaning: Use a soft, dry cloth to clean the microphone body. Avoid using harsh chemicals or solvents.
- Storage: When not in use, store the microphone in its carrying pouch in a dry, dust-free environment. Remove the 9V battery if storing for extended periods to prevent leakage.
- Handling: Handle the microphone with care. Avoid dropping it or exposing it to extreme temperatures or moisture.
Troubleshooting
| Problem | Possible Cause | Solution |
|---|---|---|
| No audio output |
|
|
| Poor audio quality / Excessive background noise |
|
|
| Intermittent audio |
|
|
Specifications
| Feature | Detail |
|---|---|
| Microphone Type | Condenser Microphone (Unidirectional) |
| Polar Pattern | Super-Cardioid |
| Frequency Response | 40-20000Hz |
| High-Pass Filter | Selectable (Flat/80Hz) |
| Sensitivity | -40dB (0dB = 1V/Pa at 1 KHz) |
| Signal-to-Noise Ratio (S/N) | 75dB or More (1KHz at 1Pa) |
| Output Impedance | 200Ω or Less |
| Power Source | 9V Lithium or Alkaline Battery (not included) |
| Connector | 3.5mm Mini-pin Plug |
| Dimensions (L x W x H) | 9.84 x 5.51 x 3.15 inches (Product Dimensions) |
| Item Weight | 9.9 ounces |
| Compatible Devices | Camcorder, Camera (DSLR) |
| Material | Foam (windshield) |
Warranty and Support
For warranty information and technical support, please refer to the documentation provided with your purchase or visit the official BOYA website. Keep your proof of purchase for warranty claims.
Manufacturer: Boya
Model: BY-VM190
Ask a question about this manual
Ask about setup, troubleshooting, compatibility, parts, safety, or missing instructions. Manuals+ will review the question and use this page’s manual context to help answer it.