
Redi-Remote RT483521837307
Redi-Remote Replacement Remote Control User Manual
For Philips Models: CCC190AT01, CCC190AT31, CCC090AT01, CCC190AT32
1. Introduction
This manual provides instructions for the Redi-Remote replacement remote control, designed to operate specific Philips television units. This remote is a custom-built replacement and is not an original Philips product. It is pre-programmed and requires no additional setup for compatible models.
Compatible Philips Models:
- CCC190AT01
- CCC190AT31
- CCC090AT01
- CCC190AT32
- CCC092AT
- N0344UD
- CCC130AT01
- CCC092AT01
- CCC090AT
- CC190AT31
- Original Remote Control Number: 483521837307
This remote control is designed to perform all functions of the original remote for the specified units. It cannot be programmed to control auxiliary devices.
2. Setup: Battery Installation
The remote control requires 4 AAA batteries (included). Follow these steps to install them:
- Locate the battery compartment cover on the back of the remote control.
- Slide the cover downwards to open the compartment.
- Insert 4 AAA batteries, ensuring the positive (+) and negative (-) terminals align correctly with the markings inside the compartment.
- Slide the battery compartment cover back into place until it clicks securely.
The remote is now ready for use. No programming is required.
3. Operating Instructions
This section details the functions of the buttons on your Redi-Remote replacement control. Refer to the image below for button layout.
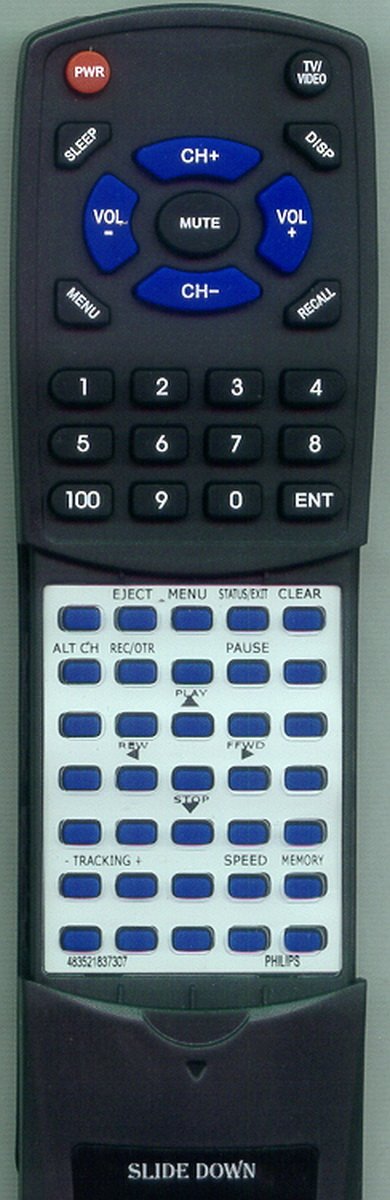
Image 1: Front view of the Redi-Remote replacement remote control. The remote is dark gray with black and blue buttons. The upper section includes power, volume, channel, and numeric keys. A lower section, initially covered, slides down to reveal additional media control and function buttons.
Upper Section Buttons:
- PWR (Power): Turns the television on or off.
- SLEEP: Activates the sleep timer function.
- TV/VIDEO: Switches between TV and video input sources.
- DISP (Display): Shows on-screen display information.
- VOL + / VOL - (Volume): Increases or decreases the volume level.
- MUTE: Mutes or unmutes the television audio.
- CH+ / CH- (Channel): Changes the television channel up or down.
- MENU: Accesses the television's main menu.
- RECALL: Returns to the previously viewed channel.
- Numeric Keypad (0-9, 100, ENT): Directly enters channel numbers. "100" may be used for channels 100 and above, "ENT" confirms channel entry.
Lower Section Buttons (Slide Down to Reveal):
A cover on the lower half of the remote slides down to reveal additional function buttons. The text "SLIDE DOWN" indicates this feature.
- EJECT: Ejects media (if applicable to the connected device).
- MENU: Accesses a secondary menu or specific device menu.
- STATUS/EXIT: Displays status information or exits current menu/function.
- CLEAR: Clears current selection or input.
- ALT CH (Alternate Channel): Switches to an alternate channel or function.
- REC/OTR (Record/One Touch Record): Initiates recording.
- PAUSE: Pauses playback.
- REW (Rewind): Rewinds media playback.
- PLAY: Starts or resumes media playback.
- FFWD (Fast Forward): Fast forwards media playback.
- STOP: Stops media playback.
- - TRACKING +: Adjusts tracking for VCRs or similar devices.
- SPEED: Adjusts playback speed.
- MEMORY: Accesses memory functions.
4. Maintenance
To ensure the longevity and proper functioning of your remote control, follow these maintenance guidelines:
- Cleaning: Wipe the remote with a soft, dry cloth. Do not use liquid cleaners or abrasive materials.
- Battery Replacement: Replace batteries when the remote's response becomes sluggish or stops working. Always replace all batteries at the same time with new ones of the same type.
- Storage: Store the remote in a dry place, away from direct sunlight and extreme temperatures.
- Avoid Drops: Protect the remote from physical impact, as drops can damage internal components.
5. Troubleshooting
If you experience issues with your remote control, try the following solutions:
- Remote Not Responding:
- Check if the batteries are inserted correctly with the correct polarity (+/-).
- Replace old batteries with new ones.
- Ensure there are no obstructions between the remote control and the television's infrared sensor.
- Point the remote directly at the television.
- Specific Buttons Not Working:
- Clean the remote's surface, especially around the unresponsive buttons, to remove any dirt or debris.
- Ensure the remote is compatible with your specific Philips model (refer to the Introduction section).
- Remote Controls Other Devices:
- This remote is designed for specific Philips units and cannot be programmed for auxiliary devices. If it is affecting other devices, ensure it is only being used with the intended Philips unit.
If problems persist after trying these steps, please contact the seller for further assistance.
6. Specifications
| Brand | Redi-Remote |
| Model Number | RT483521837307 |
| Compatible Devices | Television (Specific Philips models listed in Introduction) |
| Connectivity Technology | Infrared |
| Power Source | 4 AAA Batteries (included) |
| Product Dimensions | 7 x 2.5 x 1 inches |
| Item Weight | 4.5 ounces |
| Special Feature | No Programming Needed |
| Max Number of Supported Devices | 1 |
7. Support and Warranty
This Redi-Remote replacement control is designed for immediate use with compatible Philips models without programming. For any concerns or issues with the remote after purchase, please contact the seller directly for assistance.
As a custom-built replacement, specific warranty details may vary. Please refer to your purchase documentation or contact the seller for information regarding warranty coverage and support.
Ask a question about this manual
Ask about setup, troubleshooting, compatibility, parts, safety, or missing instructions. Manuals+ will review the question and use this page’s manual context to help answer it.