
1. Product Overview
The High Tech Pet Power Pet Automatic Sliding Glass Patio Pet Door provides automated access for your pets. It features a heavy-duty aluminum frame, dual-pane Low-E glass for energy efficiency, and advanced ultrasonic sensor technology for secure, pet-only entry and exit. This door is designed for easy installation into existing sliding glass patio door frames.
- Collar Activated: Operates with genuine High Tech Pet MS-5 ultrasonic collars for secure, pet-only access.
- Adjustable Access: Separate activation distances for entry and exit using precision ultrasonic sensors.
- 4-Way Control: Offers In Only, Out Only, In & Out, or Locked modes for flexible pet management.
- Directional Sensing: Prevents unintended opening by activating only when the pet approaches directly.
- Security Features: Automatic steel deadbolt lock and anti-pinch safety mechanism.
- Durable Construction: Heavy-duty aluminum frame with dual-pane Low-E glass for insulation.
- Power Options: Can be powered by the included AC adapter or an optional rechargeable battery.
2. Package Contents
Before beginning installation, ensure all components are present and undamaged. Refer to the diagram below for a visual representation of the included parts.

Image: Main product view of the Power Pet Automatic Sliding Glass Patio Pet Door.
- Bottom Panel Assembly (with pet door unit)
- Top Panel Assembly
- MS-5 Ultrasonic Collar (or MA-5 Collar Kit)
- AC Adapter
- 5/8" Weatherstripping
- 2" Draft Stopper Seal
- Section Connectors (2)
- Door Lock Housing
- Lock Hasp
- Lock Handle with Plastic Washer
- Rectangular Hole Plug
- Round Hole Plugs (2)
- House Lock Tabs (2)
- Vacation Lock
- 1/16" Allen Wrench
- 1/8" Allen Wrench
- Various Screws (Flat Head Machine, Round Head Thread Cutting, Round Head Sheet Metal, Flat Head Sheet Metal)
3. Tools Required
The following tools are recommended for installation:
- Scissors
- Tape Measure
- Pencil
- No. 1 Phillips Screwdriver
- Power Drill
- 1/4" Drill Bit
- #32 Drill Bit
- 3/32" Drill Bit
- Safety Glasses

Image: A collection of tools necessary for the installation of the pet door.
4. Installation Instructions
Follow these steps carefully to install your Power Pet Automatic Sliding Glass Patio Pet Door.
4.1. Prepare the Door Panels
- Measure Track Height: Measure the height of your patio door frame from the inside bottom track to the inside top track.
- Adjust Riser Extension (if needed): If your sliding glass door frame measures less than 77 inches, remove the riser extension on the bottom panel assembly.
- Connect Panels: Insert the section connectors into the bottom frame assembly panel. Then, insert the top frame assembly onto the bottom frame assembly. Secure them by screwing the top and bottom panels together using the provided 1/4-20 x 1/2" Flat Head Machine Screws to form a single door panel.
Video: Detailed installation instructions for the High Tech Pet Patio Pet Door. This video covers panel assembly, placement, and locking mechanisms.

Image: A person demonstrating the installation of the pet door into a patio door frame.
4.2. Install the Pet Door into the Patio Frame
- Loosen Top Slider: Loosen the top slider locking set screws on each side of the upper panel using the 1/8" Allen wrench.
- Position Panel: Position the assembled pet door panel into your sliding glass door frame. Ensure the semicircular grooves on the bottom panel are placed over the sliding rail at the base of your sliding glass door track.
- Engage Top Slider: Pull down on the top slider assembly, releasing it into the upper slider track.
- Tighten Top Slider: Tighten the top slider set screws to lock the top slider into place.
4.3. Install House Lock Tabs
- Mark Height: Measure from the sliding rail at the base of your door track and mark the appropriate height on the inside of your door track. Refer to the provided table for specific measurements based on your track height.
Track Height Armor Flex All Sizes & Power Pet Medium Power Pet Large 75"-77" (Short) 44" 50" 77"-81 1/4" (Regular) 46" 52" 92 7/8"-96" (Tall) 54 1/4" 54 1/4" - Attach House Lock Tab: Remove the tape liner from a house lock tab. Position the top of the non-drilled end on your mark. Drill the lock house tab mounting holes using a 1/16" drill bit. Screw the lock house tab to your door track using the provided 2-1/2" Round Head screws.
- Engage Lock Tabs: Lift up and push the pet door panel against the sliding glass door track, allowing the house lock tabs to engage each other.

Image: A close-up view of the universal lock, showing its components and how it fits into the door frame.
4.4. Install Universal Lock (Optional)
If you choose not to use the universal lock assembly, install the rectangular hole plug in the locked cavity on the open side of the assembled door panel.
- Insert Door Lock Housing: Insert the door lock housing on the open side of the assembled pet door panel, ensuring the lock arm is in the up position. Secure it with the provided 3/8" Flat Head screws.
- Install Lock Handle: Insert the lock handle with the plastic washer. Make sure the handle is vertical when the lock is open. Tighten the lock arm set screw using the 1/16" Allen wrench.
- Install Lock Hasp: Note that the orientation of the lock hasp is as shown in the video. Insert the lock hasp into the door lock housing. Turn the lock knob counter-clockwise to trap the hasp. Remove the tape backing.
- Secure Lock Hasp: Slide your patio door closed. Turn the lock handle clockwise, releasing the lock hasp. Open your sliding glass door. The lock hasp should now be affixed to your sliding glass door. Drill two holes within the slots of the lock hasp using a 3/32" drill bit. Screw the lock hasp to the sliding glass door using the provided 2-1/2" Round Head screws.
4.5. Apply Weatherstripping and Draft Stopper Seal
- Weatherstripping: Apply the 5/8" weatherstripping. Start at the bottom, applying it to the inside edge of the open side of the assembled door panel. If using the universal lock assembly, cut the weatherstripping at the bottom of the lock and restart above the lock. Continue to the top of the top frame assembly and cut.
- Draft Stopper Seal: Apply the 2" draft stopper seal. Start at the top of your sliding glass door and apply the seal, removing the adhesive backing as you move down. When you reach the bottom, cut the remaining seal material with scissors.

Image: Diagram illustrating the energy-efficient features of the door, including dual-pane glass and aluminum frame.
5. Operating Instructions
The Power Pet door operates using an ultrasonic collar worn by your pet. The door will only open for pets wearing a compatible MS-5 ultrasonic collar.
- Collar Activation: Ensure your pet is wearing a genuine High Tech Pet MS-5 ultrasonic collar. The door's performance is warranted only with authentic MS-5 transmitters.
- Adjusting Activation Distance: Use the precision ultrasonic sensors to set separate activation distances for entry and exit. This allows you to control how close your pet needs to be to trigger the door.
- 4-Way Access Control: Select from four modes:
- In Only: Pet can enter but not exit.
- Out Only: Pet can exit but not enter.
- In & Out: Pet has full access.
- Locked: Door remains closed and secured.
- Directional Sensing: The door is designed to open only when your pet approaches directly, preventing accidental openings from pets wandering nearby.
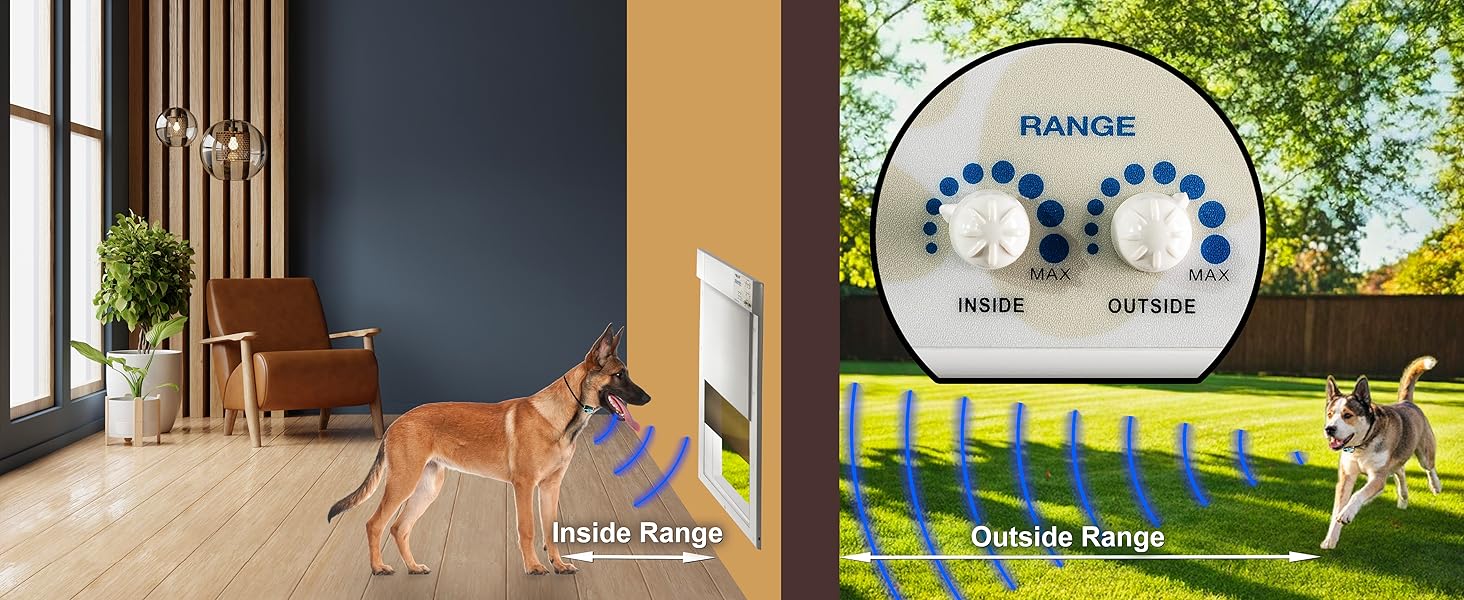
Image: A visual representation of the dual range control feature, allowing adjustment of activation distances for pets.
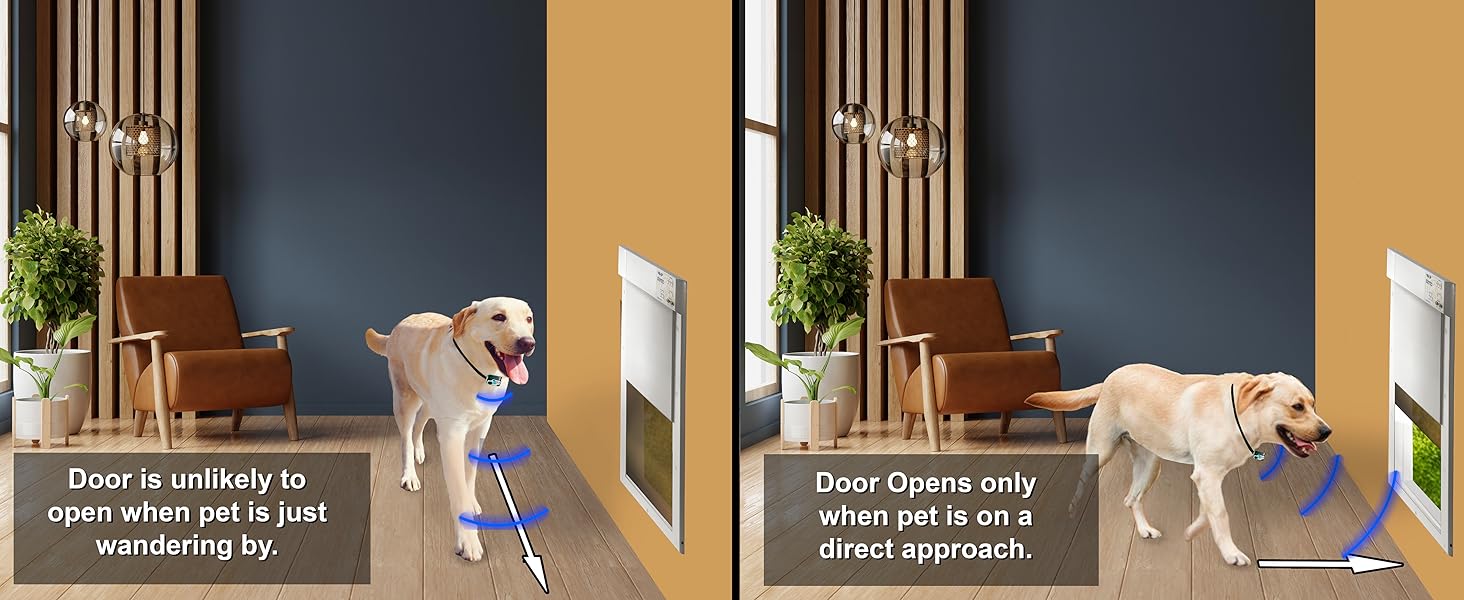
Image: Illustration of the directional sensing technology, ensuring the door opens only when a pet approaches directly.
6. Maintenance
Regular maintenance ensures the longevity and optimal performance of your pet door.
- Cleaning: Periodically clean the pet door flap and frame with a mild soap and water solution. Avoid abrasive cleaners that could damage the finish or the electronic components.
- Track Inspection: Inspect the sliding tracks for any debris or obstructions that could hinder smooth operation. Clean as necessary.
- Collar Battery: Monitor the battery life of your MS-5 ultrasonic collar. Replace or recharge as needed to ensure continuous operation.
- Weatherstripping/Seals: Check the weatherstripping and draft stopper seals periodically for wear and tear. Replace if damaged to maintain energy efficiency.
7. Troubleshooting
If you encounter issues with your Power Pet door, refer to the following common troubleshooting tips:
- Door Not Opening:
- Ensure the pet's collar is on and the battery is charged.
- Check if the door is in the correct operating mode (e.g., "In & Out" or "In Only" if pet is trying to enter).
- Verify the activation distance settings are appropriate for your pet's approach.
- Confirm the AC adapter is properly connected and receiving power, or that the optional battery is charged.
- Door Opening Randomly:
- Adjust the directional sensing sensitivity.
- Ensure no other ultrasonic devices are interfering with the door's sensors.
- Door Not Closing Fully:
- Inspect the tracks for any debris or obstructions.
- Check the door flap for any damage or debris preventing full closure.
For further assistance, please contact High Tech Pet customer service.
8. Specifications
| Feature | Detail |
|---|---|
| Model Number | PX1-STE |
| Brand | High Tech Pet |
| Size | Medium (up to 30 lbs.) |
| Product Dimensions | 14.75 x 4 x 93.75 inches |
| Item Weight | 48 Pounds |
| Weight Limit | 30 Pounds |
| Color | Cream |
| Material | Aluminum |
| Frame Material | Aluminum |
| Pet Type | Cat, Dog |
| Smart Home Compatibility | Not Smart Home Compatible |
| UPC | 032868811092 |
9. Warranty and Support
Every Power Pet Door is backed by a lifetime manufacturer's warranty. For any questions, technical support, or warranty claims, please contact High Tech Pet's U.S.-based customer service team.
Contact Information: Refer to the product packaging or the official High Tech Pet website for the most current customer service contact details.


