
CareSens Meter only
CareSens N Blood Glucose Monitoring Meter User Manual
Model: Meter only | Brand: CareSens
Introduction
This manual provides comprehensive instructions for the safe and effective use of your CareSens N Blood Glucose Monitoring Meter. Please read this manual thoroughly before using the device and keep it for future reference. The CareSens N meter is designed for self-testing of blood glucose in fresh capillary whole blood samples obtained from the fingertip, palm, forearm, calf, or thigh.

Figure 1: CareSens N Blood Glucose Monitoring Meter and its retail packaging.
Key Features
- No Coding Required: Simplifies the testing process, minimizing potential errors.
- Fast and Accurate Results: Provides blood glucose readings in just 5 seconds with a small 0.5 micro-liter sample.
- Easy to Use: Features a user-friendly design with a large display and intuitive 3-button navigation.
- Post-Meal Flagging: Allows users to mark readings taken after meals for better glucose management.
- Alarm Function: Includes a post-meal alarm to remind users to test their blood glucose.
- Multiple Test Sites: Options for testing from fingertip, palm, forearm, calf, or thigh.

Figure 2: Design features of the CareSens N meter, emphasizing its ergonomic shape, accessible buttons, and alarm indicator.
Setup Instructions
Before using your CareSens N meter for the first time, or after replacing the batteries, you will need to set up the device. This involves installing batteries and configuring the date and time.
1. Battery Installation
The CareSens N meter uses two CR 2032 Lithium Metal batteries. To install or replace batteries:
- Locate the battery compartment on the back of the meter.
- Open the battery cover.
- Insert the two CR 2032 batteries, ensuring correct polarity (+/-).
- Close the battery cover securely.
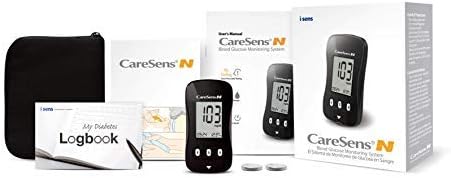
Figure 3: The complete CareSens N kit, showing the meter, user guide, logbook, carrying case, and batteries.
2. Setting Date and Time
Accurate date and time settings are essential for tracking your blood glucose readings. Follow these steps to configure your meter:
- With the meter off, press and hold the 'S' button for 3 seconds until "SET" appears on the screen.
- Press the 'S' button once to enter the set mode. The year will begin blinking.
- Use the up (↑) and down (↓) buttons to adjust the year. Press 'S' to confirm and move to the month.
- Adjust the month using the up (↑) and down (↓) buttons. Press 'S' to confirm and move to the day.
- Adjust the day using the up (↑) and down (↓) buttons. Press 'S' to confirm and move to the time format (12-hour or 24-hour).
- Select your preferred time format (AM/PM for 12-hour or 24H for 24-hour) using the up (↑) and down (↓) buttons. Press 'S' to confirm and move to the hour.
- Adjust the hour using the up (↑) and down (↓) buttons. Press 'S' to confirm and move to the minutes.
- Adjust the minutes using the up (↑) and down (↓) buttons. Press 'S' to confirm.
- To exit the set mode, press and hold the 'S' button for 3 seconds.
Video 1: Detailed instructions on how to set up the CareSens N Blood Glucose Monitor, including battery installation and date/time settings.
Operating Instructions
The CareSens N meter is designed for simple, one-step operation once set up. Follow these steps for accurate blood glucose testing:
- Prepare for Testing: Wash your hands thoroughly with soap and warm water. Dry them completely. Gather your CareSens N meter, a CareSens N test strip, and a lancing device with a new lancet.
- Insert Test Strip: Insert a new CareSens N test strip into the test strip port of the meter. The meter will automatically turn on and display a blinking blood drop symbol, indicating it is ready for a blood sample.
- Obtain Blood Sample: Use the lancing device to prick your fingertip (or an alternative site as approved by your healthcare professional) to obtain a blood drop.
- Apply Blood Sample: Touch the tip of the test strip to the blood drop. The blood will be drawn into the strip automatically. Ensure the confirmation window on the test strip is completely filled.
- Read Results: The meter will count down from 5 seconds and then display your blood glucose result.
- Record and Dispose: Record your result in your logbook if desired. Safely dispose of the used test strip and lancet in a sharps container.

Figure 4: Visual guide to the one-step blood glucose testing process with CareSens N.


Figure 5: Sequence of images demonstrating the blood glucose testing process.
Maintenance
Proper maintenance ensures the longevity and accuracy of your CareSens N meter:
- Cleaning: Wipe the meter exterior with a soft, damp cloth. Do not immerse the meter in water or use harsh cleaning agents.
- Storage: Store the meter and test strips in a cool, dry place within the specified temperature range (as indicated in the full user manual). Keep them away from direct sunlight and extreme temperatures.
- Battery Replacement: Replace batteries when the low battery indicator appears on the display.
- Control Solution Testing: Periodically perform a control solution test to verify the accuracy of your meter and test strips. Refer to the control solution instructions for details.

Figure 6: Control solution used for self-checking meter accuracy.
Troubleshooting
This section addresses common issues and frequently asked questions regarding your CareSens N meter.
What do Error 1 and Error 4 mean?
| Error Code | Meaning and Solution |
|---|---|
| Error 1 | Occurs when a used strip is inserted. Always apply your blood sample to the strip AFTER inserting the strip into the meter. |
| Error 4 | Occurs when the blood sample has insufficient volume or is not applied correctly. Ensure the blood sample is applied at the TIP of the strip. |
For all other error messages, please contact customer service.

Figure 7: Common error codes and their resolutions.
Why are my readings different when comparing it to a different brand?
CareSens N is FDA-approved and ISO15197 certified. Results between different brand meters may vary due to algorithm differences. Please DO NOT compare among brands. To ensure the accuracy and precision of the meter, please consult with your healthcare provider. If you believe our product is not performing well due to unknown reasons, contact us immediately.

Figure 8: Explanation for variations in readings between different meter brands.
Why are my back-to-back readings different?
Despite finger-pricking tests being the best way to monitor blood glucose levels, some differences in readings may arise when doing back-to-back testing. This is due to blood samples having differing amounts of cells and interstitial fluid. Other reasons include having residue on skin or not completely drying your hands after washing. This could create a significant inaccuracy in test results. To ensure that you're testing accurately, make sure to always wash your hands before testing.
If strips and meter are not stored properly at the temperature specified in the manual, inaccurate readings may occur. If you believe that your meter is not giving accurate results after all proper steps were followed, please contact us immediately.
* FDA states that 95% of all Blood Glucose results must be within ±15%, meaning that meters may produce a slight margin of error.

Figure 9: Factors influencing variations in consecutive blood glucose readings.
What should I do if the void sticker is tampered?
We send ALL of our products in NEW condition. We have also implemented VOID stickers to make it easy for customers to identify if the product has been opened upon receiving the product. If the VOID sticker is tampered with, disregard the product immediately and contact our customer service, and we'll promptly send you a new product.

Figure 10: Instructions regarding tampered void stickers.
Can I switch to a different CareSens N Meter but keep the strips?
Yes. All of the CareSens N meters use the same strips. You can change to a different CareSens N Meter anytime!

Figure 11: Information on test strip compatibility.
Specifications
| Specification | Detail |
|---|---|
| Product Dimensions | 5"L x 2"W x 6.5"H |
| Item Weight | 7 Ounces |
| Model Name | Meter only |
| Batteries | 2 Lithium Metal batteries required (included) |
| Battery Cell Composition | Lithium Metal |
| Manufacturer | CareSens N |
| Date First Available | April 26, 2013 |
Warranty and Support
For any concerns, questions, or support needs, the CareSens Customer Service Team is available to provide fast and reliable information.
- Customer Service Hours: 9 AM ~ 6 PM EST
- Contact: Refer to the contact information provided in your product packaging or visit the official CareSens website for the most current support details.
Related documentsMeter only


Ask a question about this manual
Ask about setup, troubleshooting, compatibility, parts, safety, or missing instructions. Manuals+ will review the question and use this page’s manual context to help answer it.